1.18 FAQ-130 How do I define custom colors?Define-Custom-Colors
Last Update: 10/6/2021
You can define a custom color anywhere you set color properties, whether you are setting colors of a line + symbol plot using buttons on the Style toolbar; or setting the fill color or a worksheet cell in the Format Cells dialog box. Custom colors are saved with your Origin project and, thus, are available to anyone with whom you share your Origin project.
Origin has a couple of graphical user-interface (GUI) tools for defining custom colors. Which you choose will likely depend on your version of Origin; and whether you just need a quick color or two to apply to an object, or whether you want to create a color list or palette to be saved and applied to any number of data plots.
Be sure to see the Origin Help file for information on Customizing Data Plot Colors
Defining a Color "on-the-fly" for Immediate Use (All Versions)
For example, if you want to define a custom font color for a text object, you could click on the Format toolbar Font Color button menu (the downward pointing arrow on the Font Color button  ) to expose the Color Chooser; then, click on a blank color-well where you see the "+" sign, and open the Colors dialog. ) to expose the Color Chooser; then, click on a blank color-well where you see the "+" sign, and open the Colors dialog.
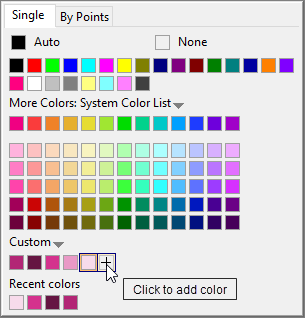
Note that the pre-2016 interface differs slightly but the process is essentially the same.
Defining custom colors for a data plot (2016 and later)
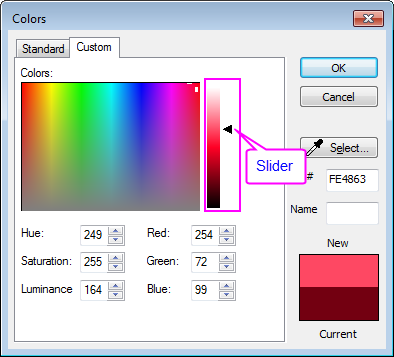
After opening the Color Chooser, click on the Single tab. Under Custom, click a blank color well to open the Colors dialog, then click on the Custom tab. Here, you can define colors in one of three ways:
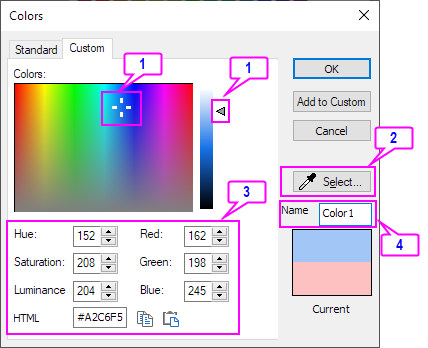
- Define a color by one of the following:
- Manipulate the cross-hair and slider to pick a color.
- Click the eyedropper tool, then click on the desired color in another portion of your workspace.
- Enter the value of RGB, HSL or HEX of color in edit boxes.
- Provide a Name for the custom color (optional).
- If only defining a single color, click OK. To add multiple colors to the Custom color wells, click Add to Custom as you define each color, clicking OK when you have finished adding custom colors.
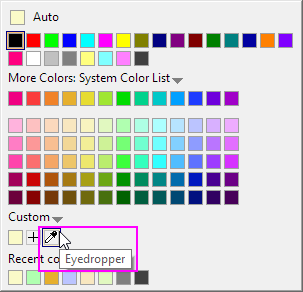
From Origin 2022, the Eyedropper tool is available directly from the Custom list. Click on the Eyedropper and select the desired color in another portion of your workspace to add a new color.
Customizing an existing list color (2016 and later)
The slider can help you to get a similar color but with a different tint or intensity from built-in color lists/palettes. For example, if you want to fine-tune the last color of list D02 Maple, you can:
- Click to select D02 Maple in the drop-down list of More colors.
- Click to select the last color.
- Open the Color Chooser once again, and click a blank color well in the Custom group to open Color dialog with the previously-selected color
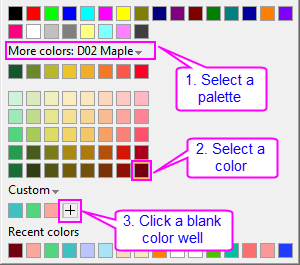
- Use the slider to get the new color.
| Note: These custom colors then become available throughout Origin. They are saved locally, but also get saved with the project or window. Thus, when someone else views the project on a different computer, they too will see the color you assigned.
|
Define and Save a Color List or Palette (Origin 2021 or later)
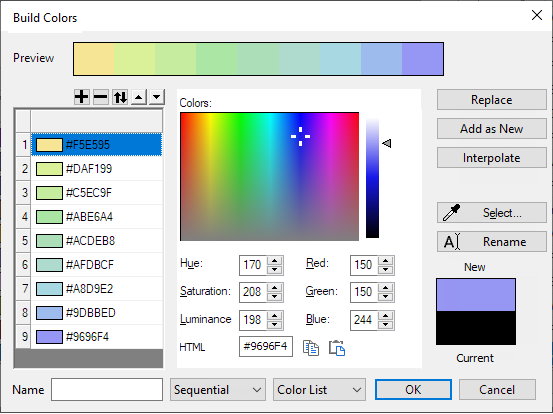
Beginning with Origin 2021, you can use the Color Manager to define custom color lists or palettes. Once defined and saved, you can access your color list or palette throughout the GUI.
- Click Tools: Color Manager.
- Click the New button at the top of the dialog box. This opens the Build Colors dialog.
- Define a series of colors, give them a Name, define them as Sequential, Diverging or Qualitative, choose Palette or Color List and click OK to save and close the dialog.
Your custom Color List or Palette is now available for applying single colors or lists to all elements of the GUI.
For instructions on use of Build Colors controls, see Add a New Color List or Palette.
Keywords:Custom color, RGB, HSL, HEX, HTML color, Build Colors, color list, palette, increment,
Minimum Origin Version Required: Origin 2016
|