6.18 FAQ-20 What should I do if my Origin crashes or freezes?troubleshooting-Origin-crash
Last Update: 11/5/2025
If your Origin crashes, freezes, dialogs will not open, or is in some way not responding, here are some general troubleshooting solutions you should try. These solutions are supposed to be used in the order in which they are presented. If you try one of these solutions and it does not help, go to the next section.
 | If you have experienced a crash or freeze -- something that prevented you from saving your project -- you may be able to recover the bulk of your work if Origin's Autosave feature is turned on. See this FAQ for details.
|
Step 1: Send Crash Report via Error Report Dialog
If you have Origin version 9.1 or higher, you could send crash report directly after you experience crash. OriginLab will investigate on the details and follow up with you if you left an email address. To send crash report to tech support, click the Send Report button when you encounter this dialog:
-
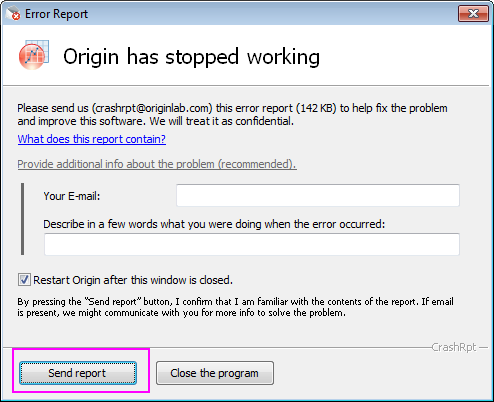
| Notes: Note that if you cannot directly send the crash report, you can click the What does this report contain link and export the crash report details as a zipped file and send the zipped file and any additional information to us later via email
|
If you did not see the Crash Report dialog, go to Step 2.
Step 2: Send Debug Information
If your Origin freezes, hangs or crashes without the Error Report dialog. You can send us the debug information with steps as below
Minidump
Minidump mechanism is a recommended method which can help us to investigate what went wrong in your Origin.
Create a Minidump file and send to us with steps below.
- Download ProcessExplorer (an advanced Task Manager tool from Microsoft) from
- http://technet.microsoft.com/en-us/sysinternals/bb896653.aspx
- Start Origin, perform the steps that illustrate the problem.
- Unzip the tool downloaded in step 1, run procexp.exe
- In the open dialog, right click on the Origin EXE file and select context menu Create Dump > Create Minidump.
- It will save a *.dmp file, zip it and send to us
Debug Log
If we have confirmed that minidump file does not help. You can send us the debug log file with steps below.
- Start Origin.
- Select Window:Script Window to open the Script window.
- Type the following in the Script window and then press ENTER:
@log=1
- The Origin_Log.txt file and it's location will be returned in the Script window. Make note of this.
- Close Origin and then restart Origin to start the debug log file generation.
- Perform the steps that illustrate the problem.
- Send us the debug log file.
- Once the logging has been turned on by @log, it can turn itself off automatically after you use Origin more than 5 times.
|
Additional Notes:
- In Origin 2019 and earlier versions,
- To turn on logging, run the script
debug_log 2 and the location of log file will be returned in the Script window.
- To turn off the generation of the debug log file, run the script
debug_log 0
- The debug_log 2 command turns on logging and keeps 2MB worth of data between sessions.
- To turn on logging and re-write the log file at every Origin startup, use debug_log 1 instead.
- To view the current status of logging, and to find the debug log file name and save location, use debug_log.
|
If you have not experienced a hard crash, but still cannot run Origin normally, go to Step 3.
Step 3: Modify DLLs
If Origin crashes after launching, it may be caused by missing or mismatched MS DLLs. Please try steps as below.
- In the search box on the taskbar of Windows, type Control Panel and select it from the results.
- Select Programs > Programs and Features.
- According to the Origin version you are running, find the required MS redistributables in the table below, usually they are named as Microsoft Visual C++ xxxx Redistributable xxxxxxxx.
- If a required DLL is found, right click on it and choose Uninstall from context menu. If prompted, restart PC
Note: you may install a required DLL before but different versions, e.g. you have installed VS 2015-2019, 14.0, but what Origin requires is VS 2015-2019, 14.2, that would also cause the "DLL missing" problem even though you have "already installed" it. So we always suggest uninstalling the found DLL and reinstall it again (see next step).
- Download all the DLL installers required by your Origin version and reinstall them.
- Once done, restart your PC for the changes to take effect.
- Now try Origin again (Run Origin as administrator if needed)
If this does not work, go to Step 4.
Step 4: Change the Default Printer
There are some reports of HP printer driver conflicts, often manifesting as the following:
If you experience this, change your printer driver to another local default printer and restart Origin.
If this does not work, go to Step 5.
Step 5: Check Software Conflict
Check if there is a software conflict between Origin and other application (such as GamePP).
- If yes, please close the third-party software and then try Origin.
- If you are not sure whether there is a software conflict, please try following:
- Restart Computer. Do no run other softwares.
- Run Origin. See whether there is a crash.
- If the crash still happens, expand the taskbar (docked at the bottom-right corner) and check if there is any third-party software running in the background. If yes, close it and see if this fixes the crash.
If this does not work, go to Step 6.
Step 6: Install the Latest Version
Make sure you have installed the most up-to-date patch (service release) available for your Origin version, or latest version available. You may use Help: Get Help Files/Check for Updates to check for a patch/version, or go to our website to download the patch/version as an EXE or ZIP file.
If this does not apply or if applying the patch does not resolve the problem, go to Step 7.
Step 7: Delete Temporary Files
- Choose Window: Script Window from Origin menu
- Enter script blow in the Script Window and press Enter to delete OCTemp folder so OriginC will use all new source files
del -occlean
If deleting temporary files does not help, go to Step 8.
Step 8: Change User Files Folder
- Run script below in the Script Window to clear the User Folder path value in registry and then you can reset User Files folder the next time Origin starts.
del -path
- Close Origin.
- Restart Origin. Specify an empty new folder in your local drive as User Files Folder.
If changing UFF does not fix the problem, go to Step 9.
Step 9: Check Whether the Crash is File-Specific
Sometimes the crash is file-specific, for example if the project file is corrupted, it may lead to a crash or freeze.
In order to check whether the crash is caused by specific file(s), you can try to reproduce the crash behavior with a new Origin project file of a relatively small size.
If the crash is file-specific, you can Send the Corrupted File(s) to Support and ask for assistance.
If the crash is not file-specific, continue to Step 10.
Step 10: Run Complete System Check
Origin may behave incorrectly if the computer is infected with a virus. First make sure your anti-virus software is up-to-date and fully functioning, and then run a complete system check to see if this resolves the issue.
If the problem still exists after a complete system check, continue to Step 11.
Step 11: Repair the Origin Installation
Go to your list of installed program files (browse the Start menu or Apps list, depending on Windows OS), and double-click the shortcut OriginPro X.X Add or Remove Files. This launches the Origin Setup files (the shortcut name is version dependent). Select Repair/Upgrade as your goal and follow the setup wizard to repair your installation.
If repairing installation does not help, go to Step 12.
Step 12: Contact Tech Support
If none of the solutions above solve the problem, please contact tech support for help.
Related Topics
Keywords:crash, not responding, installation, crash report, stop working, freeze, repair, printer driver, corrupted, stall
|