6.21 FAQ-23 How do I use my custom files from my previous version in my Upgrade?Transfer-Old-Files
Last Update: 6/28/2017
The Transfer User Files dialog box is designed to help you transfer files when upgrading your Origin software. To open this dialog, click Tools on the main menu, and then click Transfer User Files.
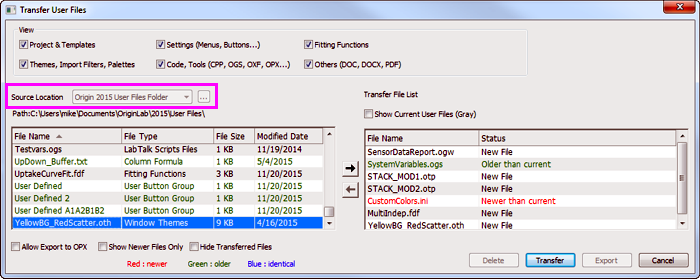
- When upgrading on the same computer, use the Source Location list to point to your previous version's User Files Folder (UFF) and move files as needed.
- If you are adding files from a network location, select Source Location = Specified Folder and use the browse button
 to locate the folder. If you are adding files from subfolders, check the Recursive box. to locate the folder. If you are adding files from subfolders, check the Recursive box.
- If you need to transfer files to another computer with no network connection, copy your User Files Folder to a thumb-drive, insert the drive into the new computer and browse to your user files by selecting Source Location = Specified Folder.
Specific components that you might want to move:
- You can move custom fitting functions with the Transfer User Files dialog; you can add them using the Fitting Function Organizer; or you can drag-and-drop the .FDF file onto your Origin workspace.
- To transfer "@ System Variable" values to a new installation, use the Transfer User Files dialog. In the View group select Code, Tools and look for SystemVariables.OGS in your previous version's User Files Folder.
- To transfer custom colors, use the Transfer User Files dialog. In the View group, select Settings and look for CustomColors.ini in your previous version's User Files Folder.
Keywords:custom files, transfer, fitting, function, template, user files, FDF, OMC, OPX, system variable,
|