5.7 FAQ-344 How to add accelerators in Origin?Add-Accelerators
Last Update: 12/11/2023
Adding an accelerator or hotkey provides quick access to menu-driven operations. Besides build-in shortcuts associated with some menu, you can define your own keyboard shortcut for any Origin menu constructed by X-function.
To check if an Origin menu is constructed by X-Function
Method 1
The simplest way is mouse over the menu you want to add shortcut for, check the text shown at bottom-left status bar. If the text begin with the X-Function name, it is a X-Function constructed menu. Otherwiase it is not.
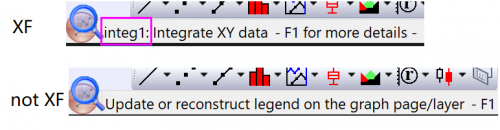
For example, both Integrate (Analysis: Mathematics: Integrate) and Update Legend (right click on legend object > from context list Legend: Update Legend...) menu open X-Function dialog, Integrate is constructed by X-Function but Update Legend is not.
Method 2
Hold down Ctrl key and click the menu.
If the menu is constructed by X-Function, it will open X-Function Builder dialog; otherwise it will open X-Function dialog or others.
To create these, follow the steps below:
- Open the origin.ini file, located in your User Files Folder. You can use Notepad to open the file.
- Find the section called [WorksheetAccelerators], [GraphAccelerators], etc. Some accelerators have already been defined here, for instance the NLFit dialog (Ctrl+Y). Add to these sections to define accelerators for the window type.
For guidance on defining your own accelerators, you can refer to the commented notes under the [WorkSheetAccelerators] section of this .ini.
- The expression begins with the sequence number of the accelerator. The order in the INI is not important, but there can be no gaps, so if you have defined 1,2,3,4 and 5 and you then delete 4, 5 will be ignored.
- Next, you place an equal sign.
- The code to the right of the equal sign includes two primary parts (plus possible options, see next bullet). First is the function name which is most-easily obtained by pressing the Ctrl key while selecting the dialog menu entry (look to the "X-Function" field in the dialog that opens). The second is the keyboard combination which you will use to control the function. You should use a vertical line (pipe character) to divide each part.
- Both Offset and nOption are optional but nOption needs to be present if Offset is specified.
- Offset links a particular dialog Theme to the accelerator and it is a zero-based offset: an Offset of "2" associates the accelerator with the third Theme in the list (<Last used> is generally the first Theme in the list). Preceding the Offset with the "+" character forces the dialog to open as will setting Offset = 14.
- Setting nOption = -1 means the argument value is not in use (i.e. the accelerator is not associated with a particular Theme).
- Resave Origin.ini, then close and restart Origin to see your changes take effect.
Example:
- Browse to \User Files and open Origin.ini, then find the section [WorkSheetAccelerators].
- To open the FFT dialog that is normally opened from the menu, Analysis:Signal Processing:FFT:FFT, add the following:
3=fft1|Ctrl+B
- Re-save the origin.ini file, then close and restart Origin.
- Open the menu Analysis:Signal Processing:FFT:FFT, and you should see your hotkey sequence at the right of the menu entry.
 | Defining accelerators in \User Files\Origin.ini will override standard accelerators (with a few exceptions, e.g. Ctrl+Y is hard-coded to open FitNL). For example, if you defined subtract_ref|Ctrl+X then you could no longer use Ctrl+X as the Edit: Cut shortcut. If you defined subtract_ref|Ctrl+Shift+X then you could no longer use Ctrl+Shift+X as a matrix window shortcut to View: Show X/Y.
|
Keywords:accelerator, menu, x-function, keyboard, hotkey, shortcut
|