4.7 Inserting Graphs Images and Other Objects into Worksheet CellsInsObject-to-WksCell
Origin worksheets can be a container for various types of information, beyond the usual tabulated text & numeric data. For instance:
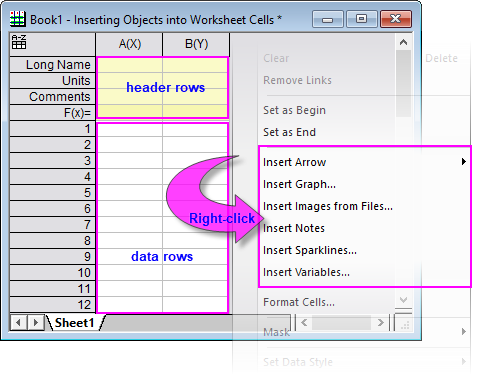
This topic is concerned only with those things that can be inserted into worksheet cells, either in the header rows (aka "column label rows") or data rows.
The following table lists things that can be inserted into worksheet cells. Some elements can be inserted into either header rows or data rows (indicated by the availability of the shortcut or menu command).
| Element
|
Comments
|
|
Arrow
|
Useful for annotating worksheets.
- Right-click on the cell and choose Insert Arrow > type.
|
|
Graph as Editable Graph†
|
This embeds an editable graph in the worksheet cell. Edit the graph by double-clicking on the worksheet cell. When you have finished, click the Close button  in the upper-right corner of the edited graph window. This closes the graph window and saves your changes to the embedded graph. in the upper-right corner of the edited graph window. This closes the graph window and saves your changes to the embedded graph.
- Right-click on the cell and choose Insert Graph....
- In the insertGraph dialog box that opens, select your graph using the Graph Browser and click OK.
- Enable Move Graph to cell (Embedding) (Options branch) and click OK.
|
|
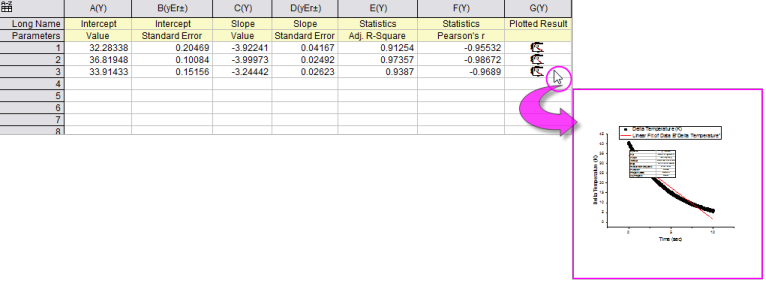
Graph as Picture†
|
This inserts a graph as a picture object. You can link the picture to the source graph so that any change to the source graph updates the picture.
- Right-click on the graph and choose Copy Graph as Picture/Copy Page, or click Edit: Copy Graph as Picture/Edit: Copy Page from the main menu.
- Right-click in the worksheet cell and choose Paste Link or click on the cell, then click Edit: Paste Link from the main menu. To paste a static (unlinked) picture, simply choose Paste.
You can mouse over the cell to see a preview.
|
|
Hyperlinks
|
You can insert hyperlinks into worksheet cells. For more information, see Inserting Links into Worksheet Cells.
|
|
Image from File†
|
Inserts an image (.JPG, .BMP, .GIF, etc.). Double-clicking on the cell opens the image in the Image window.
- Right-click on the cell and choose Insert Images from Files....
Once opened in an Image window, the inserted image can be linked to an external source file. This helps control project sizes when many (or large) images are involved. See the following links for information on (1) linking and (2) restoring externally-linked images to the workspace of opened project files.
|
|
Long Names,
Units,
Comments,
Parameter Values,
Column Forumlas, etc.
|
The header rows can display a wide variety of sheet and column-related data. For more information, see Displaying Supporting Data in Worksheet Header Rows.
|
|
Notes
|
To add a cell Note, select a cell then click the Insert Note button  on the Mini Toolbar. on the Mini Toolbar.
- A popup with Note text will appear when you hover on the red note anchor at the upper-right corner of the cell.
- Notes can be added to cells that contain other information, including embedded images.
- To manage existing Notes, select the cell and click the Mini Toolbar's Clear the Note or Open in Notes Window buttons.
- You can pre-populate a Note with your own custom text:
- Open \User Files\Origin.ini, find the [Text] section and add CellNote="Your Text Here".
- If you have not edited Origin.ini, you can use system variable @CNN to add standard elements to each Note
(e.g. @CNN=2 ==> "user 1/7/2022"). For information on modifying the value of system variable, see this FAQ.
- 0 = "type here"
1 = user
2 = user + date
3 = user + date + time
|
|
Equation
|
LaTeX equation can be insert into data area and label rows (e.g. Long Name, Unit, Comment).
- Select the desired workshee cell and click Insert LaTeX button
 from mini toolbar. Or, from mini toolbar. Or,
Double click in the desired cell to enter in-place edit mode, right click and select Insert: LaTeX Equation from context menu.
This will open the LaTeX Equation Editor.
- LaTeX equation is inserted using
\q escape. To display the equestion, you must turn on Rich Text syntax by Column Properties dialog or right-click menu Set Data Style: Rich Text (Rich Text is on for Unit label rows by default).
|
|
Sparklines†
|
A sparkline provides a thumbnail plot of the data contained in a worksheet column.
- Right-click in a Sparklines header row cell and choose Add or Update Sparklines. This adds a sparkline plot of column data to the header row cell. For more information, see the sparklines X-Function.
- Right-click in any data row cell and choose Insert Sparklines. This adds a sparkline plot of any dataset in the project, to the data row cell. For more information, see the insertSparklines X-Function.
|
|
Variables
|
You can insert variables stored in the worksheet's binary storage area (as might result from importing data files with important header information) into a worksheet cell, either as static values or as a linked value. When inserted as a linked value, a cell value is updated as the value of the linked variable changes (as might result from importing a new data file).
For more information, see The Insert Variables Dialog Box for Worksheets.
|
†Note: Beginning with Origin 2018, any inserted graph, whether it be a an editable graph, a graph inserted as a linked or static picture, an image inserted from file, or a sparkline, will generate a pop-up preview when you hover on the containing cell.
 | To insert the image file into Worhsheet cell, you also can copy and paste it directly.
- Copy an image (.JPG, .BMP, .GIF, etc.) file out of Origin,
- Click a Worksheet cell
- Press Ctrl + V or right-click on the cell to select Paste.
- Double-clicking on the cell to open the image in new Image window.
|
| Topics covered in this section:
|
|