20.2 Importing Images and VideosImport-Images
Before perform image processing and analyzing routines, you must import/open your image into Origin.
Import Image and Video to Image Window
Importing/Opening Image(s)/Video
- Select menu File: New: Image: Image/Video, or press Ctrl+Alt+I key
This way you can import single image/video file at a time.
Or,
- Select menu File: Open and select Images from file type drop-down list.
- Browse and select a single image file, or press Ctrl key to select multiple files in the file browser that opens.
This way you can import multiple image files at a time. Each selected image will be loaded to an image window.
Or,
- Drag and drop an image file into Origin workspace.
This will open the image in an Image window.
Supported Single-frame Image Types
Below table lists image types that can be imported into image window or matrix window.
| Image Type
|
Extension
|
Support by
|
| Bitmap
|
*.bmp, *.dib
|
both
|
| Graphics Interchange Format
|
*.gif
|
both
|
| Joint Photographic Experts Group
|
*.jpg, *.jpe, *.jpeg
|
both
|
| Zsoft PC Paintbrush Bitmap
|
*.pcx
|
matrix window
|
| JPEG 2000
|
*jp2
|
image window
|
| Portable Network Graphics
|
*.png
|
both
|
| Portable Images
|
*pbm, *.pgm, *ppm
|
image window
|
| Truevision Targa
|
*.tga
|
matrix window
|
| Adobe Photoshop
|
*.psd
|
matrix window
|
| Tag Image File
|
*.tif, *tiff
|
both
|
| GeoTIFF
|
*.tif
|
both
|
| Windows MetaFile
|
*.wmf
|
matrix window
|
| Enhanced MetaFile
|
*.emf
|
matrix window
|
Supported Multi-frame Image and Video Types
Below table lists multi-frame image and video types that can be imported into image window.
| File Type
|
Extension
|
| Graphics Interchange Format
|
*.gif
|
| Tag Image File
|
*.tif, *tiff
|
| GeoTIFF
|
*.tif
|
| Video
|
*.avi,*.mov,*.mp4
|
Import Multiple Images of Same Dimension into One Window
- Select menu File: New: Image: Multiple Image Files, or press Ctrl+Alt+T key
This will open the imgstack dialog. You can
- import all files in the specified folder, or
- choose any files from different paths.
The selected image files must be the same image type and have same dimension. They will be stacked into one image window, one frame for each image.
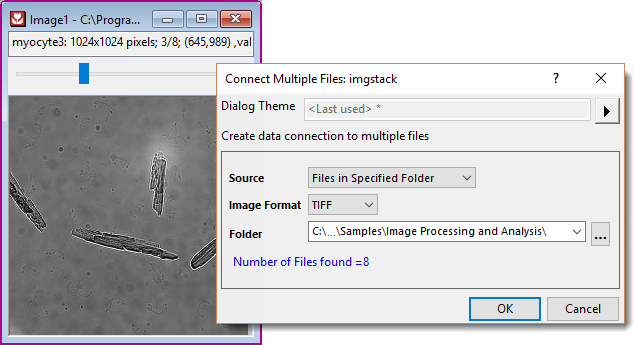
 | To import multiple GetTIFF images to one window, in the imgstack dialog, select Specified Files in the Source dropdown list, and add the imported file name by selecting in the folder.
|
Create an Empty Image Window
- Select menu File: New: Image: Empty Window
OR,
- Click the New Image button
 on the Standard toolbar on the Standard toolbar
- You can right click inside the image window and select Import to import an image. Or, paste an image to the empty window.
Import Online Image to Image Window
- Select menu File: New: Image: Web Image, or press Ctrl+Alt+L key
OR,
- In an empty Image window, right click and select Import from Web
- You can right click on an online image and select Copy Image Link/Copy Image Address to get the image link. PNG and TIFF formats are supported.
Import an Image to Matrix Window
- With a matrix window active, select Data: Import from File: Image to Matrix.
- Set the Files of type drop-down list, as needed. Navigate to the image folder and choose your file(s). Click OK. This will open the dialog of the impImage dialog.
- Adjust import options as needed and click OK.
For information on manipulating, analyzing and plotting matrix images, see Working with Images in the Matrix Window.
Save and Reload
- The image file is imported by Data Connector. Similar to other connectors, if an image is too large (threshold file size: @FSE KB), it will be excluded when saving the project. Only the connection between the source image and the project will be kept.
- If you want to reduce the project size, you can turn on this feature by right-clicking inside the image window and check Linked File from the context menu.
- When you reopen this project, you will see an empty image window. Right click inside the window and select Import, OR, press Ctrl+4 to reload the image file.
- Right click inside an image window and select Source File Path, you can view the current path or change the image path to import another image.
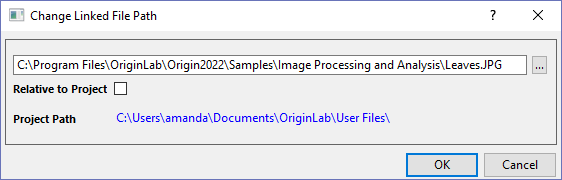
- If the current project has been saved, you can check Relative to Project to save the image source relative to project path.
- When import image from a path that is sibling or sub of current project path, Relative to Project is checked automatically.
|