2.1.2 Project ExplorerProject-Explorer
Display or Hide Project Explorer
To show or hide Project Explorer:
- Click the Project Explorer button
 on the Standard toolbar or click View: Project Explorer on the Origin menu (hot key: Alt + 1) on the Standard toolbar or click View: Project Explorer on the Origin menu (hot key: Alt + 1)
- Right-click the PE title bar to auto Float, Dock or Autohide the window.
Project Explorer Overview
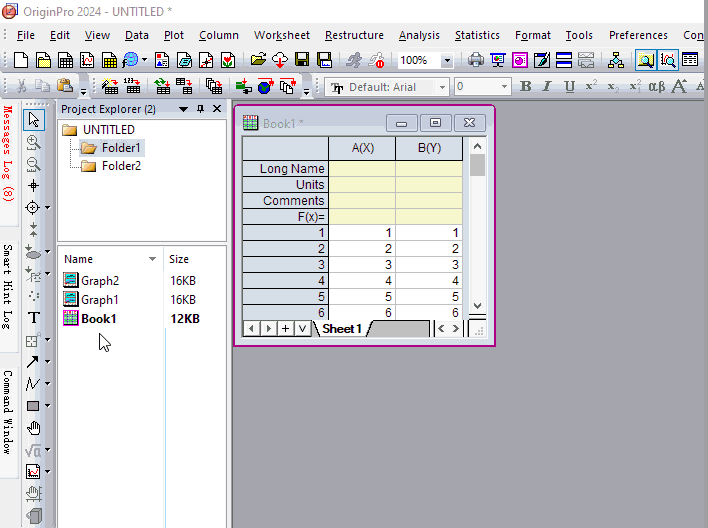
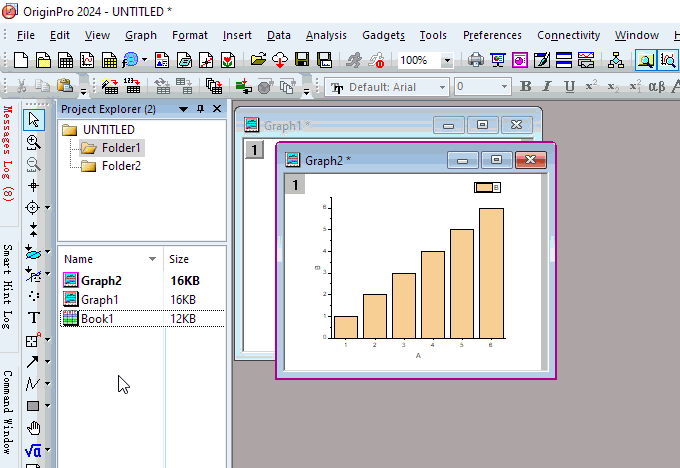
Project Explorer (PE) is a tool to help you organize the contents of your Origin project files (OPJ).
-

- Project Explorer is split into two panels. The primary panel (top) shows project folder structure. The sub-panel (bottom) shows windows in the folder highlighted in the primary panel.†
- Context menus in both panels provide options to delete, hide, print, etc. Menu options vary depending on what is selected or where you have right-clicked.
- You can hide, show or delete windows in the bottom panel of Project Explorer.
- Right-click the PE title bar to display the panels stacked (vertically aligned) or side-by-side (horizontally aligned).
- Right-click on the sub-panel in Details view to turn individual headings on or off.
- In the sub-panel, select multiple windows by holding Shift or Ctrl while clicking on windows with your mouse.
- The sub-panel supports differing views of windows: Details (default), List, Small Icons, Large Icons, Extra Large Icons.
- In any window view, mouse over each window to see window comments, contents or a window preview.
- When hovering on a folder in the primary panel, a tooltip shows folder contents and optional comments. Right-click the folder and choose Properties to add comments to a folder.
- Right-click on the sub-panel and the Show Saving Size option is checked. It shows estimated size when saving the project file, only applicable when there are links to external files.
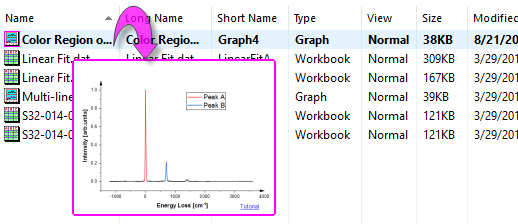
- When displaying windows as Extra Large Icons, you see a preview image of the window that is generated on-the-fly anytime that the window is updated.
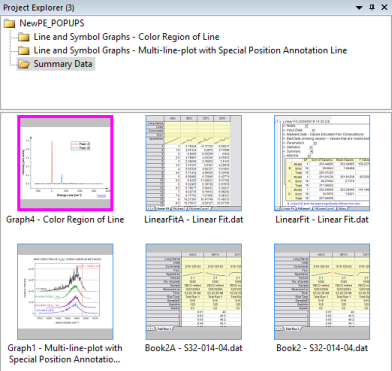
Project Explorer Previews
In all sub-panel Views, hovering on a window produces a popup preview. Preview images are generated on-the-fly and will update when a window is updated (a sub-panel Refresh (F5) may be needed).
Workbooks are unique in that they allow you to choose from three types of previews:
- Compressed Image (Default): The popup image for all window types is a duplication of what the user sees when switching the sub-panel to Extra-Large Icons view.
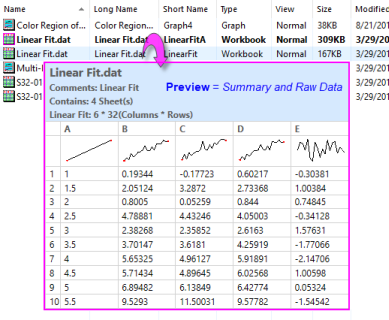
- Summary and List View: The popup image is a summary of book content (comments if any, number of sheets, etc.) plus a List View table with column Short Name, Long Name (if exists) and Sparklines.
- Summary and Raw Data: The popup image is a summary of book content (comments if any, number of sheets, etc.) plus a standard (Raw) view of the workbook with column Short Name and Sparklines.
A Preview setting made to one book is globally applied to all workbooks in the project. Preview is a window property and is set in the Window Properties dialog box.
Note: The following LabTalk System Variables can be used to modify Project Explorer Previews:
- To control use of preview images by window type, see @PESS.
- To change the default preview type for project workbooks, see @PEWP.
- To change the number of rows that display in Summary and List View previews, see @WPC.
- To control whether needs to hold Ctrl key to enable preview image popup, see @PEK.
It also can use Hold Ctrl Key for Preview Popup option in context menu of Project Explorer sub-panel to control this setting.
For information on changing the value of a system variable, see FAQ-708 How do I permanently change the value of a system variable?
|
Find Windows in Your Project
In addition to previewing windows in the PE sub-panel, you can use PE's Find dialog box to locate windows in your project file:
- Right-click on any PE folder and click Find.
- Enter a search string in the Find What box.
- Search within the Entire Project, the Active Folder or the Active Folder and Subfolders.
- Options to match case or whole words or to use wildcards "*" or "?" in your search.
- Search Folders, Graphs, Books, Sheets or Columns and Select options to narrow or broaden your search.
- Additional options to search worksheet data and text objects on graphs.
Speed Up Project Loading by Not Displaying Windows
By default, project windows are shown in the Origin workspace. When opening saved projects, window display depends on the Show/Hide status of the window at the time that the project was saved. If your project is slow to load or that the workspace has become overly crowded. One option is to load your project without displaying windows:
- To configure the workspace so that project windows do not display on loading, click View: View Windows: None or right-click in the PE primary panel and choose View Windows: None. This setting remains in effect throughout the session unless changed.
- Another option is to use the @PEN system variable to limit the number of windows that can display in a given folder. This setting takes effect the first time that you switch Project Explorer folders. This setting is stored in the registry and remains in effect until you change the value of @PEN.
- A third option is to right-click the PE folder and choose Hide All Windows; or use the Window: Hide All Windows menu command. Note that you can save the project in this state and windows will be hidden when you reopen the project. Show windows by double-clicking the dimmed window icon in the lower panel of PE; or right-click on the folder in the upper panel of PE and choose Show All Windows.
 | A number of things can cause Origin to run slowly. If Origin seems sluggish while working with a project, see this FAQ.
|
Move a Folder or Window
- To move a folder or window within the Origin project, drag the folder/window onto another folder.
Duplicate Windows in Project Explorer
- To duplicate windows in same folder, pressing CTRL key and drag the selected windows in sub-panel of Project Explorer.
- To duplicate windows in other folder, click to select the windows, then pressing CTRL key and drag the windows to other folder in the primary panel of Project Explorer.
Create/Remove Shortcut for a Window
Add Shortcuts to Favorites folder
- Right-click on a window in the PE/ right-click on the header of a window
- Choose Add Shortcuts to Favorites.
A Favorites folder is added to the OPJ folder structure and the window shortcuts will add in the Favorites folder.
Note: In the Favorites folder, the shortcuts window is hidden.
Add Shortcuts to other folders
- Press Alt key and drag a window onto another folder. This creates a shortcut to this window in this folder.
or
- Right-click on the Window header, and select Add Shortcuts to (Seesaw to see):...
It will create a Shortcut in the last active folder.
| For example:
- Active Folder2 in Project Explorer.
- Click on Folder1, and right-click on the header of Book1 in the Folder1, then you select Add Shortcuts to (Seesaw to see):Folder2 to add a Shortcut in Folder2.
|
Add Shortcuts to Active Folder
With a folder activated, right-click on another folder to select Add Shortcuts context menu to open the Add Shortcuts to Active Folder dialog:
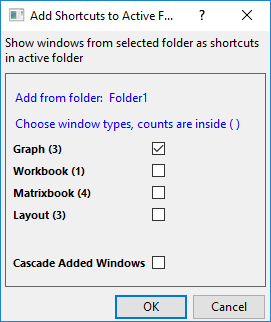
In this dialog, you can decide which type of window will be shown as shortcuts in active folder.
Once you chose the window types you want to add shortcuts for, you can check the Cascade Added Windows to cascade the shortcut windows in the active folder.
Go to the Original folder
To go to the Original folder from short cut:
- Right click on the shortcut in the PE, select Go to Original Folder
or
- Right click on the on the header of the shortcut window, select Go to Original Folder
or
- Click on the Go to Original
 button on the on the header of the shortcut window. button on the on the header of the shortcut window.
Remove Shortcuts
Click the Close button of the Shortcut window, it just will be hidden.
To remove the Shortcut,
- Right-click on the shortcut in the PE and select Delete.
or
- Right-click on the folder in the PE and select Remove Shortcuts (remove all shortcuts in this folder).
Change the Display or the Order of Columns in Details View
When the PE sub-panel is in Details view (right-click an open area and choose View: Details), you customize what information displays:
- Right-click on the column header and select or de-select a heading to display or hide the heading.
- Drag to reorder displayed column headings.
Sort in Project Explorer
In Detailed view of Project Explorer, multiple attributes of windows and folders are listed.
- Click on the column header to sort the windows in project explorer. Upper arrow means ascending. Down arrow means descending order.
- To do nested sort with multiple attributes, hold down SHIFT key before clicking on secondary attribute column header and on.
Rename a Folder or a Window or Add Comments
- To modify a folder or window Long Name, right-click the folder(either panel)/ window and choose Rename or Properties.
- To rename by in-place editing, left-click once on the folder(either panel)/ window (Long Name or Short Name column is showing on sub panel), then click a second time. Type the name.
- In addition to Long Name and Short Name columns, there is a Name column which displays the window Long Name if it exists. You can rename either the Long or Short Name from this column by clicking the LN/SN button to toggle between the two names.

- To add/edit Comments by in-place edit, left-click once in the Comments column (sub-panel), then click again. Type your comments.
Notes:
- Prior to Origin 2015 SR1, choosing Rename in PE led to editing of the window Long Name. You can restore the old behavior, by setting the System Variable @PERB = 0 (see documentation of @PERB).
- You can choose to show window Long Name (Short Name if Long Name not exits) only in View modes other than Details by right click in the lower panel and uncheck Show Long and Short Names'. By default, both Long and Short Names are shown in format of SN - LN.
|
Folder Notes
To add Folder Notes to a Project Explorer folder:
- Right-click on the folder and choose Folder Notes.
or
- Click on the folder, then click the Folder Notes button on the Mini Toolbar.

- In Project Explorer, folders with notes will be indicated by a blue dot.
- If no folder Comment exists, this adds a blank Folder Notes window to the folder.
- Folder Notes will use Origin Rich Text, by default. To switch syntax, choose Notes: Syntax; or right-click on the Folder Notes window title bar and choose Syntax (see this page for options for adding and displaying Notes window content).
- Change default syntax by changing the value of system variable @FNS.
- If there is existing Comment (hint: right-click on the folder and choose Properties), adding Folder Notes will copy the Comment to the Folder Notes window.
- When switching between folders, for example using the Folders and Windows toolbar, Folder Notes will always be displayed in the workspace, if pinned or minimized.
- If you close Folder Notes (i.e. by clicking the Close button
 ), they are embedded in the folder and will only be displayed again by right-clicking on the folder in PE and choosing Folder Notes. ), they are embedded in the folder and will only be displayed again by right-clicking on the folder in PE and choosing Folder Notes.
- Press Ctrl + hover on a folder to see preview of Folder Notes. Folder Comments will show as a plain-text tooltip.
| Note: For more information on folder notes, Notes windows and Notes window syntax, see the following topics:
|
Folders and Windows Toolbar
The Folders and Windows toolbar makes it easier to switch between Project Explorer (PE) folders (Seesaw) or to add the active window as a shortcut in the previous folder; plus, to pin the active window in place or to arrange windows in the active folder Window: Arrange Windows <Last used>.

- Folder Backward: From current folder, return to previous folder.
- Folder Forward: From previous folder, return to current folder.
- Seesaw: Alternate between two folders (Ctrl + Alt + X). From the menu, Windows: Seesaw.
- Add Active Window Shortcut for Seesaw: Share the active window to the previous folder as a shortcut (Ctrl + Shift +F7). Alternately, right-click the window title and add shortcut to previous folder.
- Add shortcuts from previous folder: Add shortcuts by window type, to the current folder.
- Arrange Windows (last used): Same as Window: Arrange Windows <Last used>.
- Pin Active Window: Pin window so that it isn't included when Arrange Windows (last used) is clicked. Alternately, right-click the window title and Pin Window (or unpin).
Check Dependents for Workbook and Matrix window
In bottom panel, you can show a column Dependents to indicate how many graph windows are denpending on current window.

You can also check which graph windows are depending on current workbook/matrixboox window. Click one graph in the fly-out list will open the graph window.

Two system variable @PEDC and @PDC have been added:
- @PEDC is used to specify whether to include Browser Graph for Dependents;
- @PDC can be used to return active page's dependent page number considering the status of @PEDC.
View Graphs as Slide Show or Send Graphs to PowerPoint
- To view a slide show of graphs in your project, right-click on the PE folder containing the graphs and choose Slide Show of Graphs.
- To view a slide show of all the graphs made from one or more worksheet columns, select the columns then click Column: Slide Show of Dependent Graphs in the main menu.
- To send graphs to a PowerPoint file, right-click on the PE folder containing the graphs and choose Send Graphs to PowerPoint.
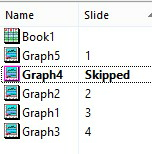
Modify Graph Order for Slide Show or PowerPoint
- Show the bottom panel of Project Explorer (PE) in Detailed view.
- Make sure Slide column shows in Detailed view. Right click any column header to make sure Slide checkbox is checked. You may need to widen your PE view to see the Slide column. For graph and layout windows, slide index number shows. This will be the order graphs appear in Slide Show or PowerPoint.
- Click the Slide column header so the bottom panel is sorted by slide index number. You will see an upper/down arrow next to slide column header. Note: This step can not be skipped.
- With bottom panel sorted by slide index, drag a graph/layout window in PE up or down to change the slide index number.
- To skip a graph in slide show, right-click on the window in PE and choose Skip Slide.
Save a Portion of the Project as a New Project File
- To save a folder in the project file as a new project, right-click on the folder and choose Save Project As.
| Note: Prior to Origin 2020, if you right-clicked on an inactive folder in Project Explorer and chose Save Project As, all project windows would be hidden upon opening, regardless of their Hide/Show status on saving. Default is changed to preserve Hide/Show status on open. See system variable @FSK.
|
Merging Data from Multiple Projects
You can have only one project file (OPJ or OPJU) open in a given session. However, there are a couple of options for combining data from multiple Origin projects:
- Append Project Files: You can append the contents of another project file to the current project. In the upper-panel of Project Explorer, select the target folder then choose File: Append; or right-click on the target folder and choose Append Project. You will be asked if you want to create a new folder for the appended project. If you answer No and (a) the appended project has no windows in the root folder and (b) has only a single sub-folder, then the folder contents are added directly to the target folder. Otherwise, a new folder is added to the project file and folder names are enumerated as needed, to avoid naming conflicts.
- Run Another Instance and Copy: You can run another instance of Origin and copy data from one project to another. As of Origin 2019b, you can use Project Explorer to copy and paste workbooks or folders from one project to another. Right-click on the folder (upper panel of PE) or workbook (lower panel of PE) and choose Copy from the shortcut menu. To paste a folder, right-click in the upper panel and Paste. To paste a workbook window, choose a target folder in the upper panel then right-click in the lower panel and Paste.
| You can also copy and paste workbooks and folders within a given project.
|
Duplicate Folder
- Right-click on the folder, then select Duplicate Folder in the context menu.
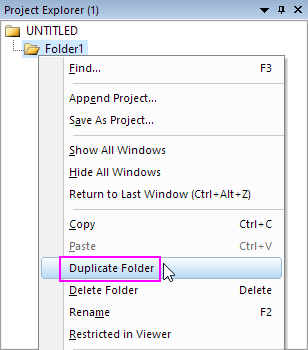
- Click on the icon of the folder, then the Mini Toolbar for the folder will show. Click the Duplicate Folder button
 in the Mini Toolbar. in the Mini Toolbar.
- Click to select the duplicated folder in Project Explorer, press Ctrl+C key, and click parent folder, then press Ctrl+V.
Copy and Paste Folder Across Origin
- To copy and paste a folder, including all the windows inside, to another instance of Origin, right-click on the folder and choose Copy/Paste.

Hide a Folder from the Origin Viewer
The Origin Viewer is a freely-distributed, standalone application that allows viewing and copying of information contained in Origin Project (OPJ) files and Origin child window files (OGG, OGW, OGM). If you would like to prevent your data from being viewed or copied by someone using the Viewer, do the following:
- Right-click on the folder in Project Explorer.and choose Restricted in Viewer. The folder icon should now display as locked.
|