2.5 Origin Template Files (OTW(U), OTP(U), OTM(U))OFileType-Template
Origin template files are used to store a custom suite of data handling and format options. Templates can be saved from Origin workbook, graph or matrixbook windows. Data are not saved with a template file.
 | A series of Unicode-compliant (UTF-8) file types was added for Origin 2018. Upgrade users may recognize that some of the old familiar file types now have a Unicode counterpart, denoted by an appended 'u' (e.g. *.otp => *.otpu). Origin versions 2018 and later will read and write the older, non-Unicode file types. As the default is to save to the newer Unicode-type files, be sure to set the File Type drop-down if you need to save to an older template file type.
|
Origin's predefined templates
Origin ships with a number of predefined system templates and Extended templates. During installation, these system templates are installed to the Origin program folder and the Extended templated are installed to the AppData/Local/OriginLab/Template folder of current window system user folder. You can use and freely customize the workbook, graph and matrix templates that ship with Origin but you cannot overwrite the templates in your program folder.
- If you customize a system template and you want to save those customizations for later use, save the template to your User Files Folder (UFF), or other convenient location. See Saving a customized window as a template.
- Saving the customized system template to your UFF has the advantage of (a) keeping your customized templates in a single, easily-remembered and easily-transferred location and (b) it allows you to make your custom template the default template associated with Plot menu commands and toolbar buttons. See Modifying the default template.
- If you need to restore the system default template for a particular menu command or toolbar button, see this section.
- Saving a customized Extended template will save the new template as a User template and store it in your UFF. This new template will also listed in the Template Library.
Note: There are three system templates that are special: ORIGIN.OTWU (workbook), ORIGIN.OTPU (graph), and ORIGIN.OTMU (matrixbook). These are the templates called when you click the New Workbook  , New Graph , New Graph  or New Matrix or New Matrix  buttons on the Standard toolbar. buttons on the Standard toolbar.
|
Saving a customized window as a template
You can open the template_saveas dialog to save a customized window as a template.
To open the dialog to save a graph/workbook/matrixbook template:
- With the child window active, from the main menu, select File: Save Template As...
or
- Right-click on the window's title bar and select Save Template As... from the shortcut menu.

| Category
|
Choose or type a custom category name, to be used in the Template Library. The default is UserDefined.
|
| Template Name
|
Specify the template name. The default is the name of the template used to create the window. You can save to the same name or you can provide a new name. See this section for guidance.
|
| Template Description
|
Add a description that helps to identify the template.
|
| Preset Graph Short Name
|
This option is only available for graph window. Preset Short Name for graph created from this template.
|
| Preset Graph Long Name
|
This option is only available for graph window. Preset Long Name for graph created from this template.
|
| Mark as Cloneable Template
|
This option is only available for graph window. If it's checked, when plotting new graph with such template, Origin will ignore the data selection in worksheet, it will check if the new data matches the original data by the Clone by Matching condition below. If matching, graph will be created purely by cloning the graph with new data. Cloneable Template can be quickly called by selecting Plot: User Templates menu. If this isn't checked, it will be a regular graph template. Graph will be created based on data selection. To learn more about clone plotting, please refer to Batch Plotting.
|
| Match Column by
|
This option is available only when Mark as Cloneable Template is checked. Determines how new columns of data will be identified when using your cloneable template. Columns will be identified by:
- Index (column order, starting from 1)
- Long Name
- Short Name
Notes:
- The matrix window equivalent of the worksheet column is the matrix object. Like worksheet columns, Matrix objects have Long Names, Short Names and an index number. For more information, see Matrixsheet Dimensions and XY Coordinates, Labels and Origin matrix object naming conventions.
- Attempting to save a template with Match Column by = Long Name when the column Long Name is missing or duplicated in the sheet or matrix object, produces the warning message "Empty/duplicate column long name exists in the source." Change option to proceed with saving template.
|
| Match Modifier(s) by
|
Some plot attributes can be modified by mapping them to a column of values. The mapped column can be identified by its relative column index number (Offset) or by column Short Name, Long Name, Units, Comments, (built-in) Parameter(n) or User-defined Parameter.
When duplicating a graph with new sheets or books, this setting controls modifier column selection, not the Match Plot Columns by setting in the Select Worksheet dialog.
This same Match Modifiers by control exists on the Miscellaneous tab of Plot Details.
|
| File Path
|
Specify the template file path. The default path is the User Files Folder (UFF). If current project is pre-saved, you can choose <Project Folder> or <Project Folder><PE Path> to saved this template to the project path or subfolder of the project path which has same folder structure as Project Explorer.
|
| Preview Image (Optional)
|
When you save a graph or workbook template, a preview image of the window is automatically generated. Graph previews are used in the Plot menu (Templates category) and Template Library. Workbook previews are used in the New Workbook dialog.
Most users will accept the default image but you can use this field -- either when saving a new template or when editing an existing template -- to add an alternate image. Any size image should do (Origin will resize the image) but for best results, make the image close to final display size (around 160px width X 130px height).
|
| Allow System Theme to Override
|
This check box is available when saving a graph window. Specify whether or not to allow system theme upon loading to override the template settings.
|
| Allow System Increment Lists to Override
|
This check box is available when saving a graph window. Specify whether or not to allow system increment lists(color lists, shape lists or pattern lists) upon loading to override the template settings.
|
Modifying the default template
- System templates are templates that ship with Origin and which are installed to the Origin program folder. They cannot be overwritten.
- In a fresh Origin installation, system templates will be the default templates.
- Default templates are those that are associated with various menu commands and toolbar buttons. Default templates may be a system template or they may be a customized version of a system template that was saved to the User Files Folder (UFF).
- Origin's default templates are associated with the New Window buttons on the Standard toolbar and the various graph types listed in the Plot menu (workbook or matrix is active) and the buttons on the 2D Graphs and 3D and Contour Graphs toolbars.
Saving a customized window as the default template
- Click on the window that you want to save as your default template.
- Choose File: Save Template As... from main menu or right-click on the window title bar to select Save Template as... from the short-cut menu. This opens the template_saveas dialog.
- In the template_saveas dialog, two details are most important: Template Name and File Path.
- The Template Name will show the name of the template that was used to create the window. In the example below, the template name is Scatter and if saved to this name, this template will become the new default Scatter template associated with the Plot > Basic 2D : Scatter menu command and the Scatter graph button
 on the 2D Graphs toolbar (an attention message will inform you that saving to the same name will set the template as default for this page type). on the 2D Graphs toolbar (an attention message will inform you that saving to the same name will set the template as default for this page type).
- The File Path should be set to your \User Files folder.

 | Note that the dialog image shown above is for a graph template but this same principle applies to other window types: If you modify the template associated with a new graph, workbook or matrix menu command or toolbar button, then save the modified template to your User Files Folder (UFF) using the default name, the template in your UFF will now be used to create new windows when you select the menu command or toolbar button.
|
Setting an existing template file as your default workbook/matrix template
On the Standard toolbar, there are buttons for New Workbook  and New Matrix and New Matrix  . There is a method for connecting a custom template to these toolbar buttons even if your custom template does not have the same name as the default template (Origin.otwu, Origin.otmu). . There is a method for connecting a custom template to these toolbar buttons even if your custom template does not have the same name as the default template (Origin.otwu, Origin.otmu).
- From the Origin menu, choose File: New: Workbook/Matrix: Browse to open the New Book dialog.
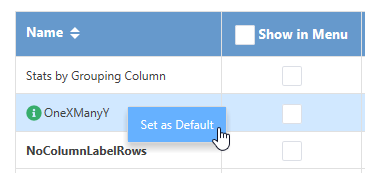
- Choose a book you desired and right-click on it to select Set as Default.

- Click Close to close the dialog.
If you want to change another one as default, you can select the new one and set it as default. To roll back to the system default one, just right-click the current one to select Clear Default.
Restoring the system template as the default
- To restore a system template as your default template, follow the instructions in the previous section while setting Path to Origin Program Folder.
- Remove the identically-named custom template from your UFF (Help: Open Folder: User Files Folder). This forces Origin to look to your program folder for a system template of the same name.
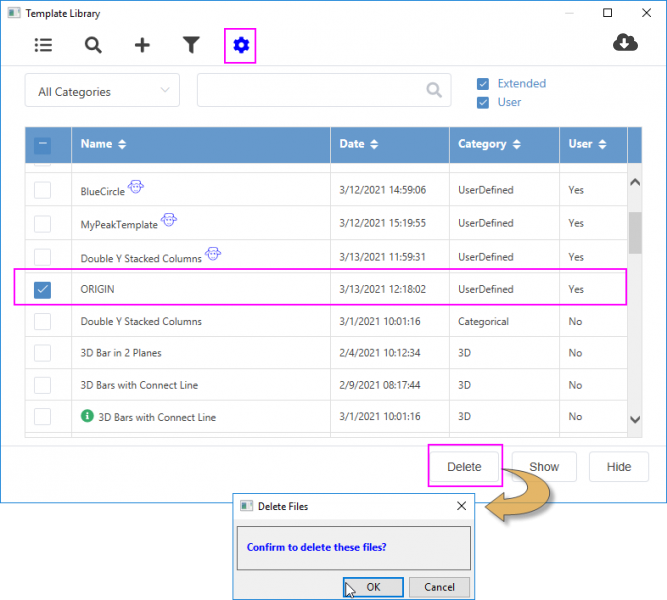
- For graph templates, you can open the Template Library and click Manage Mode button
 to switch to the manage list. In this list, you can select the template you saved as default to click Delete button to delete it. to switch to the manage list. In this list, you can select the template you saved as default to click Delete button to delete it.

- A small dialog opens:
- If you simply click OK, the template is removed from the Template Library and the template files stored in your UFF will also be deleted. If the custom template was previously associated with a graphing toolbar button, the system template will be restored as the default template for that graphing toolbar button.
|