2.1.3 Child Windows from TemplatesCreate-ChildWindow
When you create a new workbook, graph or matrixbook, Origin uses a template to create the new window. Predefined properties that were saved with the template are used to set various window format and data handling behaviors of the window. Data are not saved with a template file.
Creating a new window using the Standard toolbar buttons
The easiest and most obvious way to create a new workbook, graph or matrixbook window is to click on one of the Standard toolbar buttons.

These buttons open a window based on one of the Origin templates: ORIGIN.OTWU (worksheet), ORIGIN.OTPU (graph) or ORIGIN.OTMU (matrix).
Creating a graph window using Graph Template
Using System Template
Generally, with some data selected in a workbook or matrix, you can create a graph window by once-clicking on the buttons on the 2D Graphs and 3D and Contour Graphs toolbar.
All supported system graph templates are accessible from the Plot Menu. You can simply highlight or activate the source data to select the Plot Type you desired to plot the graph.
Using User or Extended Templates
From Origin 2021b, there are some Extended Graph Templates have been added as supplements to the System Templates. They are listed and managed in the Template Library with the User templates you pre-saved for reuse.
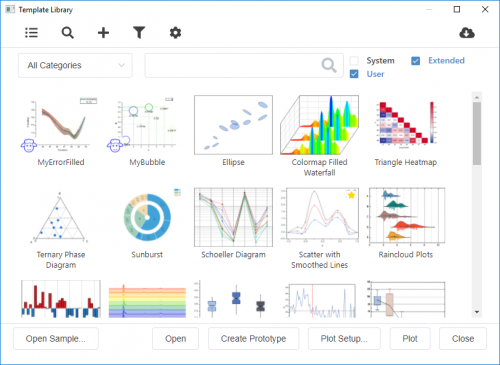
With any source data selected, choose Plot : Template Library to open the Template Library. In this dialog, click on the template you want and then click Plot button to create the graph.
Creating a new book with the New book dialog
Since Origin 2021b, New Book dialog will be opened if you select File: New: Workbook/Matrix : Browse... main menu.
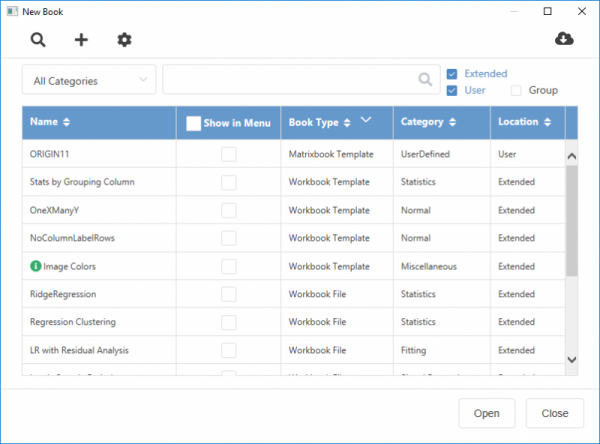
Once this dialog has been opened, you can select any book listed and then click Create to create a ne workbook or matrix book.
Please note, all user and extended templates(analysis templates, workbook/matrix templates and workbook/matrix files) have been listed here. You can also scan, add, modify and remove a user template in this dialog.
Constructing a workbook or matrix book
By New Workbook dialog
Before Origin 2019, you can also open a empty workbook window using the New Worksheet dialog box. This dialog calls the same ORIGIN.OTWU workbook template as the Standard toolbar button, but this dialog box allows "on-the-fly" adding of columns and column designations.
- Click File: New: Worksheet: Construct, from Origin's main menu.
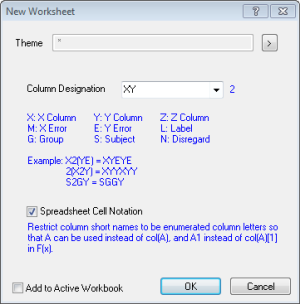
- Use the Column Designation combo box to set multiple column plot designations. Select a column designation from the list, or type a custom designation in the box (the dialog provides hints, in blue, explaining the column designation syntax).
- When the Spreadsheet Cell Notation check box is selected, column short name restriction is on. It will restrict column short names to be enumerated column letters so that A can be used instead of col(A), and A1 instead of col(A)[1] in F(x).
- When the Add to Active Workbook check box is selected, Origin adds the new worksheet to the active workbook. When Add to Active Workbook is cleared, Origin creates a new workbook with the new worksheet. If the active window is not a workbook, the Add to Active Workbook check box is unavailable.
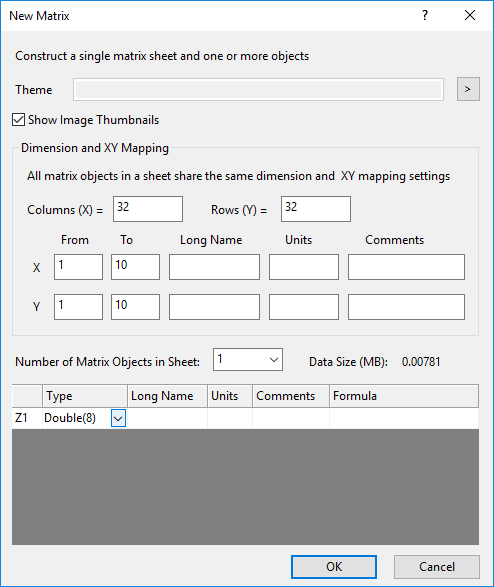
By New Matrix dialog
Similar to the New Matrix toolbar button  , the New Matrix dialog opens a window based on the Origin.otmu matrixbook template. As with New Workbook, you have the option of doing some on-the-fly customization (e.g. number of rows or columns, add matrix objects, etc.). , the New Matrix dialog opens a window based on the Origin.otmu matrixbook template. As with New Workbook, you have the option of doing some on-the-fly customization (e.g. number of rows or columns, add matrix objects, etc.).
- Click File: New: Matrix : Construct...
Indicate whether to display image thumbnails in the new matrixsheets.
Customize the number of columns (X) and rows (Y), X/Y mapping arrangement, and X/Y labels (Long Name, Units, Comments) for a new matrixsheet.
- Number of Matrix Objects in sheet
Select or type the number of matrix objects in the sheet. Customize the data type, labels, and formula for each matrix object on the grid table. To apply a value to all cells in the same column, right-click, and then click Apply to all.
|