20 Customizing OriginCustomizing-Origin
Customizing Default Settings
Setting Preferences with the Options Dialog Box
Customizing Origin, Global Settings
Options Dialog BoxPreferences:Options
Excel
The multi-tabbed Options dialog box has controls for Origin global settings pertaining to numeric display, file and system paths, text fonts, Origin program opening and closing behaviors, etc.
To open the Options dialog box:
- Choose Preferences: Options (any Origin window is active)
- If you opened an Excel file inside Origin, choose Window: Origin Options (Excel workbook is active)
|
|
Controls For
|
| Axis Tab
|
- Max number of ticks for numeric and date/time scales
- Distances from the tick labels to tick marks, axis titles
- Display of zeros and scientific notation in tick labels, units display in axis title
 | Two zero control check boxes were added and turned on by default for Origin 2020b:
- Zero is '0'
- No Trailing Zero
Beginning with Origin 2021, these options are turned OFF by default.
|
|
| Excel Tab
|
- Use of default plot assignments
- Scan datasets for legend text
- Prompt before opening Excel files by drag-and-drop or saving Excel workbooks
|
| File Locations Tab
|
- Set file paths to track last opened, last saved, last exported file
- Set default path and file extension for importing different file types
- Define applicable file types for ASCII import dialogs
|
| Graph Tab
|
- Dash lines definitions, line to symbol gap, user-defined symbols, etc.
- 2D graph anti-aliasing
- Enable in-place editing of linked and embedded graphs in another application
- Speed mode reminder watermark
 | Origin 2022 improved support for user-defined symbols, removing some long-time restrictions and making it easier to apply custom symbols to your graph:
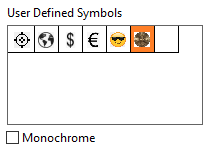
- Support for Clipboard, .bmp or .svg formats.
- Support B&W or color symbols.
- Add symbols via the Options dialog or via Plot Details Add from Clipboard button (Symbol tab > Custom Construction check box > User Defined Symbols radio button).
|
|
| Miscellaneous Tab
|
- Proxy server configuration
- Default templates for ASCII import
- Custom date/time formats
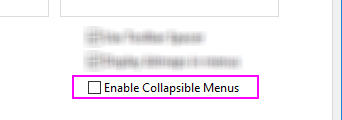
- Enable collapsible menus
- Use of dataset names in the Origin workspace
| Origin's Python Packages dialog for managing installation of Python packages used with Origin, supports package installation via proxy server. Open Preferences: Options, go to the Miscellaneous tab, choose Use HTTP Proxy Server and enter the proxy address.
|
|
| Numeric Format Tab
|
- Thresholds for displaying numbers in scientific notation
- Defaults for displayed digits in data and report sheets
- Radians, degrees or gradians
- Separators for decimal places
|
| Open/Close Tab
|
- Default window closing behaviors
- Project startup, backup and autosave options
- Options dialog save options
|
| Page Tab
|
- Default percent of page size of OLE graphs copied to Clipboard, graph margin and CTRL+C hotkey controls.
| Until 2021b, the Size Factor (%) (formerly, Ratio) was set to 40. The default is now 100.
|
|
| Text Fonts Tab
|
- Default fonts for text objects
- WYSIWYG and in-place editing mode behaviors
- Size and positioning of superscripts/subscripts
- Footnote size, analysis report sheets
| For information on controlling fonts used in the Origin interface, see LabTalk's system.font(object).
|
|
| System Path Tab
|
- View/Change the location of the User Files, Autosave, Backup, Unsaved and Group folders
- View locations of system folders (Program, License and Application Data)
|
System Variables Dialog
System Variables
System variables are internal Origin settings that allow for the fine-tuning of a wide range of Origin behaviors. Origin's Set Systems Variables dialog box (Preferences: System Variables...) can be used to view and set system variable values. In the dialog, there is a link named System Variables List which opens a web page with a list of all system variables, the default value, and description.
To customize a particular system variable:
- Type the system variable name in the first column of Set System Variables, without the @ symbol. For example, if you wanted to make a global change to the Recalculate mode of analysis dialog boxes, type: DAM
- Click on the 2nd column to view the current value, and type in a new value. For example, with DAM, to set Recalculate to Auto, type the value: 1.
- Add optional comments in the third column and click OK to close dialog.
This modified value will be remembered and applied in every Origin session.
You can quickly read or set the value of a writable system variable in the Script Window (Window: Script Window) by typing @systemVariable= as, for example ...
@DAM=
... then pressing ENTER. When setting the value of a system variable in this way, note that that typing in the Script Window sets the variable value for the current session only.
3D OpenGL Settings Dialog
OpenGL
3D Graphing, Hardware Compatibility
Origin uses OpenGL (Open Graphics Library) for rendering of 3D graphs. OpenGL provides enhanced performance including fast drawing, fast rotation and zoom, transparency, and lighting support.
For optimum performance, your card should support OpenGL version 3.0 or higher. To check your hardware's support for OpenGL, run Origin and choose Preferences: 3D Open GL Settings.... Look under OpenGL Info for information on graphics hardware and the supported version of OpenGL.
If your graphics hardware is older, you may experience compatibility issues with things such as transparency settings and anti-aliasing. The controls under the Settings node in this dialog allow you do such things as disabling transparency. The dialog box also provides information on disabling OpenGL.
For more information on OpenGL in Origin, see the links under "Topics for Further Reading" at the end of this chapter.
Customizing Menus
Customizing Menus
Menus, Customizing
Collapsible Menus
Like many software products, Origin uses an auto-expanding "collapsible" menu feature that shows only a partial list of menu commands when opening longer menus. If you want to show all commands upon opening, click Preferences: Options, click the Miscellaneous tab and clear the Enable Collapsible Menus check box.
Custom Menu Organizer
Custom Menu Organizer
If you have scripts that are frequently run, you can add them to the menu for quick access. With the Custom Menu Organizer you can...
- Create up to 3 main menus and corresponding sub-menus
- Assign LabTalk scripts and X-Functions to a menu item
- Restrict menu item access to specific window types
- Hide unused built-in menu items, streamlining your Origin workspace
To open the Custom Menu Organizer, choose Preferences: Custom Menu Organizer... from the main menu. Then press F1 or click the button  in the upper-right hand corner of the dialog box for instructions. in the upper-right hand corner of the dialog box for instructions.
Once you create and save a new menu configuration (.omc) file, you can then select that configuration from the Preferences: Menu fly-out menu. Multiple configuration files can be created, allowing you to easily switch from one configuration to another. A Default configuration is also available in the fly-out, to revert to default menu settings. Configuration files can be shared among colleagues so that you use a common set of menu commands.
Displaying Bitmaps in Menus
Toolbar Bitmaps, in Menus
You'll note that form some menu commands, a bitmap is displayed to the left of the menu entry. The bitmap indicates that there is an equivalent toolbar button.
On some systems such as VirtualPC or Terminal Servers, such bitmaps may cause a long delay when opening menus. To turn off the display of menu command bitmaps:
- Select Preferences: Options to open the Options dialog box.
- Select the Miscellaneous tab, clear Display Bitmaps in Menus, and click OK.
Customizing Toolbars and Buttons
In addition to the standard Windows OS toolbar customizations, Origin provides some clever and easy-to-use tools for creating, programming and distributing custom toolbar buttons. If you or your staff are performing complex but repetitive Origin routines, you'll want to explore creating and sharing custom toolbars.
Toolbars and Buttons, Customzing
Customizing Toolbars and Buttons
Modifying Toolbars
Displaying, Hiding or Moving Toolbar buttons
- Click the small down arrow at the end of any toolbar and select the Add or Remove Buttons context menu. Then select desired sub menu and check/uncheck to show/hide buttons. A Reset option is also available.
- Press ALT key and drag a button to any new toolbar location.
- Press ALT key and drag a button to blank Origin workspace to create a new toolbar.
- Press ALT key and drag a button to any window till X shows, then release to delete the toolbar.
Customizing Toolbar Button Appearance
Use controls on the Options tab (View:Toolbars) to:
- Show toolbar screen tips and shortcut keys on hover
- Increase toolbar and toolbar button size
- Toggle between "flat" or 3D toolbar buttons
Displaying or Hiding a Toolbar
- Double click the left/top end of any docked toolbar to undock. Double-click on title of floating toolbar to dock.
- In floating mode, click X button to hide the toolbar. Drag it to any new location to reposition. Drag it to edge of the Origin workspace to dock.
- In docked mode, drag the left/top end of a toolbar to reposition.
- To show/hide multiple toolbars together, choose View: Toolbars... from the main menu. Use the check boxes on Toolbars tab to show/hide toolbars. Click the New button to add a new toolbar, then drag buttons from the Button Groups tab to add buttons on the new toolbar.
- Use the Reset, Reset All buttons to reset toolbars.
Creating New Toolbars with New Bitmap Images
Toolbar Buttons, Custom
Origin supports creating new toolbar buttons with Labtalk script, both built-in or user-defined script to run when click it. Choose View: Toolbars... and create new button group on Button Group tab.
- Origin ships with three button groups starting with User Defined... with a bunch of bitmap images.
- Click any button and click Settings... button to link .ogs (Script) file section with the button.
- Drag the button to Origin workspace to create toolbar button.
- If you are feeling really creative, Origin allows you to define a new button group that uses your own 16 color, 16 x 16 pixel bitmaps.
- Export the button group as an .OPX file and share it with others. The person who gets the OPX can drag and drop the OPX file onto Origin workspace to install the toolbar.
| Note: To learn more about creating and exporting user-defined toolbars, see:
Help: Origin: Origin Help > Customization and Automation > Customizing Toolbars
|
Add a Custom Button to the Window Title Bar
Buttons, Adding Programmable to Origin Windows
Origin supports adding a system button to the left of the minimize button on the window title bar. A custom LabTalk script can then be associated with this button.
| Note: Please view the -tbb option of the LabTalk Page command in the Programming help file:
Help: Programming: LabTalk > Language Reference > Command Reference > Alphabetical Listing of Commands > Page
|
Customizing the Status Bar
Origin uses the Status bar at the bottom of the Origin workspace to report software hints, statistics and other useful information depending upon current action, selection, window, etc.
- Right-click on Status Bar to customize the display.
- Press ALT and drag items along the Status Bar to reorder.
Customizing the Origin Workspace
Origin also supports customizing dockable windows such as the Project Explorer, Quick Help and Messages Log windows.
- Right click on the window title bar to specify dock, hide, auto hide, and other settings.
- When auto-hide is unchecked, double click to float the window.
- Drag the window title to move or dock to a new location.
- Arrange dockable windows as multiple tabs along the edge of the workspace to save screen space.
- Choose View: Toolbars... from main menu. On the Toolbar tab:
- The Reinitialize button resets menu, toolbar and dockable windows to default settings.
- The Export button exports the current menu, toolbar and dockable window settings to an .OPX file. Drag and drop the OPX file onto another Origin installation to configure the workspace to match your customized settings.
| Occasionally, an Origin workspace component goes "missing" -- The Data Display window, one of the panels in Project Explorer, etc. When this happens, you can reset your workspace by choosing View: Toolbars: Reinitialize. The downside has been that this also resets workspace customizations and toolbar configurations. Beginning with Origin 2018, clicking the Reinitialize button produces an attention message asking if you want to restore the workspace settings from your previous version or use the 2018 system defaults.
|
Templates and Themes
Themes
Templates
The hierarchy of Origin objects such as graph pages, combined with extensive object properties, lends itself to the creation of custom settings for repeat use. You can save your custom settings either as templates or themes, described briefly in the following sections.
| Note: For detailed information please refer to Origin Help file, see:
Help: Origin: Origin Help > Origin Basics > Origin Template Files (OTW, OTP, OTM)
|
Templates
The Origin template concept applies to graphs, workbooks, matrixbooks, and Analysis Templates™. Templates allow you to choose a set of properties or operations and save those for repeat use.
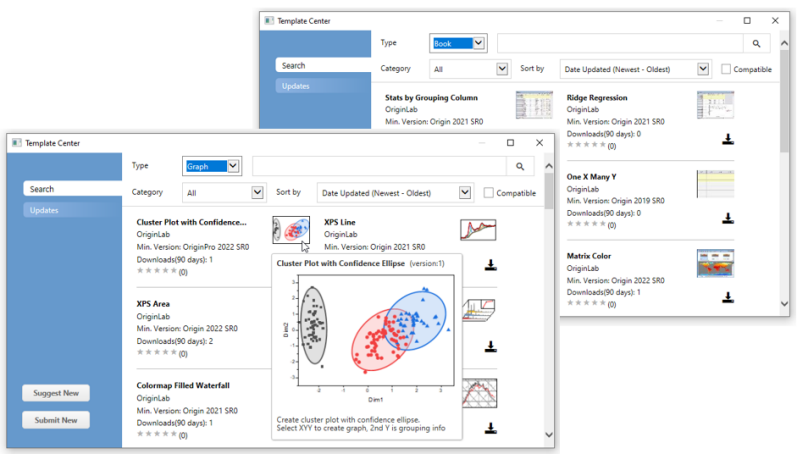
Template Center
Both the New Book (File: New: Workbook/Matrix: Browse...) and Template Library (Plot: Template Library) dialogs include an Open Template Center button  that opens a dialog for browsing and downloading additional templates. that opens a dialog for browsing and downloading additional templates.
To open the Template Center directly, choose Tools: Template Center and set the Type drop-down to Graph or Book.
| You can search for additional templates and install them directly from the Start menu.
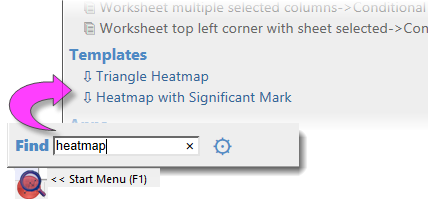
|
Workbook Templates and Analysis Templates
You can save workbook or matrixbook settings, such as the number of columns and sheets, column plot designations, fonts, colors, display formats, custom header rows, scripts associated with the sheet, or dimension and coordinate settings, to OTWU (workbook template) or OTMU (matrix template) files.
When the workbook or matrix window is active and you choose File: Save Template As, you save any window customizations, minus any data that might exist in the window at the time of saving, to a template file. The template file can then be used to create new windows, as needed, for storing and analyzing your data.
You can use the New Book dialog box for managing your workbook, matrixbook and Analysis templates. The New Book dialog is re-designed for Origin 2021b and is covered in the Workbooks chapter of this User Guide.
Use the same New Book dialog to manage your Analysis Templates™. An Analysis Template starts from a workbook but differs in that when you save it as an Analysis Template (File: Save Workbook as Analysis Template), it is saved with whatever analysis operations and dependent graphing operations, exist in the workbook at the time of saving. Analysis Templates are discussed briefly in the Batch Analysis section of How to Handle Repetitive Tasks chapter of this guide.
For a more in-depth discussion of Analysis Templates, see these topics:
Graph Templates
As mentioned in the Customizing Graphs chapter, Origin ships with about 240 built-in graph templates that are used to create Origin’s many science and engineering graph types. Using one of these as a starting point, you can create your own graph, adding more layers, setting scale or dimensional relationships between layers, modifying data plot properties, etc., and then save your customizations as a user-defined graph template (.OTP) file by clicking File: Save Template as.... See the "Templates and Themes" section of the Customizing Graphs chapter for a general discussion of graph templates.
One important subset of graph templates are what are called “cloneable” templates. A cloneable template requires a very specific data arrangement in your worksheet or matrix; the idea being that if you have once created a complex arrangement between worksheet datasets, matrix objects, etc. and, for instance, layers or panels in your graph, then you shouldn't need to recreate this arrangement every time you want to recreate such a graph. Cloneable templates are identifiable in the Template Library by the presence of a “sheep” icon next to the template name or thumbnail image.

For more information, see the section on cloneable templates in Graph Template Basics in your Origin Help file.
Themes
Dialog Box ThemesAnalysis ThemesGraphs, ThemesGraphs, Copy/Paste Format
An Origin Theme is a file containing a set of object properties or dialog settings. Thus for example, the customized settings of a graph window can be saved as a Theme, or the customized settings in an analysis dialog can be saved as a Theme. If you were to open the Theme Organizer (see below), you would see that there are tabs for Graph, Worksheet, Dialog, Function and System Increment Lists.
Themes allow you to quickly apply a new set of properties to an object, such as a graph. For example, you might apply a black-and-white Theme to a color graph in order to prepare it for publication. Or you might take the object properties of one graph and apply them to all the other graphs in the same project.
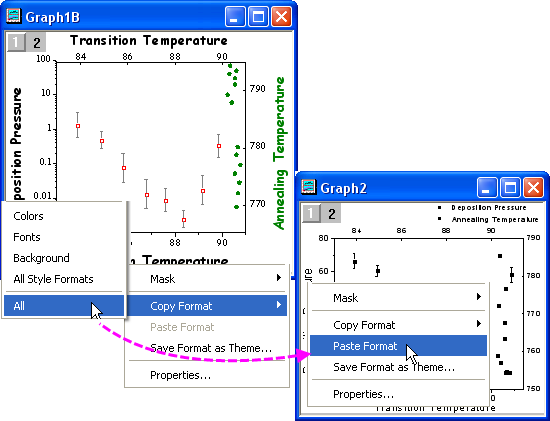
Right-click on plot, layer, object, etc. in graph -- or right click with nothing selected in graph -- and choose Copy Format context menu to copy format. Depending where you right click, the corresponding selection's format can be copied. Then right-click on corresponding selection or right click in target graph and click Paste Format to apply the copied settings to the target selection or graph. You can also choose Edit: Paste Format... to paste the Format to multiple target graphs.
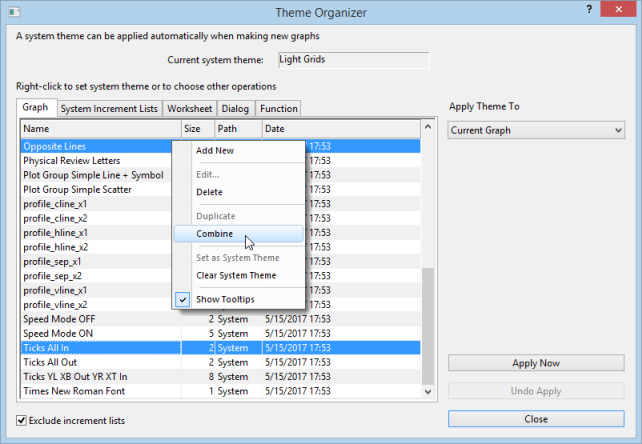
The Theme Organizer dialog box is opened from the Preferences menu. Use this dialog to organize your graph, worksheet, and dialog themes.Theme Organizer
With this dialog you can apply a graph theme to multiple graphs to have consistent look. To combine multiple graph themes in the Theme Organizer dialog, hold down Ctrl while selecting the Themes, and then right-click to access the Combine context menu. The context menu in the tool provides an option to edit a Theme, allowing the user to add/delete properties to an existing theme. Setting a Theme as a System Theme means that it will be applied to new graphs automatically, if the graph template allows a System Theme to override template settings (see the Allow System Theme & System Increment Lists to Override check box).
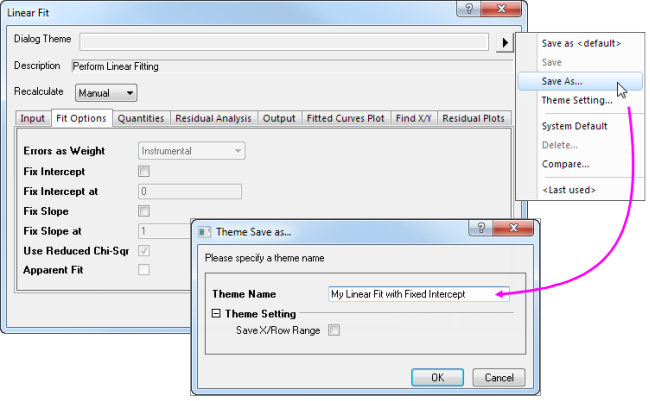
The Theme concept extends to dialog box settings, as well. For instance, you can choose a particular suite of settings in the Linear Fit dialog box (Analysis:Fitting:Linear Fitting), and then save those settings to disk as a named Theme file. You can save multiple Theme files for a given dialog box and then load them into the dialog, as needed, using the dialog box's Dialog Theme drop-down list. Saving multiple Themes for a dialog box allows you to customize your analysis routines from different experiments, when each requires using a specific (and unique) group of settings.
Dialog themes are explained in more detail in the How to Handle Repetitive Tasks chapter of this guide.
| You can select Graph: Graph Styles... in the menu main or click Graph Styles button  in Graph Page Mini Toolbar to open Theme Preview app for previewing and applying graph themes. in Graph Page Mini Toolbar to open Theme Preview app for previewing and applying graph themes.
|
Topics for Further Reading
|