4.4.17 Worksheet Query - Quick StartWks-Query-QS
The Worksheet Query dialog is used for row-wise selection, extraction or color-marking of worksheet data, according to a user-specified logical expression.
- Activate the worksheet and from the main menu choose Worksheet: Worksheet Query.
Setting Dialog Box Controls
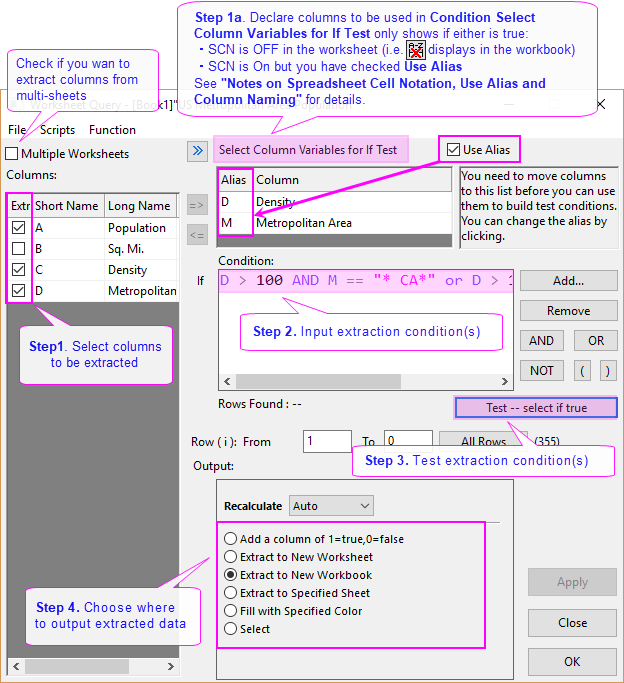
The following image shows the order in which you set controls in the Worksheet Query dialog box. Note that if either of the following is TRUE, you will need to perform Step1a:
- Spreadsheet Cell Notation is turned OFF in the workbook.
- Spreadsheet Cell Notation is turned ON in the workbook but you have opted to check the Use Alias box in the upper-right corner of the dialog box.
| Note:For the columns' information listed horizontally in the left panel, you can right-click any place within this panel to select the items you desired to show, such as Column Index, Short Name or Long Name of columns.
|
Notes on Spreadsheet Cell Notation, Use Alias and Column Naming
This tool predates the introduction of Spreadsheet Cell Notation (SCN) in Origin 2017. Previously, the use of an alias to represent the data column was an efficient alternative to use of actual column names. Aliases could be a single letter, whereas references to even the column Short Name required use of the col() function (e.g. "M<=0" vs. "Col(A)<=0"). The introduction of SCN meant that you no longer had to use the col() function to enclose column Short Name in the Set Values dialog or in cell formulas.
Beginning with Origin 2019b, when SCN is ON (default) and Use Alias is cleared, you can use the column Short Name directly in your If expression in Worksheet Query. This change simply adds more options for building your If expression. There is no "right" way to build your expressions but the following may help you decide what works best for you:
- If you have SCN turned OFF in the workbook (e.g. you have an older project file with customized column Short Names), you can continue to work as you always did. The Worksheet Query tool will look and work just as it always has.
- If you have SCN turned ON in the workbook (the default for all new workbooks in Origin versions 2017 or later), you will now see a Use Alias box in the upper-right corner of Worksheet Query. If you are familiar with Worksheet Query and like the alias option, you can check Use Alias and use the dialog as you did in versions prior to Origin 2019b.
- If you have SCN turned ON in the workbook and you prefer to use column Short Names or Long Names directly in your If expression, without declaring an alias, leave Use Alias unchecked and use the following forms:
- Use "A" instead of "col(A)". Expressions using "col(A)" will work but use of the col() function is unnecessary.
- To use column Long Names in your expression, you must enclose them with the col() function. If the Long Name contains spaces, you must enclose the Long Name in double-quotes (e.g. col("Population Density")<=100).
- If you like using the Add... button to add conditions to your If expression, check Use Alias, since Add... picks up whatever you have highlighted in the Select Column Variables for If Test field.
Simple Tutorial
- Use the Import Wizard to import the file \Samples\Data Manipulation\US Metropolitan Area Population.dat. The destination worksheet contains four columns: Population, Sq.Mi., Density, and Metropolitan Area.
- Select from the Origin menu to open Worksheet Query dialog box.
- If SCN is ON, or you have not selected Use Alias, skip this step. If SCN is OFF or if you have selected the Use Alias box, hold down the CTRL key and select Density and Metropolitan Area in the Columns: panel. Click the => button to move these columns to the Select Column Variables for If Test panel. Note that aliases D and M are assigned to the columns respectively.
- Clear the check box before Sq.Mi. in the Columns: panel so that this column will not be included in the extracted result.
- Enter ONE of the following formulas in the Condition box, depending on whether the Use Alias box is checked. Note: You can click the AND button instead of typing out A-N-D:
- D > 100 AND M == "* CA*" or D > 100 AND M = "* CA*" (SCN OFF or Use Alias IS checked, use Alias to represent data)
- C > 100 AND D == "* CA*" or C > 100 AND D = "* CA*" (SCN ON, Use Alias NOT checked, use Short Name to represent data)
- In both cases, this condition looks for population densities > 100 for all areas in California ("CA"). Note that this tool supports the wildcard symbol * inside strings.
- Click the Test -- select if true button. Notice that the number of found rows under the Condition box has been updated, and some rows in the worksheet are highlighted.
- Select Auto from Recalculate drop-down list to auto update the results if data changes.
- Select the Extract to New Worksheet radio button in Output: panel and then click the OK button. You will see that the extracted results are stored in a new worksheet in the source workbook.
What Can I Enter in Condition Text Box?
You can use column Names or Aliases and relational operators (>, <=, !=, etc.), arithmetic operators (+, -, *, /, ^) and logical operators (&& (AND), || (OR)) to construct your Condition (see this table).
You can also insert built-in functions using the Function menu; or you can create a user-defined function.
Numeric Data
| Examples
|
Descriptions
|
| T > 0
|
To extract rows with values of column Alias "T" that are greater than 0
|
| col("Population Density") > 1000
|
To extract rows with values of column Long Name "Population Density" that are greater than 1000
|
| A > 0
|
To extract rows with values of column Short Name "A" that are greater than 0
Note: The following syntax also works: col(A) > 0 or col(index) > 0 (where index is column index number).
|
| A.top(10)
|
To extract rows by the 10 largest values in column Short Name "A".
|
| N^2 != F
|
To extract rows with the square of values in column "N" (Alias or Short Name) not equal to values in column "F" (Alias or Short Name).
|
| A != -- (or A != NANUM)
|
To extract rows with no missing values and no text strings in column "A" (Alias or Short Name).
|
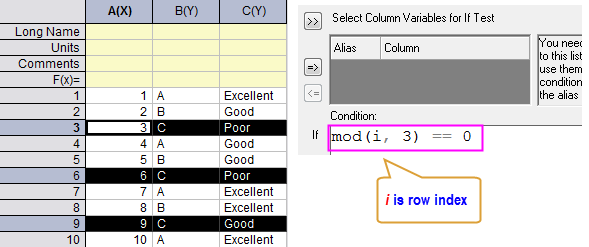
| mod(i, 3) == 0
|
To extract every 3rd row for all selected rows using mod() function, where "i" is the row index variable.
|
String Data
| Examples
|
Descriptions
|
| B == "*CA*" (or B = "*ca*")
|
To extract rows containing "CA" within the string, in a cell in column with Alias or Short Name "B". Note wildcard symbols such as * (string of characters) and ? (single character) are supported and string search is not case-sensitive.
|
| NOT(A="Tom" OR A="James")
|
To extract all rows except those that contain "Tom" or "James" in column A.
|
|
A != NANUM
OR A == "--"
OR A == ""
|
To highlight rows contain numeric data, string "--" and empty space in column with alias "A". Use the ENTER key to break expressions into multiple lines.
|
| isText(B)
|
To extract only rows that contain text strings in column with Alias or Short Name "B" using isText() function.
|
Date Data
| Examples
|
Descriptions
|
| frac(B) > Time(10:00:00) AND frac(B) < Time(11:00:00)
|
To extract data within time period 10:00 ~ 11:00 in column "B" using frac() and Time() functions.
|
| int(A) > Date(01/24/2004)
|
To extract data later than date 2004/01/24 in column "A" using int() and Date() functions.
|
Advanced Scripting Controls on Data Extraction
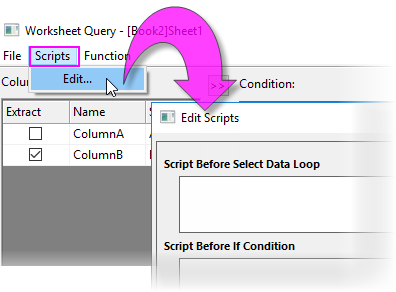
While its usage is optional, scripting increases the power of the Worksheet Query dialog. This box (Scripts: Edit...) takes one or more lines of LabTalk script and runs them before the expression in the Condition box is executed. This makes possible such things as pre-processing of input data, defining functions, variables and constants for use in the Condition box, etc.
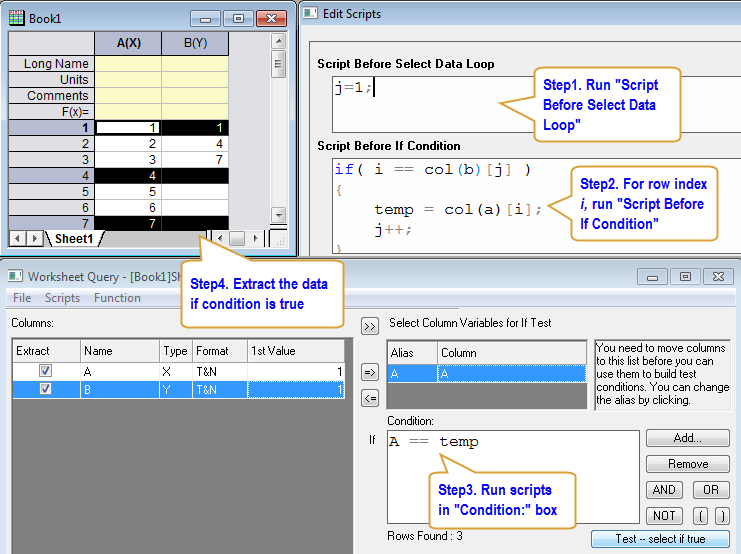
Origin actually runs the data query routine as follows:
- Run the Script Before Select Data Loop.
- Loop over all rows defined by the start and end values provided by user. For each column whose row index is i:
- Run the Script Before If Condition;
- Test the condition, for data in row i;
- Extract data if the condition is true;
- End query;
- End loop;
To show the query running routine, you can run the example below which is used to extract data in column A using indices in column B.
- Enter commands as shown below in Script Before Select Data Loop, Script Before If Condition and Condition: text boxes as shown in figure below.
- Click Test--select if true button and Origin will highlight row 1, 4, and 7 as illustrated.
Quick Examples
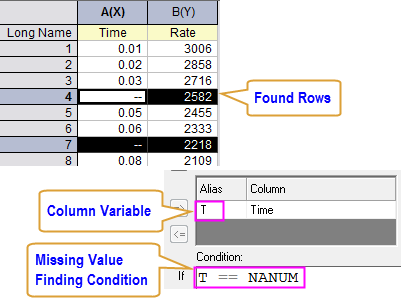
Delete Rows with Missing Values
- Use
 button to add column "Time" to Select Column Variables for If Test box. button to add column "Time" to Select Column Variables for If Test box.
- Input T == NANUM (NANUM denotes missing values) in Condition box.
- Click Test--select if true button to highlight rows with missing values in column "Time".
- Right click on any of the highlighted rows and select Delete from shortcut menu.
Extract Every Nth Row
- Input mod(i, 3) == 0 in Condition: text box where i is built-in row index variable and mod(m,n) returns the integer modulus of m divided by n.
- Click Test--select if true button to highlight and OK button to extract to new workbook.
Mask Outliers
This example is to show how to mask outliers using 25th and 75th percentiles.
1. Enter commands below in Script Before Select Data Loop text box.
pct = {25, 75};
Q1 = percentile(col(B),pct)[1];
Q3 = percentile(col(B),pct)[2];
IQR = Q3 - Q1;
UIF = Q3 + 1.5*IQR;
LIF = Q1 - 1.5*IQR;
2. Enter Y < LIF OR Y > UIF in Condition: text box.
3. Click Test--select if true button to highlight found outliers.
4. Right click on one of the highlighted rows and select Mask: Apply from appeared context menu.

See Also
|