23.2 Exporting Your Graph or Layout Page to an Image FileExpGraph-to-Image
Graphic image files fall into two categories:
- Raster formats define a fixed size array of (rows and columns) of colors. These formats take proportionately larger file space for increased detail and do not scale well. Raster file size is a function of resolution and color density. Raster formats are best used when you must reproduce graphs and layout pages with much detail and many colors, and where scalability is not a concern.
- Vector formats contain instructions on how to draw an image and may contain additional information about size and resolution. These formats scale well (within limits), but must be interpreted by a target application, and may be subject to error. File size is proportional to the complexity of the image. Vector formats are best used where scalability is needed.
Supported formats
Origin supports these 17 image export file formats:
| File
|
Extension
|
Format
|
|
Adobe Illustrator
 | Origin recently added support for .SVG files. If you export images for final editing in Adobe Illustrator, we strongly recommend the .SVG format.
|
|
(*.AI)
|
vector
|
|
Bitmap
|
(*.BMP)
|
raster
|
|
Computer Graphics Metafile
|
(*.CGM)
|
vector
|
|
AutoCAD Drawing Interchange
|
(*.DXF)
|
vector
|
|
Encapsulated PostScript
|
(*.EPS)
|
vector
|
|
Enhanced Metafile
|
(*.EMF)
|
vector
|
|
Graphics Image Format
|
(*.GIF)
|
raster
|
|
JPEG, Joint Photographic Experts Group
|
(*.JPG)
|
raster
|
|
Zsoft PC Paintbrush Bitmap
|
(*.PCX)
|
raster
|
|
Portable Network Graphics
|
(*.PNG)
|
raster
|
|
Truevision Targa
|
(*.TGA)
|
raster
|
|
Portable Document Format
|
(*.PDF)
|
vector
|
|
Adobe PhotoShop
|
(*.PSD)
|
raster
|
|
SVG, Scalable Vector Graphics
|
(*.SVG)
|
vector
|
|
TIFF, Tag Image File
|
(*.TIF)
|
raster
|
|
Windows Metafile
|
(*.WMF)
|
vector
|
Creating an image file
Graphs and layout page export uses the expGraph X-Function, the GUI tool being the expGraph dialog box. Settings in the expGraph dialog can be saved as a Dialog Theme thus allowing user to create multiple export Themes for repeated use. Beginning with Origin 2021, dialog settings are automatically saved with the graph on export. If you are are not exporting your graph immediately, you can save settings by clicking on the Dialog Theme flyout menu and choosing Save to <Graph>.
| Note: Since Origin 2021b, there is a simpler export tool Export Graph as Image which allows you to export the current graph window as a raster image file quickly.
|
Options controlled in the expGraph dialog:
- Output file format
- Option for exporting the active page, all pages in Project Explorer subfolder, all pages in the entire project, or specific named pages
- Option to use the page short name or long name as the name of the exported file, or to enumerate the exported file name for multi page export
- Ability to apply a system or user-defined graph theme "on the fly" to change properties of elements of the graph
- Ability to control the area of the page that is exported, such as removing borders outside of all objects on the page
- Image settings to control output image size in various units
- Image settings that are specific to the chosen output file format
Exporting a Graph or Layout Page (simple method)
- With the graph active, select File: Export Graphs. For layout windows, select File: Export Layout as Image. Either will open the expG2img dialog. This is a simpler tool to export the current graph or layout to a selection of common raster and vector image types.
- Click Preview to check export. Not available for Image Type = SVG.
- With the graph active, press hotkey Ctrl+Alt+G to export graph the same as Export Graph (Advanced) <last used>
Exporting a Graph or Layout Page (Advanced)
- With the graph active, select File: Export Graphs (Advanced). For layout windows, select File: Export Layout (Advanced). Either will open the expGraph dialog box.
- Choose an Image Type suited to your needs.
- Select a Page Option to export one or more graphs or choose Specified from this list and select specific Graph Pages using the Graph Browser button to the right.
- Choose a naming convention from File Names or type a name. If multiple graphs are being exported then the name will be enumerated.
- Choose a Path for your file(s) and decide if the export should Overwrite Existing files.
- In Export Settings you can apply a Graph Theme and specify the border limits of the graph (Advanced branch). Note that this process creates a temporary copy of a graph with the specified Export Settings applied and this temporary copy can be viewed in the Preview pane. If you wish to automatically preview the temporary copy, check the Auto Preview option.
- Image Settings provides options specific to your chosen export Image Type.
- When you are satisfied with your settings, click OK.
To View the Exported Graph
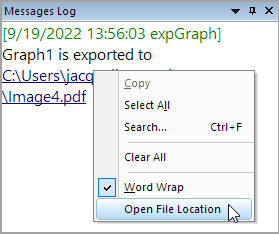
After export a graph, the path link of the graph will show in the Message Log. Click the link, it will open the graph in Origin build-in viewer directly.
Note:
- This internal viewer only support these formats: PNG, BMP, JPG and EMF . Other formats image will be open by system software.
- System variable @VID can control whether open the Origin internal viewer image dialog
|
To open exported file location, right click the path link of the graph, select Open File Location in Context menu, or press Ctrl key and click the path link of the graph.
| This section covers the following topics:
|
|