23.5 Creating Graph AnimationGraph-Animation
Introduction
A video or graph animation can be used to show a trend in a series of graphs, allowing real-time analysis and comparison of graphic results. Origin provides ways to manually select graphs or programmatically update data to create the animation video.
Manually Selecting Graphs as Frame
Origin provides a Video Builder tool to manually capture a series of graph windows, and write one frame at a time to a video (.AVI) file.

|
- Select the menu Tools: Video Builder....
- Enter a file name for the generated video and browse its location.
- Click the Start button to start adding graphs.
- Click the Add button to add the active graph as a new frame of the video.
- Click the Finish button to finish the recording and save the video file in the file location chosen previously.
|
Programmatically Updating Graphs as Frame
Videos can be created using LabTalk script or Origin C code, by programmatically computing or updating data and then writing out the graph as a frame in the video, at each step during the computation.
 | For specific examples of programmatically created movies, including Origin Projects and code, please visit the Animation Gallery.
|
Video Builder
The Video Builder dialog
This dialog will be brought up when a file name and location of the generated video are specified for the first time.
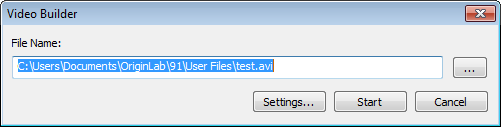
The text in the File Name box shows the file path and file name of the video which will be generated. It is possible to edit both by direct typing or clicking the Browse for File button  to the right of the text box. to the right of the text box.
There are three buttons in the dialog:
| Settings
|
Open the Video Settings dialog.
|
| Start
|
Start to add graphs as frames.
|
| Cancel
|
Close the dialog without creating the video.
|
Once you click the Start button, the video builder dialog shrinks and you can start adding graphs as frames.
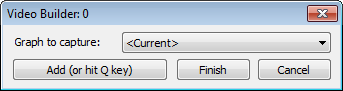
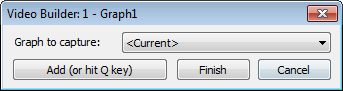
The title bar shows the current number of frames/graphs that have been added. In case more than one graph has been added, the graph window name of the last-added graph will also be shown in the title bar.
There are a dropdown list three buttons in the dialog:
| Graph to capture
|
Select the graph window that you want add to the video in the active folder. By default, it is set to Current, so you can click on the graph window directly to select the added graph.
|
| Add (or hit Q Key)
|
Add the active graph window as the current frame to the video. Also, can use the hotkey Q to add the frame.
|
| Finish
|
Finish the adding graphs process and create the video.
|
| Cancel
|
Close the dialog without creating the video.
|
| Notes: This is a modeless dialog, you can browse to other folders or even open a new Origin project to activate graph windows.
|
The Video Settings dialog
This dialog is used to set the video properties.

| Video Width
|
Specify the width of the video in pixels, default value is 800.
|
| Video Height
|
Specify the height of the video in pixels, default value is 600.
|
| Keep Aspect Ratio
|
Specify whether keep aspect ratio when creating graph animation.
|
| Alignment
|
Specify the alignment method of the video, default option is Center. Also, the alignment method can be set to Top/Left or Bottom/right.
|
| Frames Per Second
|
Specify number of frames in one second, default value is 1, ranged from 0.001 to 120.
Note: Only a few compression methods (codecs) support a Frames Per Second value of less than 1.
|
| Compression
|
Specify the compression method of the generated video, default option is Uncompressed and other options are the auto-detected methods supported in the computer environment.
|
|