23.3 Using the Layout Page WindowExpGraph-Layout-Window
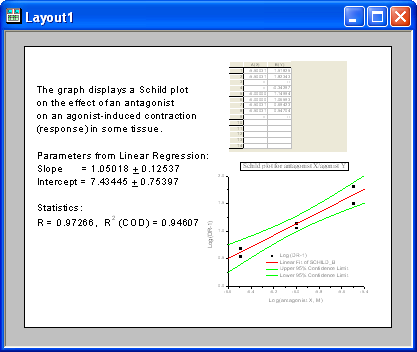
The layout page window acts as a "display panel" for worksheets and graphs which are created and edited in separate child windows. And you can also add graph objects into the layout window. Arrange the pictures and objects in the layout page window to create a custom presentation to print from Origin or to export to the Clipboard or a graphic file.
- Select File: New : Layout to create a blank Layout window.
Or
- Click New Layout button
 in the toolbar. in the toolbar.
Note: Layout page windows are named Layout1, Layout2, etc.
Adding a graph or a worksheet picture to the layout page window
To add a graph or worksheet to the layout page window:
- From the menu, select Insert: Graph or Insert: Worksheet when the layout page window is active (or right-click on the white space in the layout window to select Add Graph or Add Worksheet context menu). These actions open the Graph Browser or Sheet Brwoser dialog box.
- Select the graph or worksheet in the list box provided.
- Click OK.
- Click once in the layout page window to create a picture of the default size.
- or
- Drag out a box in the layout page window to create a picture of the specified size (the size of the rectangle that you drag out with your mouse). Release the mouse button and a picture (object) of the associated graph or worksheet is displayed.
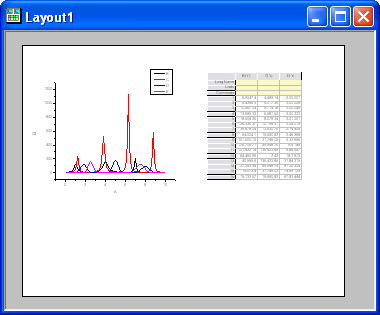
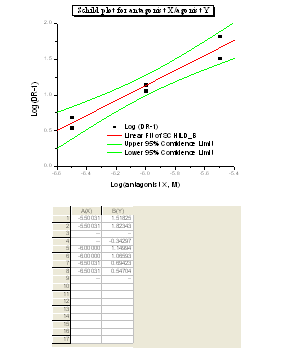
If the source window is a worksheet window, the worksheet grid and cell values display as a picture in the layout page window. Text labels in the worksheet window will not display in the layout page window.
If the source window is a graph window, all graphics within the graph page display in the layout page window. Text labels and other objects display in the layout page window if at least part of the object is inside the graph window page (The gray area in the graph window is outside of the page).
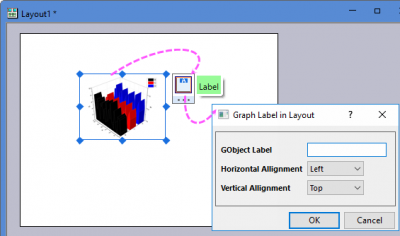
Once you have add a graph onto the layout window, clicking on the graph object will pop up a mini toolbar with Label button which can be used to add a label into the graph object wityh specified alignments.
 | If you are using the Layout window to aggregate and arrange color-mapped graphs (e.g. contour or surface plots) that use a common color scale, note that as of Origin 2019, you can add an independent color scale to the Layout window. For more information, see Adding an independent color scale.
|
Selecting pictures
- To select a picture in the layout page window:
- Click on the picture.
or
- Alternatively, drag a box around the picture with your mouse (with Pointer tool
 selected). selected).
- Release the left mouse button and a highlighted boundary with control handles displays around the picture.
To de-select the picture, click anywhere in the layout page window (off of the picture).
- To select more than one picture:
To select more than one picture in the layout page window:
- SHIFT+click on the pictures.
or
- Drag a box around the multiple pictures using the Pointer tool.
Sizing pictures
- To change the size of the picture in the layout page window:
- Click on the picture to display its bounding box with control handles.
- Drag the control handles to resize the picture.
- Use the control handles on the horizontal or vertical sides to change the respective dimensions. Use the control handles at the corners to resize proportionally (keep aspect ratio).
- Click off the picture (but inside the layout page window) to de-select the picture. Note that access to resizing and positioning of the object can be blocked by settings in the object's Object Properties dialog box. (To open the Object Properties dialog box, double-click on the object in the layout window. The Control tab controls editing access to the object.)
Notes on sizing of pictures
- To ensure that the picture's proportions are not changed during future sizing, make sure that Keep Aspect Ratio is checked on the shortcut menu or select the Keep Aspect Ratio check box on the Dimensions tab in the picture's Object Properties dialog box (double-click on the layout page picture to open this dialog box).
- Alternatively, to preserve the aspect ratio during resizing, press the CTRL key while dragging on a control handle. Drag the control handle to the desired location. Release the CTRL key and the mouse button to display the resized picture.
- Reducing or expanding the size of a worksheet picture in the layout page window controls the display of the number of rows or columns in the picture.
Preserving size when pasting objects between layouts
When added to the layout window, these objects will have Units expressed as % of layer (Object Properties > Dimensions tab):
- Certain image objects (EMF, BMP, DIB, OIMAGE and SVG) pasted to the layout window.
- Graphs (GPage) and worksheets (WBook) added via the layout page shortcut menu.
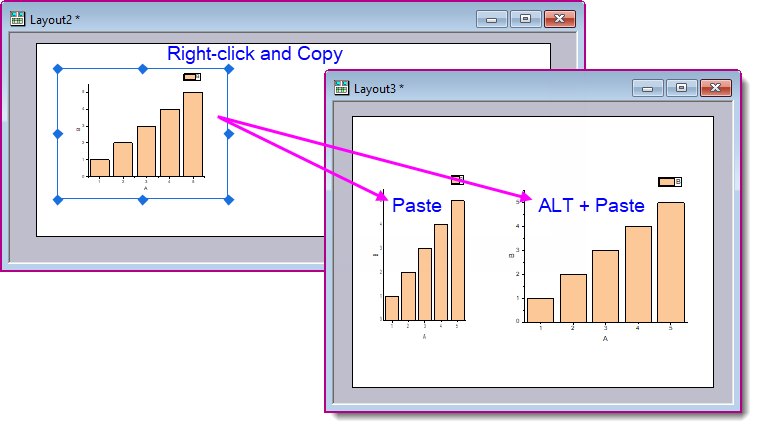
Thus, when pasting objects between layouts of the same page Dimensions, the size and aspect ratio of the copied objects are kept. However, this also means that when pasting these objects between layouts of different Dimensions, objects may appear distorted or resized.
To keep the absolute size of the original copied image, graph, or worksheet object when copying and pasting between layouts of different sizes, press the ALT key before choosing Paste in the target layout window.
Moving and aligning pictures
- To move the picture in the layout page window:
- Click on the picture and drag it to a new location.
- Click off of the picture (but in the layout page window) to de-select it.
You can also position and resize the picture using controls on the Dimensions tab of the Object Properties dialog box:
- Double-click on the picture to open the Object Properties dialog box.
- Select the Dimensions tab.
- Edit the settings in the Units drop-down list and the Size text boxes.
- To align objects (text, images, etc.) using the layout grid:
- With the layout page active, choose View:Show Grid or click near the top of the window and when you see the Mini Toolbar prompt
 , click and then click the Show Grids button. , click and then click the Show Grids button.
- To snap objects to the grid, select Format:Snap to Grid or check the Snap to Grid option on the Mini Toolbar Show Grids menu.
| Layout grid color can be modified using the color() function and the @GCL system variable. Open the Script Window (Window: Script Window), type the following and press Enter (substituting your RGB values for those in the script).
@GCL=color(R, G, B, 1)
If the grid is already displayed, press F5 to see the change.
|
- To align pictures using the Object Edit toolbar:
Use the Object Edit toolbar (View:Toolbars) to align pictures (or any other objects) in the layout page window. The buttons on the Object Edit toolbar control the movement of any active object(s) in the window.
- To make an object active, click once on the picture.
- To make more than one picture active, SHIFT+click on the desired pictures, or drag a box around multiple pictures to select them all.
- To align pictures using the Object Properties dialog box controls:
- Double-click on the picture to open the Object Properties dialog box.
- Select the Dimensions tab and edit the Left or Top values in the Position group. Manually edit these boxes for multiple objects to precisely align them vertically or horizontally.
Editing pictures
To alter the display of the picture in the layout page window, edit the source graph or worksheet child window.
- To edit the source graph or worksheet window:
- Right-click on the picture in the layout page.
- Select Go to Window from the shortcut menu.
After changing the display of the graph or worksheet, click on the layout page window to see your changes. If the layout page window does not update, select Window:Refresh, or click the Refresh  button on the Standard toolbar. button on the Standard toolbar.
Adding a background to a picture
As with other objects, you can add a background display to the picture in the layout page window.
- To add a background display to the picture:
- Double-click on the picture to open the Object Properties dialog box.
- Select the Image tab.
- Select the Background check box and choose a background from the drop-down list.
|
Note: You can apply this background to individual or to every object in the window. However, once applied to every object in the window, the background display can only be removed from objects individually.
|
Copying/Pasting Format context menu for graph object on Layout window
You can copy format of a graph object and paste the format to another graph object. For example,
- Open a layout page, and then add two text object "test1" and "text2" on the layout page.
- Right-click the text object "test1" to select Properties... to open the Object Properties dialog.
- Select Shadow for Background drop-down list. Click OK to close the dialog.
- Right-click the object "test1" to select Copy Format: Background from the context menu.
- Right-click the object "test2" to select Paste Format from the context menu. The background format of object "test1" will be applied to object "test2".
Increasing redraw speed in a layout page window
There are two ways to increase the redraw speed of the layout page window.
- To show picture placeholders:
- Click to select the picture.
- Select Layout:Set Picture Holder.
A check mark appears next to the this menu command when a placeholder displays for the selected picture.
To disable the placeholder display:
- Click to select the placeholder.
- Select Layout:Clear Picture Holder.
- or
- Clear the Use Picture Holder check box on the Image tab of the picture's Object Properties dialog box or right-click on the object and Clear Picture Holder.
Picture placeholders can be moved and sized like pictures. You can double-click on the placeholder to open the objects Object Properties dialog box. Changes made to the Background drop-down list are visible when you disable the picture placeholder display.
|
Note: Pictures print out regardless of the display of picture placeholders.
|
- To display the pictures in fast Page View mode:
You can choose to display all pictures (and additional objects - text, drawing, etc.) in the layout page window in the Page View mode, regardless of the view mode of the picture's child window. The Page View mode provides faster screen updating than the Print View mode. To display pictures (and objects) in the layout page window in the Page View mode:
- Select Layout:Global Speed Control.
or
- Right-click in the layout page window (but off the page) and select Global Speed Control from the shortcut menu. This menu command is checked when displaying pictures in Page View mode. To disable this command, reselect Global Speed Control.
Because the Page View uses the screen driver to generate the display (Print View uses the printer driver), text placement may not be accurate in the layout page window when the Global Speed Control menu command is selected. This should not be too problematic as editing is actually done in the associated child window. Check text placement in the child window by selecting View:Print View when the child window is active. Pictures in the layout page window should print just as they appear in the child window Print View mode.
Updating the changes to the worksheet object in Layout or Graph window
When the column width/row height, font color, filled color, etc. are changed in the source worksheet, you can right-click on the worksheet object in the Layout or Graph window and select Update from the context menu.
You can also update the Layout or Graph window by clicking the Update button in the Programming tab of Object Properties dialog.
Fitting the layout page size to all objects
To expand the layout page size to encompass all inserted objects, you can
- With a layout window activated, select Format: Fit Page to All Objects to open the Fit Page to Layers dialog.
- Set the margin for the layout page.
- Click OK button to apply the page size and margin.
|