6.3.1 Customizing the ASCII Import OptionsImpASC-Options
If your ASCII file structure is simple and does not have complex features such as header lines with parameters to be extracted, your files can be imported using either the Import Single ASCII method or the Import Multiple ASCII method. You will still have the option to customize the import settings using controls in the impASC dialog box. Once the needed adjustments are made to ASCII import options, you can save the settings in one of two ways:
- As a Theme file to disk. Saving as a Theme file to disk allows you to recall that theme later to import similar files of identical structure, with the saved settings.
- With the template. Once you import, customized settings are saved by default to <sheet> and become part of the worksheet. This option is suitable for Batch Processing of multiple files using Analysis Templates.
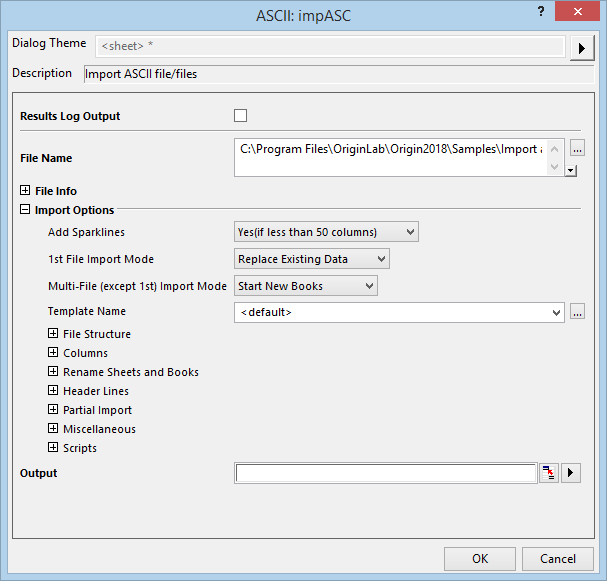
To open the impASC dialog box (see the picture below), choose Data: Import from File: Multiple ASCII or Data: Import from File: Single ASCII. Check the Show Options Dialog in the ASCII dialog, and then select the import file(s) and click OK.
Note: If you have opened a Workbook Template and wish to save these settings with the Workbook Template, you must resave the template (File: Save Template As).
Import Options
| Add Sparklines
|
Specify whether to add the sparklines for the imported data.
- No: Do not add sparklines for the imported data.
- Yes: Always add sparklines for the imported data.
- Yes(if...):If the imported data are less than 50 columns, add sparklines.
|
| 1st File Import Mode
|
This setting determines where the imported data are added:
- Replace Existing Data
- For single file, it will replace the existing data in active worksheet. For multiple files, the 1st file will replace the existing data in active worksheet and other files will start new workbooks (with template if specified in Template Name drop-down list) to import the data.
- Start New Books
- Import data into a new workbook for each file.
- Start New Sheets
- Import data into the existing empty sheets after the active sheet. If there is none, new sheet will be created. A maximum of 1024 sheets can be added to a book before a new book will be created.
- Start New Columns
- Start new columns for each file starting from 1st empty column. The headers of each file will be appended to their corresponding columns as Long Name, Units, etc.
- Start New Rows
- Start new rows for each file starting from 1st empty row. Only the headers of the last file will be appended to columns as Long Name, Units, etc.
|
| Multi-File(except 1st) Import Mode
|
Import mode for files number 2 to n.
- Start New Books
- Import data into a new workbook for each file.
- Start New Sheets
- Import data into the existing empty sheets after the active sheet. If there is none, new sheet will be created. A maximum of 1024 sheets can be added to a book before a new book will be created.
- Start New Columns
- Start new columns for each file starting from 1st empty column. The headers of each file will be appended to their corresponding columns as Long Name, Units, etc.
- Start New Rows
- Start new rows for each file starting from 1st empty row. Only the headers of the last file will be appended to columns as Long Name, Units, etc.
|
| Template Name
|
For data import, a workbook template (*.otw) or an analysis template (*.ogw) can be used. You can type a template name with its file extension in this field or click the browse button to select one. Template Name is only available when Import Mode is Replace Existing Data, Start New Books or Start New Sheets:
- By default, an Origin prototype workbook template <default> is used.
- The <clone> uses the active workbook as the template to import files into duplicates of current worksheet/workbook.
- Beginning with version 2018b when you choose <clone>, analyses that involve recalculation operations with imported data do not have to be set to Auto. Recalculation is triggered automatically regardless of the analysis tool's Recalculate mode. This change does not apply to named templates used for data import. When using a named template, you must ensure that your operation is set to Auto update.
|
Header Lines
| Auto Determine Header Lines
|
Select this checkbox if you want Origin to determine the number of main header and sub header lines automatically.
Header lines typically are not structured in the same way as the data. Subheader lines are typically structured the same way as the data (i.e. same delimiters or fixed column structure).
Clear this checkbox if you want to specify these two values by yourself.
|
| Line Numbers Start From Bottom
|
Selecting this checkbox, causes the line numbers for Short Names, Long Names, Units, Comments From/to, System Parameters From/To, User Parameters From/To to count upward from the bottom of subheader sections.
Clear this checkbox, to count from the top down.
|
| Main Header Lines
|
Some files -- particularly those generated by lab instrumentation -- will have header information in the beginning of the file that typically identifies the instrument, the operator, the date, the sample number, etc. These are the main header lines. You can specify how to determine the number of main header lines with this control.(Note: This control is available only when Auto Determine Header Lines checkbox is cleared.)
- Fixed Number
- Select this radio box, and then enter the number of the main header lines in the following Input Number text box.
- By Leading Character
- Select this radio box to enter the leading characters to detect the header lines which started with the characters you entered in the following Input Leading Character text box. This control is available since Origin 2018b.
|
| Number of Subheader Lines
|
This control is available only when Auto Determine Subheader Lines checkbox are cleared.
You can use this list to specify the number of subheader lines of your file.
|
| Long Names
|
Specify lines of the ASCII file header to be read into worksheet column label rows.
Choose <none> to leave a particular label row empty.
|
| Units
|
| Comments From/To
|
| System Parameters From/To
|
| User Parameters From/To
|
| Composite Header Line No.
|
If your import file header has names and units on the same line (e.g. Wavelength (nm), Intensity (a.u.)), specify the subheader line, then use Composite Pattern to indicate how the header information should be read.
|
| Composite Pattern
|
Choose an option to parse the composite header line; or default <auto> which scans for the following paired tokens ("()", "[]", "{}"), single tokens ("/", "-", "#") or repeated tokens (e.g. "###") and parses the header line accordingly.
|
File Structure
| Data Structure
|
ASCII Data Structures are of two types:
- Delimited - Single Character, Delimited - Multiple Characters: files in which data columns are delimited by a character or multiple characters (typically a comma, tab or white space).
- Fixed column widths: files of fixed column width.
Origin can usually "guess" the correct data structure when importing simple ASCII files, but may have difficulty with some files. When files are not correctly imported, use these controls.
|
| Delimiter
|
Available only when you choose Delimited - Single Character. Specify, Tab/Space, Tab, Comma(,), Semicolon, Space, Unknown or Other.
- If Unknown, Origin will search your file for a repeating delimiter.
- If Other, an Other Delimiters field is added (see next).
|
| Other Delimiters
|
When both the following are true ...
- Data Structure = Delimited - Single Character
- Delimiter = Other
... use the Other Delimiters box to enter the delimiting character (e.g. ':' or '/'). Note that multiple delimiters are accepted. In this case, see the Treat Consecutive Delimiters as One box (next).
|
| Treat Consecutive Delimiters as One
|
When all the following are true ...
- Data Structure = Delimited - Single Character
- Delimiter = Other
- You have entered multiple delimiters into Other Delimiters
... check this box to treat those multiple characters as a unit. If you DO NOT check the box, multiple characters will be interpreted as a list of acceptable delimiters and any matching character, or a matching sequence of characters, will be treated as a delimiter.
|
| Multiple Characters
|
Available only when Data Structure = Delimited - Multiple Characters. Enter an ordered sequence of delimiters (no spaces and no comma separators unless these are to be considered as delimiters). A matched sequence will be treated as a delimiter.
 | To enter a {tab} character into this text box, open Notepad and press the Tab key. Select the entire entered space and then copy and paste the result to the text box.
|
|
| Column Widths
|
For a fixed column width file, set Data Structure to Fixed Column Widths and specify the width in the Column Widths field. Note that you can specify varying column widths by separating each with a comma. If the number of data columns exceeds the number of column width values, Origin uses the last value to set the width for all remaining columns. If you enter a single width value, Origin sets all columns to that width.
|
| Numeric Separators
|
Numeric separators vary by language. The default <auto> in this list directs Origin to use the Separator for ASCII Import setting on the Preferences: Options > Numeric Format tab . Unless you have specified otherwise, Separator for ASCII Import will be Window Settings - the decimal and grouping separators of your Windows Regional settings. Other options allow you to specify an alternate scheme to use when importing your simple ASCII files into the active workbook.
|
| Custom Date Format
|
Select a date format from the drop-down list, or type in a custom date format string. For more details, please see the Custom Date Format page.
|
| Custom Time Format
|
Select a time format from the drop-down list, or type a custom time format string. For more details, please see the Custom Date Format page.
|
| Transpose Data
|
This check box is used to specify whether to transpose the data during import.
|
Columns
| Number of Columns
|
Specify n number of columns for import. If the file you are importing contains more than n columns, only the first n columns are imported. If the file contains less than n columns, the entire file is imported without creating additional (empty) worksheet columns.
When 0 is selected from the list, Origin imports all columns in the file.
|
| Auto Determine Column Types
|
When this checkbox is selected, Origin automatically determines whether each column contains text or numeric data and sets each worksheet column's Format accordingly.
When the check box is cleared, Origin retains the Format settings of the target worksheet columns. In this case, the input format should be consistent with the worksheet column format to avoid data loss.
|
| Min Number of Consistent Lines to Determine Data Structure
|
Specify a minimum number of consistent lines to determine data structure. When this number of lines are found to have the same structure, this structure will be used as the data structure for the whole file.
|
| Max Number of Consistent Lines to Determine Consistent Structure
|
Enter a number which exceeds the number of header rows but is less than the number of lines in the file.
|
| Column Designations
|
Apply Origin column plot designations to imported worksheet data. Make a selection from the drop-down list, or type a pattern of designations directly. This option supports the column designation syntax (including repeat designations) in the same manner as the Import Wizard. Refer to this help page for more details.
|
File Name
| Auto Rename Using File Name
|
If it is checked, Origin will use the default settings to rename the worksheet and workbook name, which is:
- Use the whole filename (excludes the file extension) as worksheet name.
- Use the whole filename (includes the file extension) as Workbook Long Name if current workbook is empty or the import mode is Replace Existing Data.
|
| Rename Sheet with (Partial) Filename
|
Renames the target worksheet with the file name. If a sheet of the specified name already exists, a number is appended to the sheet name. This checkbox is available only when the Auto Rename Using File Name checkbox is selected.
|
| Trim Filename From/To
|
Use these two text boxes to specify the part of filename that is used to rename the worksheet.
|
| Rename Book with (Partial) Filename
|
Renames the target workbook with the file name. This checkbox is available only when the Auto Rename Using File Name checkbox is unchecked.
|
| Trim Filename From/To
|
Use these two text boxes to specify the part of filename that is used to rename the workbook.
|
| Rename Long Name for Book only
|
Check this to rename the Long Name for workbook only.
|
| Include File Path when Renaming Book
|
When this is checked, the import file path is appended to the workbook name.
|
| Append Filename to Workbook Comment
|
Appends file name to the workbook comment.
|
| Append Filename to Worksheet Comment
|
Appends file name to the worksheet comment.
|
| Append Filename To Column Comment
|
Appends file name to the worksheet's Comments header row. If the Comments row is hidden, it will be shown automatically. The value repeats for every column imported and is useful when import mode for multiple files is New Columns.
|
| Add Filename User Parameters Row
|
When this is checked, the file name is put to user parameter row SourceFile.
|
| Include Path when Appending Filename
|
When this is checked, the import file path is included with the file name.
|
Partial Import
| Partial Import
|
This drop-down list is available only when Multi-File (except 1st) Import Mode is set to Start New Columns.
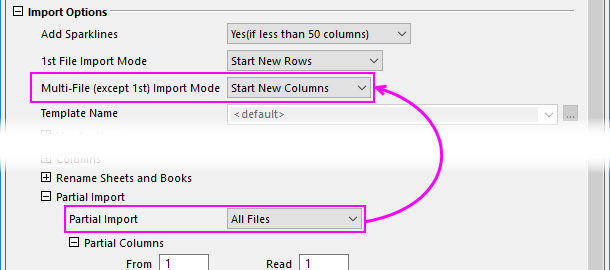
- All Files: Apply the partial import settings for all selected files.
- From 2nd File On: Apply the partial import settings for all selected files except the 1st file.
|
| Partial Columns
|
This branch controls how to partially import files by column.
- Specify the start and end column index which will be imported.
- When you specify a number l for Read and a number k for Skip, l columns are imported and k columns are skipped for every l+k columns.
- For Custom, see Partial Import and Re-import for the notation used to specify column selection.
|
| Partial Rows
|
This branch controls how to partially import files by row.
- Specify the start and end row index which will be imported.
- When you specify a number l for Read and a number k for Skip, l rows are imported and k rows are skipped for every l+k rows.
- For Custom, see Partial Import and Re-import for the notation used to specify row selection.
|
Miscellaneous
| Text Qualifier
|
Specify the text qualifier.
- There is no qualifier used.
- The qualifier is ".
- The qualifier is '.
|
| Remove Text Qualifier from Quoted Data
|
Select the box to remove quotes upon file import.
|
| Remove Leading Zeros from Numbers
|
Removes zeros from zero-padded data (data with leading zeros).
|
| When Non-numeric is Found in Numeric Field
|
The When Non-numeric is Found in Numeric Field list selection controls how Origin proceeds if non-numeric information is encountered in a numeric column below the header lines. Select an option from the associated drop-down list:
- Terminate Import
- Skip
- Read as Text
- Start New (hidden) Workbook
- Start New Worksheet
- Start New Column
For further information, see Non-Numeric Data in a Numeric Field Controls.
|
| Allow Import All Text Data
|
Specify whether to allow importing all text data.
|
| Save File Info. in Workbook
|
Specify whether to save the file information to the workbook, which can be seen from the Workbook Organizer. Storing the file information requires extra time, so you might consider clearing this option to improve the import speed for multiple files.
|
Script
| Script after Each File Imported
|
LabTalk scripts entered in this edit box will be run after each file is imported.
|
| Script after All Files Imported
|
LabTalk scripts entered in this edit box will be run only once after all files are imported.
|
|