6.1 Importing from ExcelImport-Excel
Importing Excel Data using the Excel Data Connector Dialog
Data Connectors are a relatively new general import mechanism. From Origin 2021b, the Import Excel toolbar button has been re-coded to use the Excel Connector, in place of the older impMSExcel routine.
- With a worksheet active, choose Data: Connect to File: Excel; or click the Import Excel button
 on the Import toolbar at the top of the workspace. on the Import toolbar at the top of the workspace.

- If your Excel file has multiple sheets, specify one Excel Sheet (you will have the chance to connect additional sheets after the connection is made), or <All> sheets to connect.
-
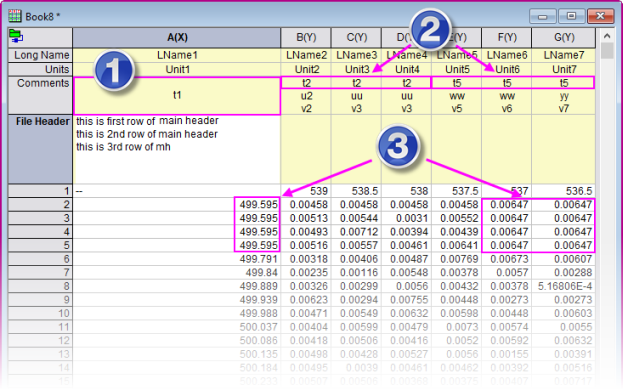
- The Auto box is checked for Main header lines, by default. Header lines will be added to a File Header label row.
- If you clear Auto and enter the number of Main header lines, an additional Save file header to drop-down is added to the dialog. Use this to specify saving header info to the Worksheet label area or the Book organizer.
- When sub-header lines are detected, the Column Labels box is checked and Long Name and Units rows are automatically specified. To manually specify the location of Column Labels, including Comments From and Comments To, edit the accompanying combo boxes.
-
check Partial Import and enter ranges for Column and Row following the in-dialog examples or by referring to the Custom syntax outlined in this table.
-
check Import Raw Formalu check box to import with Excel formula. Otherwise the result values will be imported directly. Note that some Excel formula are different/missing in Origin, which will return "#NAME?" (missing value). See Excel and Origin Functions Comparison for reference.
-
- To add sparklines on import, click the Other Options button (to the left of OK) and select a radio button. To disable sparklines on import, set @IMPS = 0.
- To run LabTalk scripts after import for post-processing, click the Other Options button and enter the scripts in the Post Import LabTalk Script edit box.
- For merged cells in the label rows that are designated as Comments in Excel Import Options, (1) vertically-merged values are imported as one value; (2) horizontally-merged values are duplicated across merged cells.
- Merged cells in the data area (3) are not kept; merged cell values will be duplicated across merged cells.
- If you choose to import one sheet during import, after the file is imported, you can Add and Connect Sheet(s) to add other sheets in your Excel file using the the Data Navigator panel. Note that you can select multi-sheet in the Data Navigation to import them at once.
- Drag-n-Drop to import an Excel file will use the <last used> settings in the Options dialog. So if your Excel file has multi-sheet and you choose to import <All>, then later you can use D&D to import all sheets in a new file. If you choose to import one sheet and later import by D&D, the same sheet will be imported. If the new file doesn't have such sheet name, first sheet will be imported.
Importing Excel Data using the impMSExcel X-Function Dialog
 | Beginning with Origin 2021b, clicking the Import Excel button will open the Excel Import Options Data Connector dialog box. To revert to previous behavior where this button opened the impMSExcel dialog box, set LabTalk system variable @TIB = 2. To change the value of a system variable, see this FAQ.
|
To import an Excel file:
- Select Data: Import from File: Excel (XLS, XLSX, XLSM)..., or click the Import Excel button located in the Standard toolbar. This opens the Excel dialog box.
- Add your files one at a time or press CTRL or SHIFT to select multiple files, and click Add File(s). After choosing all the files, click the OK button. For more information about this setting, please see below.
- Make necessary adjustments in the impMSExcel dialog box, then click the OK button to import the files into Origin.
Additional Excel dialog box controls
- Use the Remove File(s) button to remove selected files from the import file list.
- Click the buttons (see the picture below) over the import file list to sort the files by File Name, Size or Modified date.
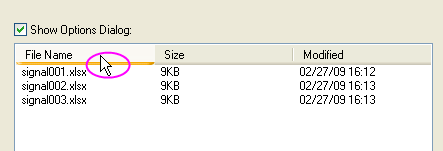
- Origin opens a secondary dialog box -- the impMSExcel dialog box -- when you click the OK button.
To re-import one or multiple Excel sheets:
From Origin 2015, you are allowed to re-import multiple sheets from Excel to Origin. During Excel re-importing, a link is maintained so that Origin is able to use up-to-date data.
To re-import Excel files, go to Data: Re-Import Directly or use Ctrl+4 keys to re-import Excel sheets with same settings as before. Or you can go to File: Re-Import... to bring up dialog box to change import settings for files to be re-imported.
You can also type command reimport -d in command window to re-import Excel files.
 | One advantage of the Excel Connector (and Data Connectors, in general) is that it can be automatically configured to update your project upon data changes in the connected Excel file. See Working with Microsoft Excel for information.
|
The impMSExcel dialog box allows more controls over the way in which .XLS or .XLSX or .XLSM files are imported:
| File Name
|
The File Name box lists all the files that have been chosen in the Excel dialog. Note that you can click the Browse button to the right to re-select your files.
|
| File Info
|
Node gives file size and sheet structure of selected excel file(s):
- The read-only Info box shows the size of the Excel file.
- All sheets in the Excel file are shown. Choose sheet(s) to be imported using the check box next to each sheet.
|
| 1st File Import Mode
|
Import mode for the first file to be imported. Choose from:
- Replace Existing Data to import data by replacing the existing Excel data in target window.
- Start New Books to import the first file to a new workbook.
- Start New Sheets to import the first file into the empty sheets following the active sheet, if it exists; Otherwise, import file into new sheets following the active sheet. A maximum of 1024 sheets can be added to a book before a new book will be created.
- Start New Columns for Each Sheet to import each sheet in the first Excel file as new columns in the specified worksheet.
- Start New Books for Each Sheet to import each sheet in the first Excel file into a new book.
|
| Multi-File (except 1st) Import Mode
|
Import Mode for files after the first file. Choose from:
- Start New Books to import each file to a new workbook.
- Start New Sheets to import files into empty sheets following the active sheet in the workbook into which data were first imported, if it exists; otherwise import file into new sheets following active sheet. A maximum of 1024 sheets can be added to a book before a new book will be created.
- Start New Columns for Each Sheet to import each worksheet in the Excel file as new columns to the Origin worksheet into which the first file was imported.
- Start New Books for Each Sheet to import each sheet in file(s) following the first Excel file, into a new book.
|
| Template Name
|
For data import, a workbook template (*.otw) or an analysis template (*.ogw) can be used. Select a template from the list, or click the browse button.
- By default, an Origin prototype workbook template <default> is used.
- Origin also provides a special template named <clone>, which allows importing data files into a worksheet/workbook cloned from active worksheet/workbook.
Note: when importing a multi-sheets Excel book into the specified workbook template which contains empty worksheet(s), you can refer to system variable @ISE for additional control over importing behavior.
|
| Column Designations
|
Apply Origin column plot designations to imported Excel workbook data. Make a selection from the drop-down list, or type the designation directly. This option supports the column designation syntax (such as repeat designations) same as Import Wizard. You can refer to this page for more details.
Note: the specified column designation will be applied to all sheets automatically.
|
| Add Sparklines
|
Add sparklines for the data:
- No: disable sparklines.
- Yes: to add sparklines.
- Yes(if less than 50 columns) to add sparklines if there are less than 50 columns.
|
| Import Cell Formats
|
Specify whether to import cell formats (text color, font, cell height, .etc) in the Excel file.
|
| Maximum Number of Empty Columns (-1 for all)
|
Specify the maximum number of empty columns that will be imported into Origin.
|
| Exclude Empty Sheets
|
Specify whether input the empty sheets into target window. If it is chekced, empty sheets will not appear in the File Sheet(s) branch under the File Info branch.
|
| Apply Header to All Sheets
|
Specify whether apply the header settings in the Header Lines branch to all Excel sheets.
|
| (Re)Naming Worksheet and Workbook
|
Specify how to rename the worksheet and workbook.
- Auto Rename Using File Name: If it is checked, Origin will use the default settings to rename the worksheet and workbook name, which is, (1)using the whole filename (includes the file extension) as workbook name, (2)using Excel sheet name as worksheet name.
- Rename Sheet with Excel Sheet Name: Specify whether rename the sheet with the Excel sheet name.
- Rename Book with (Partial) Filename: Check this to use part of the file name as workbook name.
- Trim Filename From: Specify the start of the name.
- Trim Filename To: Specify the end of the name.
- Rename Long Name for Book only: Check this to rename the long name for book only, but not short name.
- Include File Path when Renaming Book: Specify if the file path should be included for the workbook name.
- Append Filename to Workbook Comment: Specify if the file name should be appended to the workbook comment.
- Append Filename to Worksheet Comment: Specify if the file name should be appended to the worksheet comment.
- Append Filename to Column Comment: Specify if the file name should be appended to the column Comment row.
- Add Filename User Parameters Row: Specify if the file name should be put to the column User Parameter row "SourceFile".
- Include File Path when Appending Filename: When this is checked, the import file path is included to the appended file name (so as file extension).
- Add Sheetname User Parameter Row: Specify if the sheet name should be put to the column User Parameter row "SourceSheet".
|
| Header Lines
|
Use these branch to specify which rows, if any, should be supply Origin worksheet column Long Name, Unit and Comment. The Number of Main Header Lines and Number of Subheader Lines can be specified too.
- Number of Main Header Lines(exclude subheader lines): Specify the number of the main header lines, which will be skipped upon importing.
- Number of Subheader Lines: Specify the number of the subheader lines.
- Long Names: Specify the row index for column long name row.
- Units: Specify the row index for column units row.
- Comments From: Specify the starting index of the comments rows.
- Comments To: Specify the ending index of the comments rows.
- System Parameters From: Specify the starting index of the system parameters rows.
- System Parameters To: Specify the ending index of the system parameters rows.
- User Parameters From: Specify the starting index of the user parameters rows.
- User Parameters To: Specify the ending index of the user parameters rows.
|
| Partial Import
|
Select columns and/or rows to import by specifying a regularly repeating pattern; or use Custom and the notation listed in Partial Import and Re-import to select columns for import. Note that for columns or rows, specifying To = 0 means "read to the end."
- Partial Import: Apply partial import settings to All Files or From Second File On.
- Partial Columns: Use these controls to specify a regular pattern of columns to import, beginning with the starting column (From), read m number of columns (Read), then skip n columns (Skip), repeating pattern until you reach the last column (To).
- Partial Rows: Use these controls to specify a regular pattern of rows to import, beginning with the starting row (From), read m number of rows (Read), then skip n rows (Skip), repeating pattern until you reach the last row (To).
For Custom, see Partial Import and Re-import for the notation used to specify data range selection.
|
| Scripts
|
Third branch Script is used to specify the LabTalk scripts to be run after file(s) being imported.
- Script after Each File Imported: Enter LabTalk scripts in the edit box to be run after each file is imported.
- Script after All Files Imported: Enter LabTalk scripts in the edit box to be run only after all files are imported.
|
|