4.6.8.3 Entering Expressions in the Set Values DialogWks-SetColVal-Expression
Expression Basics
The expression used in the Set Values dialog should follow the logic of LabTalk. The expression can contain arithmetic operators, range variables, built-in LabTalk functions and user-defined functions etc. There are two places to define expressions:
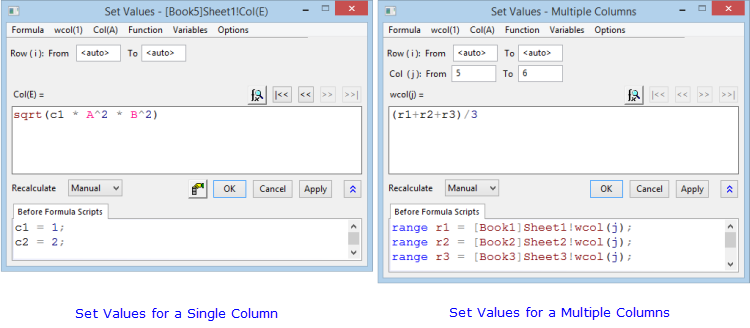
- Column Formula. Only a single-line expression can be input here.
- Before Formula Scripts. Multi-line LabTalk scripts can be input here, which will be executed before column values are set with the formula in the Column Formula edit box.
Please note that several samples are available for you. You can select Formula: Load Sample to retrieve them.
Useful Tips for Inputting Expressions
Beginning with Origin 2017 SR0, Spreadsheet Cell Notation (SCN) is enabled by default. When SCN is enabled, you can use the new notation or you can use the pre-2017 notation in either the Set Values Column Formula box or in the the F(x)= column label row. Note, however, that when using the col() or wcol() functions, entering a script into the Before Formula Scripts panel, or when your expression uses brackets "{}", some limitations apply.
- When referring to a column by its Short Name, the Short Name must be limited to no more than 3 characters. Otherwise such column reference cannot be recognized. When Short Names exceed 3 characters, use the "old" notation (col() or wcol()) instead. The pre-2017 notation doesn't have this limitation.
- From Origin 2022b, if there are multiple columns with the same Long Name in a worksheet, you can use both Short Name and Long Name to specify the column with duplicated Long Name. The syntax is
col(ShortName"LongName") If Short Name is omitted, the left-most column with this LongName will be referred to.
- The Variables menu can help you define variables used in the expression.
- Origin offers many built-in functions under the Function menu, which can be directly used in the expression. The Search and Insert Functions dialog can be used to search for built-in functions.
- You can also create a User-Defined Function yourself.
- If you use the new simplified column notation in a function with string parameter, such as Token, you should use double quote instead of single quote.
- The letters i and j are reserved system variables that store the current row index and column index, respectively. If you want to fill the column with row numbers or column index numbers, you can directly input i or j in Column Formula.
- When using i and j in your Column Formula (or in an F(x)= cell), you must refer to them using lowercase letters to prevent conflict with column short names.
- You can use LabTalk's Conditional operator to fill a column or range. For example (when the 4th column is the target), you can input col(3)==1?col(1):col(2) in Column Formula to either copy the values of the first column or the second column according to the values in the third column.
- The {} notation can be used in Column Formula to fill the selected column(s) with a series of equi-spaced numbers.
- {begin:step:end} fills the column(s) with numbers beginning at begin, ending at end and incrementing by step.
- {begin:end} fills the column(s) with numbers beginning at begin, ending at end and incrementing by 1.
- Data from other books and sheets can be accessed in several ways:
Add Expressions only in Column Formula
You can add a single-line expression in the Column Formula edit box and leave the Before Formula Scripts panel empty. The expression in the Column Formula edit box can include built-in functions and user-defined functions. The following example shows how these functions can be used.
Example 1:
- Create a new workbook.
- Highlight column A. Right-click on it and select Fill With: Row Numbers.
- Highlight column B and right-click on it to select Set Column Values to open the Set Values dialog. Select Function: Trigonometric/Hyperbolic: Cos(x) to add cos(x) to the Column Formula edit box. Highlight the "x" variable in the formula and from the Set Values menu, select Col(A): Col(A) . The expression now reads cos(A). Click the OK and the column is filled with values calculated by taking the cosine of each column A value.
Add Expressions only in Before Formula Scripts
You can input multi-line LabTalk scripts in the Before Formula Scripts edit box and leave the Column Formula edit box empty. In addition to the built-in functions or user-defined functions, any other LabTalk scripts are supported here. So you can use range variables, string variables, loops, and LabTalk accessible X-Functions.
The following example will get the same results as Example 1.
Example 2:
- Create a new workbook.
- Highlight column A and right-click on it to select Fill Column with: Row Numbers.
- Highlight column B and right-click on it to select Set Column Values to open the Set Values dialog.
- In Before Formula Scripts, enter Col(B)=cos(Col(A)) and click the OK button to generate the data.
The following example will load a sample expression which contains multi-line scripts for normalizing data.
Example 3
- Create a new workbook.
- Highlight column A. Right-click on it and select Fill Column with: Row Numbers from the short-cut menu.
- Right-click on column A again and select Set Column Values from the short-cut menu to open the Set Values dialog.
- Select Formula: Load Samples: Normalize column to (0, 1) from the menu of the Set Values dialog to load scripts in the Before Formula Scripts. Then click the OK button to normalize the data.
|
Note: Each line of LabTalk script in the Before Formula Scripts panel should be terminated with a semicolon.
|
Example 4
- Create a new workbook.
- Click the Import Wizard button
 to open the dialog. to open the dialog.
- Under Data Source, select the file \Samples\Graphing\Waterfall.dat. Click Finish to import the data.
- Activate the worksheet, click the Add New Columns button
 . Scroll to the end of the worksheet and note column DW(Y). . Scroll to the end of the worksheet and note column DW(Y).
- Hightlight this column DW(Y), right-click and select Set Column Values from the short-cut menu to open the Set Values dialog.
- Input the following script into the Before Formula Scripts box.
range r1 = col(DW);   //  Set range variable to the added column
r1 = wcol(2);   // Set initial value of the range
int nc = wks.ncols;   // Retrieve the total number of the columns

// Loop over all y columns to sum them up
for(page.v1=3; page.v1<= nc-1  ; page.v1+=1)
{
  range rY = wcol(page.v1);
  r1 += rY;
}

r1 = r1/(nc-2); // Calculate the average of y columns
- Click OK to apply. The average of all y columns is calculated and input into column DW(Y).
Add Expressions in both Column Formula and Before Formula Scripts
Often, we need to enter scripts in both the Column Formula edit box and the Before Formula Scripts panel. For example, you can define range variables in Before Formula Scripts and then use them in Column Formula.
Example 5:
- Create a new project. There should be a empty workbook named "Book1".
- Highlight column A. Right-click and select Fill Column With: Row Numbers from the short-cut menu.
- Highlight column B. Right-click and select Fill Column With: Normal Random Numbers from the short-cut menu.
- Create another workbook named "Book2".
- Highlight column A in Book2. Right-click and select Fill Column With: Row Numbers.
- Highlight column B in this workbook. Right-click and select Set Column Values from the short-cut menu to open the Set Values dialog.
- Now we insert two range variables which point to the columns in Book1. Select Variables: Add Range Variables... from the menu of the Set Values dialog. The Range Browser appears. Choose two ranges in the dialog as the following screenshot shows (make sure that List Columns is set to in Current Project):
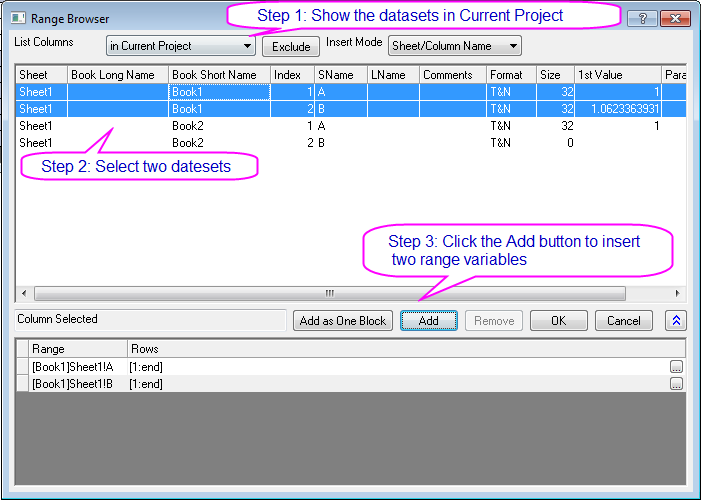
- Click OK to return to the Set Values dialog.
- Enter r1+r2 into Column Formula. The Set Values dialog should look like:
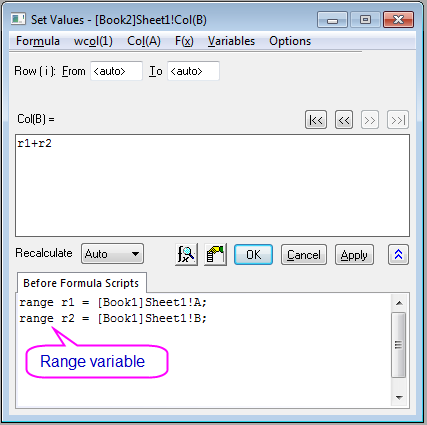
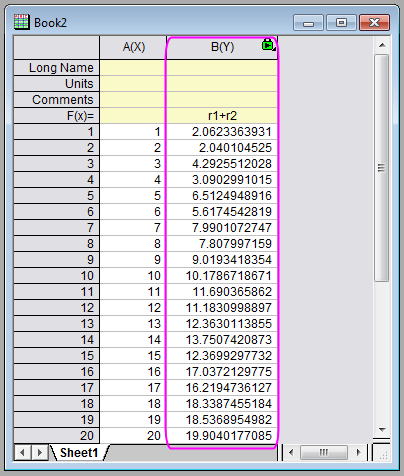
- Click the OK button to generate data for column B. Each element in column B should be the sum of the elements in the corresponding row in Book1.
Example 6:
This is an example to show how to calculate the integral at each given T value using both integral function and User Defined function.
- Create a new Book.
- Set column A Long Name as T and set formula for Column A using the formula below:
data(1,10,0.5)
- Set column B Long Name as Integral, highlight column B and right click to select Set Column Values to open dialog.
- Input integrand function as shown below in Before Formula Scripts and integral expression in Col(B)= edit box as shown below:

- Click OK to apply. The calculated integral is shown below:
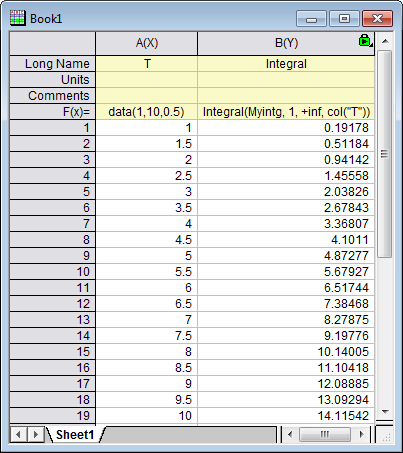
The Before Formula Scripts is also provided below:
// Define Integrand
function double Myintg(double x, double T)
{
//Define constants
      Double h = 1.23*10^(-4);
      Double k = 8.61*10^(-5);

      return 1/(exp(h*x/(k*T)) - 1);
}
|