4.6.10 Named RangeNamed-Range
From Origin 2022, you can define a range variable by directly naming a single cell or (part of) column in the worksheet. The named range can be used to refer to a cell/column in X-Functions, Set Column Values formula, analysis templates, LabTalk scripts etc.
Beginning with Origin 2022b, use named range values as X "From" and "To" values, initial parameter values, lower and upper bounds and fixed parameter values, in the linear fit, nonlinear fit (NLFit), polynomial fit and multiple linear regression dialog boxes.
Define a range
There are several places in the Origin user-interface where you have the opportunity to define a named range.
by Define Name menu
- Select a single cell or column in the worksheet.
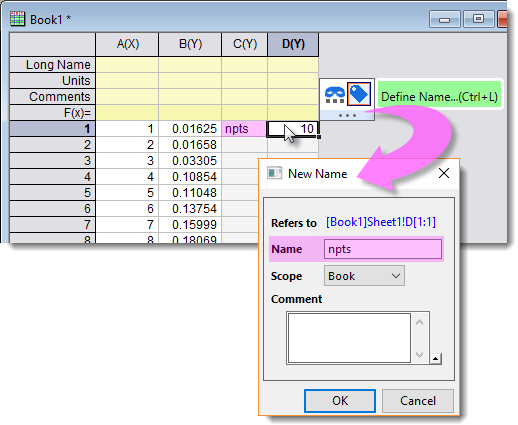
- Select menu Data: Define Name (Ctrl+L).
This will open the New Name dialog.
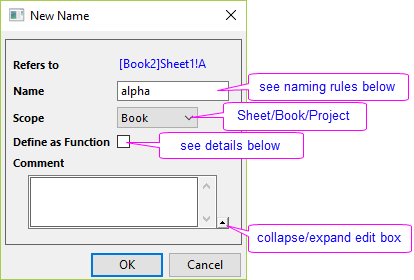
| Name
|
Enter a meaningful name for the range variable. Avoid using something like "AAA1", which conflicts with SCN notation. Naming rules:
- Starts with a letter.
- At least 4 characters.
- Space or special characters are not allowed.
- Not case sensitive.
|
| Scope
|
The named range can be 3 scope levels: Worksheet, Workbook, or Project.
- Range of Worksheet/Workbook/Project scope is saved with the worksheet/workbook/project, respectively.
- In the same scope level, the name must be unique.
- If a named range is defined as sheet/book scope, when you use this range as inputs in the X-Function or LabTalk scripts, the sheet/book must be active.
|
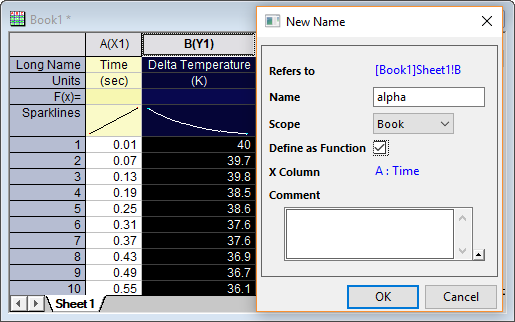
| Define as Function
|
When a Y column is selected, check this checkbox to use this column and its corresponding X column as a function. That means, the named XY range can be used to interpolate/extrapolate Y from the given X.
- The X to interpolate on can be a single value or a dataset.
- X must be monotonical.
- The default interpolate method is line. You can optionally specify spline/bspline method as the second argument of this function.
Refer to LabTalk Guide Interpolation document for details.

|
For example, suppose we defined range “alpha” as col(B).
Run following script in the Script Window to get interpolated Y value at x=0.15 .
alpha(0.15,spline)=;
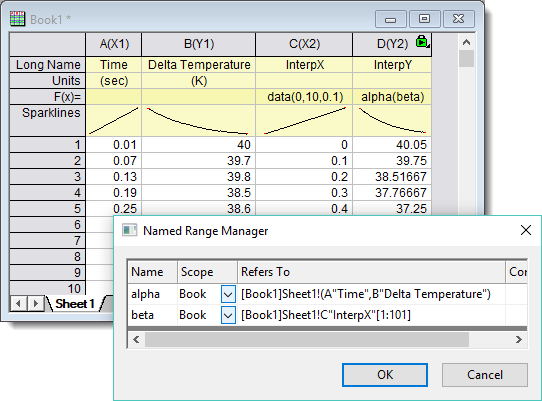
Now we add two more XY columns and fill col(C) with X values we want to interpolate/extrapolate, and define it as range “beta”.
In F(x)= of col(D), enter formula:
alpha(beta);
to fill it with interpolated/extrapolated Y values from col(C).
|
|
Preventing conflicts in named ranges:
- When duplicating a sheet: sheet-level named ranges are duplicated. Book and project-level named ranges are not duplicated.
- When duplicating a book: book- and sheet-level named ranges are duplicated. Project-level named ranges are not duplicated.
- When dragging sheets between books: if there is duplication of a book-level named range, keep only the named range of the destination book.
- When appending a project: if there is duplication of a project-level named range, keep only the named range of the project being appended to and discard the named range in the project being appended.
|
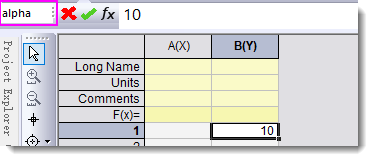
by Formula Bar
- Select a single cell or column in the worksheet.
- Select menu View: Format Bar to turn on Formula bar.
- In the left most edit box, enter the range name to define a range.
Note:
- the scope of named range added by this way is Book by default.
- Selecting from drop-down list an existed named range will jump to that range.
by Mini Toolbar
- Select a single filled cell in the worksheet.
- Select Define Name button
 from the mini toolbar that appears. This will open the New Name dialog. from the mini toolbar that appears. This will open the New Name dialog.
 | If there is a naming-rule satisfied text on the left of the selected cell, the text is auto-picked as the range Name.
|
by Name Manager menu
- Select menu Data: Name Manager (Ctrl+F3).
- In the Name Manager dialog that opens, you can add, modify or remove a named range. Refer to the next section for details.
Manage Named Ranges
Named Range Manager
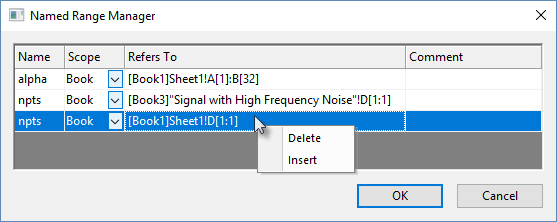
- Select menu Data: Name Manager (Ctrl+F3).
- In the Named Range Manager, you can
- Change names, scope, and edit Comments of an existed range.
- Right click to insert a new range.
- Right click to delete an existed range.
- Multi-selection is supported: press Ctrl key and click rows to select multiple rows; press Shift key and click rows to select a continuous range.
Display in Object Manager
Named ranges list under the worksheet in which they are defined.
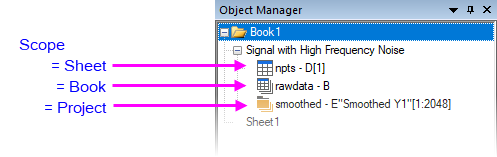
- The assigned range appears beside the range name.
- The named range icon indicates scope.
- A single-click on a named range will highlight the assigned range in the worksheet.
- Double-clicking will open the Named Range Manager with the named range highlighted.
Using Named Range in Label Rows
A named range can be defined for data row or column label row (header row) cells. Use of named range in label rows is useful in the following applications:
- Column/Cell Calculations: Named ranges can be used in Set Values or when defining a cell formula.
- Defining Reference Lines: Named ranges can be used in the Reference Lines dialog when Value Type = Value or Expression.
- Defining a Function Plot: Named ranges can be used when defining a function plot expression (e.g. for 2D Function Plot).
| Pay attention to scope when defining your named range. For instance, if you want to use a named range only within certain sheet or book calculations, you can limit scope to Sheet or Book. This allows to use the same Name in a different sheet or book. However, to use a named range throughout the project -- as you would need to do for reference lines or function plots -- you'll need to set Scope = Project. You can always change the scope of a named range using the Named Range Manager.
|
Quick tutorial
| See these OriginLab blog posts for more examples of usage:
|
Below is a simple story of making an analysis template with named range.
- Create a new workbook. Select menu Data: Connect to File: Text/CSV to import sample data <EXE folder>\Samples\Signal Processing\Signal with High Frequency Noise.dat with default settings.
- Click the connector icon
 and check Exclude Imported when Saving from the context menu. and check Exclude Imported when Saving from the context menu.
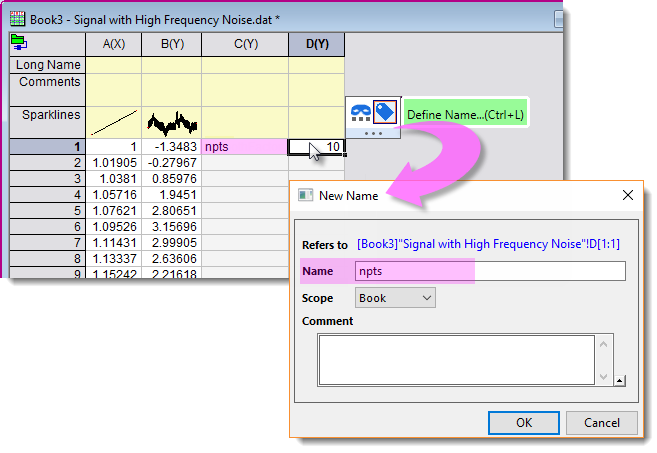
- Add two more columns, col(C) and col(D). In C1, enter text
npts. In D1, enter number 10. Click on D1. Select Define Name button from mini-toolbar that appears.
- In the New Name dialog, “npts” is auto-filled in Name edit box. Click OK.
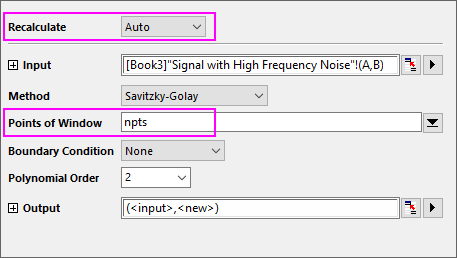
- Highlight col(A) and col(B). Select menu Analysis: Signal Processing: Smooth. In the dialog, set Recalculate to Auto. Enter npts to Points of Window.
- Save this book as an analysis template by menu File: Save Workbook As Analysis Template.
|