23.4 Creating a master Page Layout for GraphsMaster-Page-Layout
Origin provides a Master Page feature to simplify the global annotation of graphs. Use the master page to display a consistent background, a company logo, or other labels and images on all or selected graph windows in your project.
Using the MASTER.OTPU template
- Select File: New: Master Page from the menu. Then the Master.otpu template is open.
 | If you are not in the project root folder when selecting this menu item, you will be asked to switch to the project root folder.
Note: if you Master template is in the project root folder, the master item will be shown in the graph with the same dimensions automatically (beginning with Origin 2018b). If the Master template is not in the project root folder, for the existed graph, you need to active the graph window and click Refresh button to show the master items, when you new or update a Master template.
|
The Master page window shows:
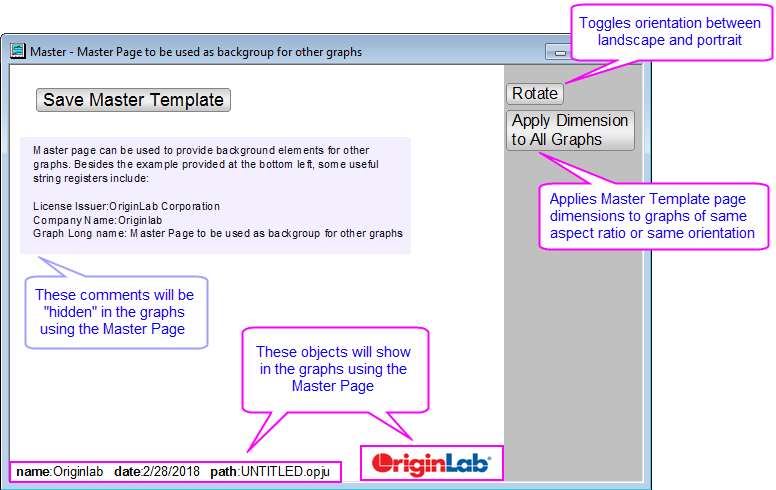
- Customize the Master Template.
- The Master Page should contain only the properties and objects that you want to display on your graph windows.
- Note: the comments that show beneath the Save Master Template button are "hidden" and will not be applied to your graph windows.
- Click the Save Master Template button.
- When you save, the Master Template will be saved to the User Files Folder as "name of active window".otpu
(e.g. "C:\Users\YourName\Documents\OriginLab\User Files\Master.otpu").
- If you click the Rotate button to toggle to portrait, the template short name will change to Portrait. Then you can save the Portrait.otpu template.
| You could use the Text tool to add project and system information to your Master Template as static text objects, but since the idea is to build a template for re-use, consider "soft-coding" information in your text labels. To learn more, see these topics:
|
Control Master Item display and export at the graph page (window) level
Once you have set up your Master Template, your Master Items will show in the Origin workspace for all graphs of the same dimensions as your Template, by default. Master Items will also be applied to graphs that you export, copy or print.
If you do not want to show Master Items in the workspace and neither do you want to apply Master Items to your exported, copied or printed graph, you can disable their use in the graph's Plot Details dialog box:
- Select Format: Page to open the Plot Details dialog box at the graph page level.
- Select the Display tab.
- Clear the Use Master Items check box. This disables use of Master Items for this graph page only. Other pages for which Use Master Items is checked, will not be affected.
Adding common elements to an MS Word or PowerPoint file
Edit: Copy Page normally copies an Origin graph object to the Clipboard. When the object is pasted into an MS Word document and the user subsequently double-clicks on the graph object, the graph opens in an OLE instance of Origin, where it can be edited. When Master Items are present on the graph, Edit: Copy Page places an image object (EMF) on the Clipboard, not the usual graph object.
If you need to embed an editable Origin graph object in your MS Word document, clear the Use Master Items check box in Plot Details before clicking Edit: Copy Page. Alternately, you can set LabTalk System Variable @GMC = 1. For information on modifying Origin's default behaviors using system variables, see Customizing Origin Using System Variables.
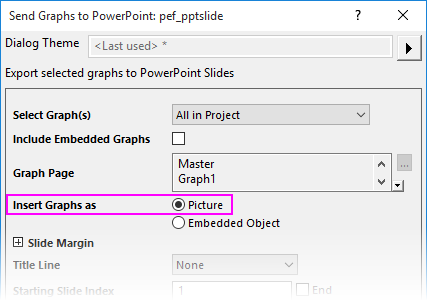
Similarly, Origin's Send Graphs to PowerPoint feature does not support OLE embedding of Master Items in a PowerPoint presentation. To add common items to Origin graphs in a PowerPoint presentation, you can:
- Create a Slide Master in PowerPoint that contains your "master items".
- Create a minimal PowerPoint file with a "master items" slide that you can select when you Send Graphs to PowerPoint from Origin (no need to create a Slide Master).
- Send Graphs to PowerPoint and Insert Graphs as Picture.
Control Master Item display in the Origin session or project
You can, without disabling Use Master Items for each graph window, turn on or off their display in the Origin session or in the project. This is simply a workspace display toggle and does not affect export or printout (see Notes):
- Activate any graph window and place a check mark beside View: Show: Master Items on Screen to show Master Items.
- Remove the check mark beside View: Show: Master Items on Screen to hide Master Items.
|
Notes:
- This menu command is not available if the Plot Details Use Master Items check box is cleared for the active window.
- The View: Show Master Items setting is saved with the project.
- Clearing the check mark beside View: Show Master Items will not hide Master Items in copied, printed or exported graphs.
|
Selectively exclude Master Items from workspace, export or print
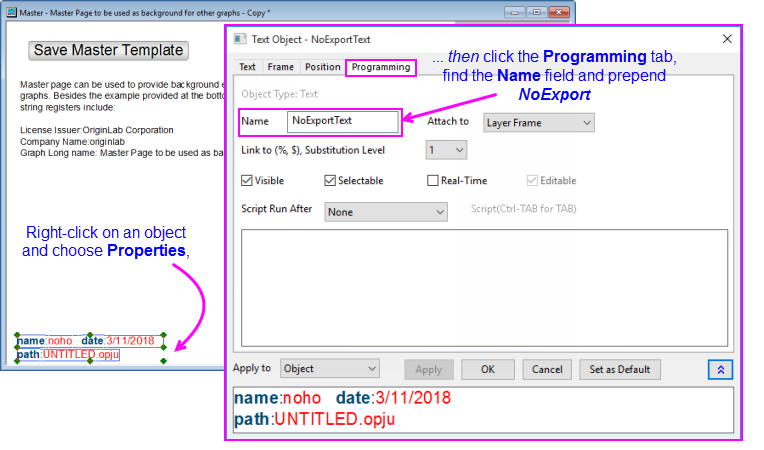
There is a mechanism for selectively excluding Master Items in the workspace and in your exported or printed page. Every object - text object, drawn object, button object, etc. -- on a graph page has a name. This name is generally found on the Programming tab of the object's Properties dialog box.
If you do not want a particular Master Page object to appear in the workspace or to be included in the exported or printed page, then you should prepend the fragment "NoExport" to the object name (e.g. "NoExportObjectName").
Additional master page notes
- To open a graph based on the Master.otpu template from a LabTalk script, use:
win -t plot master Master;
Note: this script will open the Master Page window in the active folder, if the active folder is not the root folder, you need to refresh the graph window respectively to show the master items.
- Using File: New: Master Page menu to open the Master Page window, that is landscape orientation by default. If you want to use or save the portrait orientation template, click the Rotate to swap page dimensions. Also the page short name is changed to Portrait, and you can save this template to Portrait.otpu. In addition, you can change your graph page orientation by using the menu File: Page Setup.
- Master items will only show in graphs pages of the same dimensions as the template. Apply Dimension to All Graphs button can apply Master Template page dimensions to all graphs of the same orientation.
- You can also include master items in layout page windows. By default, the Use Master Items check box on the layout page's Plot Details dialog box and View: Show: Master Items on Screen menu are checked.
|