1.18.1.5.3 HTML Dialog with a GraphHTML dialog with a graphHTML Dialog
third-HTML-dialog
Summary
In this tutorial, you build a dailog works as follows:
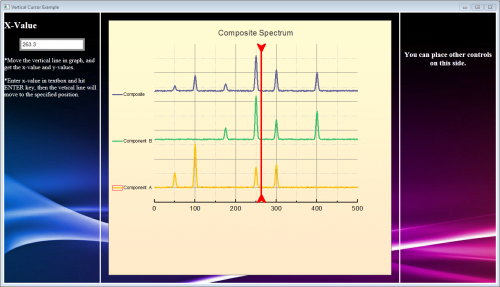
- There are three panels in the dialog, including a textbox in the left panel, a graph in the central panel and a blank right panel.
- When a user moves the vertical line on the graph manually, the program shows the x-value in the textbox.
- Conversely, when the user enters an x-value in the textbox and hit the ENTER key, the program moves the vertical line to the specified position.
You can learn how to:
- How to contain a graph in HTML dialog.
- How to resize the dialog as you pleased.
- How to call Origin C in JavaScript. (You can also learn this from the tutorial Create a Calculator.)
- How to call JavaScript in Origin C.
When you finish this tutorial, your dialog will look like the following picture except the different number:
Minimum Origin Version Required: Origin 2017
Sample Files
- Composite Spectrum.opj: This is the OPJ that contains a graph to be shown in the dialog
- Index.html: This is the HTML code for the html page.
- DlgWithGraph.cpp: This is the Origin C code to call out the HTML dialog and achieve the communication between Origin C and JavaScript.
- Background_image1.png: This is the first picture for the background of dialog .
- Background_image2.jpg: This is the second picture for the background of dialog.
| Note: You can download the sample file here
|
Preparation
- New an Origin Project named Composite Spectrum.opj, and save it to the folder HTML Dialog with A Graph.
- Select Data: Import from File: Single ASCII from Origin menu to import the data \Samples\Curve Fitting\Composite Spectrum.dat.
- Highlight Column B to Column D and select Plot: Multi-Y: Stacked Lines by Y from menu to create a stacked line plot.
- Double click on Graph1 to open Plot Details dialog, and then improve the format of Graph 1 as you pleased.
- Click Line Tool button
 to add a vertical line (press SHIFT key and draw) to the graph. to add a vertical line (press SHIFT key and draw) to the graph.
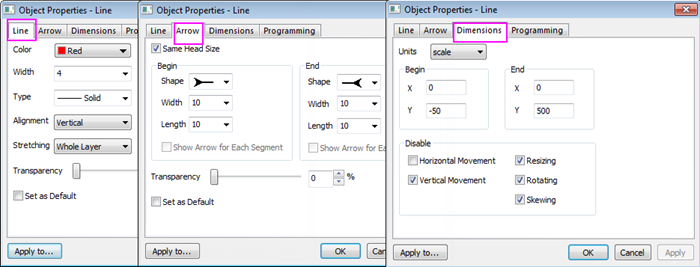
- Right click on the vertical line and select Properties… in the context menu to bring up a dialog.
- Go to Line tab and Arrow tab to modify the format of the vertical line, and then go to Dimensions tab to only allow it to move horizontally.
- Go to Programming tab, name your line object Line.
- Select Moved from the drop-down list of Script Run After, then type the following LabTalk script in the textbox.
line_move(this.X);
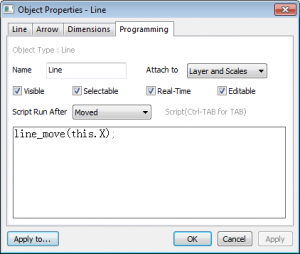
Note: In this step, you set to trigger the function line_move() when a user moves the vertical line. This function line_move() will be created later in OriginC.
|
- Open Code Builder, and then expand Project folder in Workspace window, double click ProjectEvents.OGS to open the file, and then add scripts inside the [AfterOpenDoc] section:
if(run.LoadOC("%X\DlgWithGraph.cpp", 16) == 0)
{
    @G=0;//graph background fill all so no gray band on either side
    HTMLandGraphDlgEx; //this is the function which launches the dialog
}
else
{
   type "Failed to load the dialog!";
   return 0;
}
| Note: The scripts help to launch the dialog after this Origin project is opened. If you want to learn more about ProjectEvents Script, please go to this page.
|
- Save the ProjectEvents.OGS in Code Builder and save the project in Origin.
Creating an HTML Page for Dialog
When you create an HTML dialog, the first step is to design and create an HTML page for the dialog.
- Prepare two pictures for the background in the folder HTML Dialog with A Graph.
- Open Code Builder, create a new HTML file and save as index.html to the folder HTML Dialog with A Graph.
- Copy the following code and paste it within the index.html:
<!DOCTYPE html>
<html>
<head>
<meta charset="utf-8" />
<meta http-equiv="X-UA-Compatible" content="IE=Edge" />
<style>
body{
background-image:url("background_image1.png")
}
input[type="text"] {
font-size: 14px;
}
input[type="text"]:focus {
outline: none;
}
.style-2 input[type="text"] {
padding: 3px;
border: solid 5px #c9c9c9;
transition: border 0.3s;
}
.style-2 input[type="text"]:focus,
.style-2 input[type="text"].focus {
border: solid 5px #969696;
}
#container {
border: 3px solid #ffffff;
position: absolute;
left: 0;
right: 0;
bottom: 0;
top: 0;
}
#leftcontainer {
border-right: 3px solid #ffffff;
width: 250px;
height: 100%;
float: left;
}
#rightcontainer {
border-left: 3px solid #ffffff;
width: 250px;
height: 100%;
float: right;
text-align: center;
}
</style>
</head>
<body>
<div id="container">
<div id="leftcontainer">
<h2><font color="ffffff">X-Value</font></h2>
<ul class="input-list style-2 clearfix">
<input type="text" name="XValue" id="X" placeholder="X" onkeydown = "">
</ul>
<p><font color="ffffff">*Move the vertical line in graph, and get the x-value and y-values.</font></p>
<p><font color="ffffff">*Enter x-value in textbox and hit ENTER key, then the vetical line will move to the specified position.</font></p>
</div>
<div id="rightcontainer">
<h3>   </h3>
<h3>   </h3>
<h3><font color="ffffff">You can place other controls on this side.</font></h3>
</div>
</div>
</body>
</html>
Once you finish this step, you can see the following page by opening the index.html with a web browser:

Adding JavaScript Code for Dialog
In this step, you add JavaScript code.
- Copy the following JavaScript code and paste it inside the element <script> of your html file.
<script>
    var vbg = 1;//counter to alternate html backgroud
    function lineMove(xVal)
    {
        var XValue = document.getElementById("X");
	XValue.value = xVal;
	//show html background change and graph not affected
	switch (vbg)
	{
	    case 1:
	        document.body.style.backgroundImage = "URL('background_image2.jpg')";
	        vbg = 2;
	    break;
	    case 2:
		document.body.style.backgroundImage = "URL('background_image1.png')";
		vbg = 1;
	    break;
	}
    }

    function enterXval()
    {
	var XValue = document.getElementById("X");
        window.external.ExtCall("OnEnterXvalToUpdateGraph", XValue.value);
    }

    function getGraphRect()
    {
	var leftDiv = document.getElementById("leftcontainer");
	var leftpos = leftDiv.getBoundingClientRect().right;
	var toppos = leftDiv.getBoundingClientRect().top;
	var bottompos = leftDiv.getBoundingClientRect().bottom;

	var rightDiv = document.getElementById("rightcontainer");
	var rightpos = rightDiv.getBoundingClientRect().left;

	return JSON.stringify({
	    left: leftpos + 20,
	    top: toppos + 20,
	    right: rightpos - 20,
	    bottom: bottompos - 20})
    }
</script>
Note: This code adds functionality to the HTML page you created above:
-
lineMove():Update the x-value in textbox when a user moves the vertical line
-
enterXval(): Respond to the event of a user hitting the ENTER key in textbox
-
getGraphRect(): Return a rectangular box in which the graph is shown
|
- In order to capture the hitting ENTER event, add an
onkeydown event handler inside the textbox tag of HTML code, so that the function enterXval() will be invoked when the user hits the ENTER key.
<input type="text" name="XValue" id="X" placeholder="X" onkeydown = "javascript:if(event.keyCode == 13) enterXval();">
 |
- In the function
lineMove(), a switch statement is recommended to add. As the comment said, you can see the graph overlaps the HTML page and is not affected even you change the background.
- In the function
enterXval(), window.external.ExtCall is used to call Origin C. You can learn more about window.external.ExtCall from here.
|
Creating an HTML Dialog with Graph
Now you are ready to edit the Origin C code to create an HTML dialog with a graph.
- In Code Builder, create a new cpp file named DlgWithGraph.cpp under the folder HTML Dialog with A Graph.
- Include the needed headers.
#include <Origin.h>
#include <../OriginLab/DialogEx.h>
#include <../OriginLab/HTMLDlg.h>
#include <../OriginLab/GraphPageControl.h>
- Define the GRAPH_CONTROL_ID.
#define GRAPH_CONTROL_ID 1
- Derive a user defined HTML dialog class
HTMLandGraphDlg from the class HTMLDlg, and point to the HTML page inside the method GetInitURL().
class HTMLandGraphDlg: public HTMLDlg
{
    protected:
        string GetInitURL() //get the path of html file
	{
	    string strFile = __FILE__; //the name of current file
	    return GetFilePath(strFile) + "index.html";
	}
	string GetDialogTitle() {return "Vertical Cursor Example";} //set the title of dialog
};
- Add event handler methods inside the class
HTMLandGraphDlg to respond to the event, which is triggered when a user opens, resizes or closes the dialog.
private:
    GraphControl     m_gcCntrl;
protected:
    BOOL OnInitDialog() //when the dialog is shown the first time, need to init the dialog
    {
        LT_execute(";doc -m 0");//hide Origin main window
	HTMLDlg::OnInitDialog(); //Derive a dialog from HTMLDlg class
	ModifyStyle(0, WS_MAXIMIZEBOX);//the generic HTML dialog resource did not have maximize button
	RECT rr;
	m_gcCntrl.CreateControl(GetSafeHwnd(), &rr, GRAPH_CONTROL_ID, WS_CHILD|WS_VISIBLE|WS_BORDER);

	//set options to disable clicking on various components on a graph, you can find more in OC_const.h
	DWORD 	dwNoClicks = NOCLICK_AXES | NOCLICK_DATA_PLOT | NOCLICK_LAYER | NOCLICK_TICKLABEL | NOCLICK_LAYERICON;
	GraphPage m_gp = Project.GraphPages("Graph1"); //this graph in the OPJ can be customized manually
	//attach Graph1 in OPJ to GraphControl in dialog
	BOOL bb = m_gcCntrl.AttachPage(m_gp, dwNoClicks);
	return true;
    }

    BOOL OnDestroy()
    {
	//for the developer, this allow the OPJ to be modified,
        //and you can remove this part for the end users and just do LT_execute(";doc -ss;exit;")
	bool bExitOrigin = MessageBox(GetSafeHwnd(), _L("Are you sure you want to exit Origin?") ,_L("Vertical Cursor Example"), MB_YESNO) == IDYES;
	if (bExitOrigin)
	    LT_execute(";doc -ss;exit;"); //exit Origin
	else
	    LT_execute(";doc -m 1"); //show Origin main window
	return true;
    }

    //virtual
    // when the dialog is ready, need to init the size and position of dialog
    BOOL GetDlgInitSize(int& width, int& height)
    {
	width = 1024;
	height = 450;
	return true;
    }
    // when you resize the dialog, need to reinit the size and position of each control in dialog
    BOOL OnDlgResize(int nType, int cx, int cy)
    {
	if ( !IsInitReady() )
	    return false;
	// MoveControlsHelper	_temp(this); // you can uncomment this line, if the dialog flickers when you resize it
	HTMLDlg::OnDlgResize(nType, cx, cy); //place html control in dialog

	if ( !IsHTMLDocumentCompleted() ) //check the state of HTML control
	    return false;

	RECT rectGraph;
        //GetGraphRECT is a private function calling JavaScript to get a rectangular box to involve the graph control.
        //You will get to how to call JavaScript in Origin C in the next section.
	if ( !GetGraphRECT(rectGraph))
	    return false;
	//overlap the GraphControl on the top of HTML control
	m_gcCntrl.SetWindowPos(HWND_TOP, rectGraph.left, rectGraph.top,RECT_WIDTH(rectGraph),RECT_HEIGHT(rectGraph), 0);

	return true;
    }
Note: The graph will be attached in a new-created graph control when the method OnInitDialog() is triggered.
|
- Map the dialog message inside the class
HTMLandGraphDlg to specify which events will be handled and which function will be called to handle.
EVENTS_BEGIN_DERIV(HTMLDlg)
    ON_INIT(OnInitDialog)
    ON_DESTROY(OnDestroy)
    ON_SIZE(OnDlgResize)
    ON_RESTORESIZE(OnRestoreSize)
EVENTS_END_DERIV
Calling JavaScript in Origin C
In this section, you need OriginC calling JavaScript to complete these two items:
- The graph control should be moved to a right position along with the central panel when the user resizes the dialog, so you should call JavaScript to return a rectangular box in time.
- The x-value in textbox should be updated when the user moves the vertical line, thus you should also call JavaScript to update the number.
In these section, you will use a member function GetScript() of the DHtmlControl class to get a script engine interface.
- Add the function
GetGraphRect() inside the class HTMLandGraphDlg to call the JavaScript function getGraphRECT() you wrote in the fifth section:
private:
    BOOL GetGraphRECT(RECT& gcCntrlRect) //this is the function to call JavaScript and get the position of GraphControl
    {
        if (!m_dhtml)
	    return false;
	Object jsscript = m_dhtml.GetScript();

	if(!jsscript) //check the validity of returned COM object is always recommended
	    return false;

	string str = jsscript.getGraphRECT();
	    JSON.FromString(gcCntrlRect, str); //convert a string to a structure
	return true;
    }
- Add the function
OnMoveVlineToUpdateHtml() inside your Origin C class to call the function lineMove() in JavaScript:
public:
    void OnMoveVlineToUpdateHtml(double dVal)
    {
        Object jsscript = m_dhtml.GetScript();
        if(!jsscript)
            return;
        string strXValue = ftoa(dVal, "*5*");//limit to 5 significant digits and remove trailing zeros
        jsscript.lineMove(strXValue);
    }
Adding JavaScript Callable Prototypes in Origin C
In this section, you add a method OnEnterXvalToUpdateGraph() inside your dialog class HTMLandGraphDlg, which is called in JavaScript function enterXval() in order to move the vertical line when the user enter an x-value and hit the ENTER key.
- Add the method and DECLARE_DISPATCH_MAP inside your dialog class.
public:
    DECLARE_DISPATCH_MAP

    void OnEnterXvalToUpdateGraph(string strXValue)
    {
        GraphPage gp = m_gcCntrl.GetPage();
        if(!gp)
	    return;
	GraphLayer gl = gp.Layers(0);
	if(!gl)
	    return;
	double xVal = atof(strXValue);
	if(NANUM == xVal)//user has not entered pure numeric
	    return;
	GraphObject vline;
	vline = gl.GraphObjects("Line"); //access the vertical line in the graph
	if(!vline)
	    return;
	vline.X = xVal;
    }
- Map the method of your OriginC dialog class to this HTML dialog.
BEGIN_DISPATCH_MAP(HTMLandGraphDlg, HTMLDlg)
    DISP_FUNCTION(HTMLandGraphDlg, OnEnterXvalToUpdateGraph, VTS_VOID, VTS_STR)
END_DISPATCH_MAP
| Note: More details of DISP_FUNCTION can be found here.
|
Adding Labtalk Callable Prototypes in Origin C
You’ve almost created a nice dialog, but it needs an additional item to finish it.
You must remember that you have written a script to call a function line_move() in LabTalk when you set your vertical line properties in Properties dialog.
Now you should add this function in OriginC to be triggered when the vertical line is moved:
static HTMLandGraphDlg* s_pDlg = NULL;// we need this such that dialog class can be used from LabTalk

//this is the OC function to be called from LabTalk
void line_move(double dVal) //when the line moves, get the X-value and pass the value to JavaScript
{
   if ( s_pDlg ) //trigger only if move the line in this dialog
		s_pDlg->OnMoveVlineToUpdateHtml(dVal);
}
Note: In order for LabTalk to call the method within this dialog class, we need to declare a static HTMLandGraphDlg object.
|
Launching The Dialog
You are ready to launch the dialog.
- Add a main function:
void HTMLandGraphDlgEx()
{
    HTMLandGraphDlg dlg;
    s_pDlg = &dlg;
    dlg.DoModalEx(GetWindow());
    s_pDlg = NULL;
}
| Note: You should name the function the same with you wrote in ProjectEvents.OGS.
|
- Save all the code and build it.
- Now, you double click the OPJ directly to lauch the dialog.
|