1.18.1.5.2 Create a CalculatorCalculatorHTML Dialog
second-HTML-dialog
Summary
In this tutorial, you build a calculator in which you can perform arithmetic operations (addition, subtraction, multiplication, and division).
You can learn how to:
- Trigger events to occur by using the controls inside HTML page.
- Build event handler functions to respond to events by JavaScript.
- Call OriginC function in JavaScript.
- Perform basic arithmetic operations in OriginC.
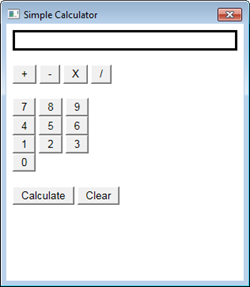
When you finish, your calculator will look like the following picture:
Minimum Origin Version Required: Origin 2017
Sample Files
- SimpleCalc.html: This is the HTML code for the html page.
- Calculator.cpp: This is the OriginC code to call out the HTML dialog and perform arithmetic operations.
| Note: You can download the sample file here.
|
Creating an HTML Page for Calculator
As the first step in developing this calculator, you create an HTML page and add equation display box, number input buttons, operator buttons, Calculate button and Clear button to this page.
- Start Origin and open Code Builder, create a new HTML file named SimpleCalc.html and save it to a new folder named Simple Calculator.
- Within the SimpleCalc.html, construct a simple user interface for calculator by the following code:
<!DOCTYPE html>
<html>

    <head>
        <meta charset="utf-8" />
	<meta http-equiv="X-UA-Compatible" content="IE=Edge"/>
    </head>

    <body>
        <!--equation display textbox-->
	<div id="Equation" style="border:solid;height:20px;"></div>
        </br>

        <!--four arithmetic operations buttons-->
	<div id="Ops">
        	<input type="button" id="btnPlus" value="+"/>
        	<input type="button" id="btnMinus" value="-"/>
        	<input type="button" id="btnMultiply" value="X"/>
        	<input type="button" id="btnDiv" value="/"/>
        </div>
        </br>

        <!--number input buttons from 0 to 9-->
        <div id="Num789">
        	<input type="button" id="btn7" value="7"/>
        	<input type="button" id="btn8" value="8"/>
        	<input type="button" id="btn9" value="9"/>
        </div>
        <div id="Num456">
        	<input type="button" id="btn4" value="4"/>
        	<input type="button" id="btn5" value="5"/>
        	<input type="button" id="btn6" value="6"/>
        </div>
        <div id="Num123">
        	<input type="button" id="btn1" value="1"/>
        	<input type="button" id="btn2" value="2"/>
        	<input type="button" id="btn3" value="3"/>
        </div>
	<div id="Num0">
		<input type="button" id="btn0" value="0"/>
	</div>
        </br>

	<!--calculation button and clear button	-->
        <div>
        	<input type="button" id="btnCalculate" value="Calculate"/>
        	<input type="button" id="btnClear" value="Clear"/>
        </div>
    </body>

</html>
| Note: When editing is complete, you can check this page by opening it with any web browser.
|
Adding Onclick Event Handlers for Buttons
The calculator works as follows:
- When a user clicks number input buttons, the program shows the input number in the textbox.
- Then the user clicks an operator button, the program appends the operator to the number inputted before.
- Next the user click to input another number that is also appended in textbox.
- At last, the user click Calculate button to evaluate the equation and result in the textbox.
- The text in textbox can be erase by clicking Clear button at any time.
In order to get your program to work that way, you need to add an onclick event handler to capture a click event from the users’ mouse on the button in the HTML page. This action usually results in a call to a JavaScript function which helps to perform the calculation.
Taking the Calculate button  as an example: as an example:
- Inside the element < script >, add the function
Invoke_Cal(). Note that this function will be used to respond to the click button event by onclick event handler mentioned in Step 2.
    <script>
        function Invoke_Cal() {}
    </script>
- Add an onclick handler event inside the calculation button tag, so that the function
Invoke_Cal() will be invoked if the user clicks this button.
<input type="button" id="btnCalculate" value="Calculate" onclick="Invoke_Cal()"/>
- Similar to the previous steps, you can add the
onclick event handler inside every button to capture click event and add its corresponding JavaScript functions inside <script>.
Calling OriginC Function in JavaScript
In this example, arithmetic operations are performed in OriginC in order to show you how to call OriginC in JavaScript.
In JavaScript, you will use the function window.external.ExtCall to call into OriginC:
window.external.ExtCall(“OriginC Function Name”, Parameter1, Parameter2…)
Note:
- Currently, no more than 5 parameters can be passed into ExtCall, including the OriginC function name.
- The parameters that can be passed as input arguments of OriginC should only be primitive types, including bool, integer, double and string.
|
Now, you can modify the functions inside <script> as follows after you figure out how to call OriginC in JavaScript, and the complete code is available in the HTML sample file.
<script>
    var PlusOp = "+";
    var MinusOp = "-";
    var MultiplyOp = "*";
    var DivOp = "/";

    function Invoke_AddOp(strOp) {
    	var OriginStr = document.getElementById('Equation').innerHTML;
        //Calling OriginC function AddOp to show the operator symbol in textbox
    	var NewStr = window.external.ExtCall("AddOp", OriginStr, strOp);
    	document.getElementById('Equation').innerHTML = NewStr;
    }

    function Invoke_AddNum(NewNum) {
    	var OriginStr = document.getElementById('Equation').innerHTML;
        //Calling OriginC function AddNum to show the number input in textbox
    	var NewStr = window.external.ExtCall("AddNum", OriginStr, NewNum);
    	document.getElementById('Equation').innerHTML = NewStr;
    }

    function Invoke_Cal() {
    	var Str = document.getElementById('Equation').innerHTML;
        //Calling OriginC function Calculate to get the result of equation
    	var Result = window.external.ExtCall("Calculate", Str);
    	document.getElementById('Equation').innerHTML = Result;
    }

    function Invoke_Clear() {
        //Calling OriginC function Clear to erase the text in textbox
    	document.getElementById('Equation').innerHTML = window.external.ExtCall("Clear");
    }
</script>
Creating an HTML Dialog
In this section, you edit and execute OriginC code to launch the calculator dialogue in Origin.
- In Code Builder, create a new cpp file named Calculator.cpp under the path of SimpleCalc.html
- Include the needed headers.
#include <Origin.h>
#include <..\OriginLab\DialogEx.h>
#include <..\OriginLab\HTMLDlg.h>
- Derive a user defined HTML dialog class from the class
HTMLDlg
class OriginCalculatorDlg: public HTMLDlg
{
    public:
        string GetInitURL()
            {
                return GetFilePath(__FILE__) + "SimpleCalc.html";
            }
	string GetDialogTitle()
            {
                return "Simple Calculator";
            }
};
- Add a main function
calc which launches the calculator dialog.
void calc()
{
    OriginCalculatorDlg dlg;
    dlg.DoModalEx(GetWindow());
}
- Save all the code and build it, then execute the
calc() function to open the dialog.
Adding JavaScript Callable Prototypes in OriginC
In this section, you add methods in your dialog class OriginCalculatorDlg, which are called in JavaScript to perform the basic arithmetic operations.
- Add DECLARE_DISPATCH_MAP in your dialog class, which help JavaScript to locate the functions
public:
    DECLARE_DISPATCH_MAP
- Add the methods to perform arithmetic operations, show and clear the equation in textbox.
//when clicking any operator
string OriginCalculatorDlg::AddOp(string str, string strOp)
{
    return str + " " + strOp + " ";
}
//when clicking any digits
string OriginCalculatorDlg::AddNum(string str, int NewNum)
{
    return str + ftoa(NewNum);
}

//use LabTalk expression to evaluate
double OriginCalculatorDlg::Calculate(string str)
{
    double dd;
    LT_evaluate(str ,&dd);
    return dd;
}

string OriginCalculatorDlg::Clear(void)
{
    return "";
}
- Declare the methods in your dialog class.
public:
    string AddOp(string str, string strOp);
    string AddNum(string str, int NewNum);
    double Calculate(string str);
    string Clear();
- Map the methods of your OriginC dialog class to the HTML dialog
BEGIN_DISPATCH_MAP(OriginCalculatorDlg, HTMLDlg)
    DISP_FUNCTION(OriginCalculatorDlg, AddOp, VTS_STR, VTS_STR VTS_STR)
    DISP_FUNCTION(OriginCalculatorDlg, AddNum, VTS_STR, VTS_STR VTS_I4)
    DISP_FUNCTION(OriginCalculatorDlg, Calculate, VTS_R8, VTS_STR)
    DISP_FUNCTION(OriginCalculatorDlg, Clear, VTS_STR, VTS_VOID)
END_DISPATCH_MAP
Note: The syntax of DISP_FUNCTION should be:
DISP_FUNCTION(User-defined Dialog Class, Function Name, Type of Ouput, Type of Input Type of Input…)
in which VTS_BOOL = bool, VTS_I4 = integer, VTS_R8 = double, VTS_STR = string and VTS_VOID = void.
|
- Save the code and rebuilt it, then excute the calc() function again, you can do simple calculation on this calculator now.
|