7.1 Working with Microsoft Excel Basic OperationsWork-Excel-Basic
Importing Excel Data using the Import Excel Data Connector Dialog
Data Connectors are a relatively new data import mechanism. OriginLab recommends using the Excel Connector for importing your MS Excel data.
For information on importing with the Excel Connector, see Importing Excel Data using the Import Excel Data Connector Dialog.
Importing Excel Data using the impMSExcel X-Function Dialog
 | Beginning with Origin 2021b, clicking the Import Excel button  will open the Excel Import Options Data Connector dialog box. To revert to previous behavior where this button opened the impExcel dialog box, set LabTalk system variable @TIB = 2. To change the value of a system variable, see this FAQ. will open the Excel Import Options Data Connector dialog box. To revert to previous behavior where this button opened the impExcel dialog box, set LabTalk system variable @TIB = 2. To change the value of a system variable, see this FAQ.
|
If you prefer to use the older impExcel X-Function dialog to import your Excel data, see Importing Excel Data using the impMSExcel X-Function Dialog
Working with Excel Books inside Origin
| For many years, Origin supported an OLE instance of MS Excel within the Origin workspace, even though it severely limited access to Origin functionality. Over time, users have reported an increase in problems and as a result, OriginLab decided to remove user interface controls for opening an Excel file directly in Origin (File: Open Excel) and for opening a new Excel workbook in Origin (File: New Excel). We urge you to consider using the Excel Data Connector (described above), for importing Excel data. The Excel Connector is fast and you have full access to Origin's graphing and analysis tools. If using the Excel Connector is not an option, you can restore OLE access by changing the value of LabTalk system variable @MOE.
@MOE=0; // 0 (default), 1 = show File: Open Excel, 2 = show File: New Excel, 3 = show Open + New
For information on changing the value of a system variable, see this FAQ.
|
The remainder of this section assumes that you have restored Origin menu access to Excel files and windows
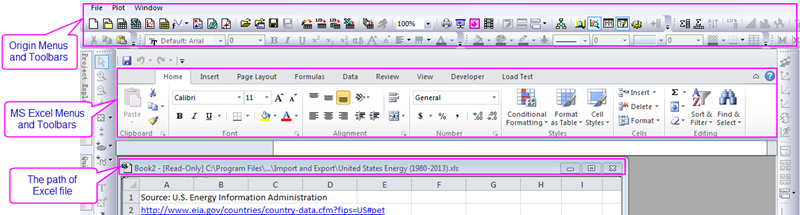
When an OLE instance of Excel is open inside of Origin, both Origin and Excel Standard toolbars display as illustrated below. Only Origin's File, Plot and Window menus are available when an Excel workbook window is active. This prevents data stored in an Excel workbook from accessing Origin's worksheet based data analysis and manipulation.
As you switch from Excel workbook windows to Origin workbook windows, you will see a toolbar spacer appear under Origin's toolbars. This spacer is used to stabilize the toolbar region when switching between Excel and Origin child windows. You can choose to turn it off by right-clicking on the spacer and selecting Hide Toolbar Spacer from the shortcut menu.
The Excel workbook is managed as a special type of Origin child window. You can rename, arrange, save, or delete the Excel workbook window. You can also open multiple Excel workbook windows within an Origin project. Like the Origin workbook, you can view text or numeric data in a Excel workbook window and view the graphic representation of the data in an Origin graph window.
Data in an Excel sheet can be dynamically linked to data in Origin worksheet. When you copy data from an open Excel sheet inside Origin, you can choose to paste the data into Origin worksheet as a link so that when data in Excel file changes, it will update corresponding data in the Origin worksheet.
Menu control of the Excel workbook is available by right-clicking on the Excel workbook window title bar:
| Save
|
Save the changes made to the workbook data. This command is available after you save the workbook window. Note that when the Excel workbook is read-only, this command is unavailable.
|
| Save Workbook As
|
Save the active workbook to a file using a new name. Open the Save As dialog box.
|
| Update Origin
|
If you rename a workbook sheet that contains data that is plotted in a graph window, this shortcut menu command updates the connection between the data plot and its source sheet. After selecting the command, Origin opens the Associate Excel Worksheet dialog box. Edit this dialog box to re-establish the connection between the data plot and the sheet.
Occasionally, the workbook window, or other windows containing workbook data, may become inactive. This condition is apparent when the window containing workbook data has a blank display. To reactivate the window and restore its display, select this shortcut menu command.
|
| Help Contents
|
Opens Origin's Help file.
|
| Properties
|
Opens the Workbook Properties dialog box. Edit this dialog box to rename the workbook window and control how the workbook is saved when you save your project.
This dialog box also lists the workbook sheets that contain plotted data, and the associated Origin index numbers. Index numbers are included in the names of data plots that contain workbook data.
|
Working with Excel Workbooks
The Excel workbook window has features that distinguish it from other Origin child windows. The following sections discuss procedures that are unique to the Excel workbook window.
Open, Create and Save Excel Workbook
Among the child windows, Excel workbooks are special in that they can be saved as internal objects of the project or as links to external Excel files.
Saving the Excel workbooks internally to the project enhances the project's portability. You can open the project on any computer that has Origin and Excel installed and have full access to your Excel workbook data. Note for internal Excel file, dynamically linking a formula in an Excel workbook to source data in another Excel workbook is not supported.
Whereas, saving the Excel workbooks as links to external files allows you to maintain separate Excel files that are updated when changes are made to the associated workbooks in Origin. The files are available for other applications such as Microsoft Excel.
When you open a project that includes links to external Excel file(s), Origin opens those workbook(s) in the project. If Origin can't find the Excel file at the location specified in the Linked File Path field of the workbook's Workbook Properties dialog box, then Origin opens the File Name dialog box and asks you to locate the Excel file. In this case, you can either type the correct external file path and file name in this dialog box and click OK, or if the Excel file isn't available, click Ignore (or Ignore All). In such cases, Origin opens the project and displays a placeholder for each workbook whose source isn't available. Additionally, data plots created from the missing workbook(s) are not displayed in the graph window(s).
Origin displays the full path and file name of the linked source Excel file in the Linked File Name group. If the workbook window was created in Origin, the default path is determined by the Excel path specified on the File Location tab of the Options dialog box.
To Open/Create Excel Workbook in Origin
- Select menu File: Open Excel... to open an Excel workbook in Origin. Select menu File: New: Excel to create a new Excel workbook in Origin.
To Make Excel Workbook Window the Default Child Window Upon Origin Start
- Select menu Window: Origin Options when an Excel workbook is active, or Preference: Options when any other child window is active. Both menu commands open the Options dialog box. Then select the Open/Close tab. Select Excel Workbook from the Start New Project drop-down list and Click OK. In the Save as Origin's startup options? prompt, select Yes to apply settings for future Origin sessions or No to apply to current Origin session only.
To Save Origin Project with Links to External Excel File
- Right-click on the title bar of the Excel workbook. Select Properties from the shortcut menu. This opens the Workbook Properties dialog box. Select the Internal radio button in the Save As group. Then click the OK button to close this dialog box. After the above operation is performed, Origin will not update the original source Excel file (if the current Excel workbook comes from an external Excel file) when you select File: Save Project or File: Save Project As, or when you click the Save Project button on the Standard toolbar. Additionally, any new changes made to the original source Excel file will not affect the Origin project.
To Save Excel File in a Relative Path with Origin Project
- If you haven’t saved the Origin project yet, or the Origin project was saved to a folder totally different from Excel file location. Right click on the title bar of the Excel book and selecting Properties. In the dialog, click Switch to OPJ Path upon Saving button. The next time the OPJ is saved, it will place a copy of the Excel file in that same folder.
- If you already saved the Origin project in the same folder as the Excel file or some folder above the Excel file, you still need to check the Relative to current project (OPJ) path checkbox. In such case the Switch to OPJ Path upon Saving button is greyed out. No extra copy of the Excel file will be saved in such case when save this Origin project.
To Update Linked Source Excel Files
- If your Origin project contains a link to an external Excel file, Origin will automatically update the source Excel when the project is saved. However, if you have selected either Before Saving or Before Save Project As from the Saving Excel Workbooks drop-down list on the Excel tab of the Options dialog box, the Save Excel Workbooks dialog box will open after selecting one of the project saving options.
- To update the source Excel file, the associated check box must be selected from the External list box. In addition, you can choose to save the data in the Excel workbook to the source file manually so as to update the external file at any time you want. To do so, right-click on the workbook window title bar and select Save Workbook As from the shortcut menu.
To Change an Internal Excel Workbook into External
- When you click the New Excel button on the Standard toolbar to open a new workbook in Origin, Origin creates an internal Excel workbook by default. To change it into a link to an external file, right-click on the title bar and select Properties from the shortcut menu. This menu command opens the Workbook Properties dialog box. Select the External radio button and click OK.
- Alternatively, right-click on the title bar and select Save Workbook As from the shortcut menu. This menu command opens the Save As dialog box. Type a file name in the File name: text box and click OK.
- If you save your project after, a link to the external Excel workbook file will be saved.
Use Excel Data to Plot
There are basically two ways you can make a plot in Origin using Excel workbook data: directly creating a new Origin graph, adding Excel workbook data to an existing Origin graph window.
The direct plotting process is mainly controlled by Select Data for Plotting dialog, where you can interactively select data from Excel workbook, assign its plot designation (X, Y, Z, etc.) and create the plot. Multiple data plots can be plotted into a single layer (by default), multiple different layers or even separate graph windows. Origin also provides an option to use default plot assignments to allow you directly highlight plotting data and select a graph type to plot without an intermediary dialog box.
The most direct way of adding data to existing graph window is by highlighting and dragging and dropping data into it. Also, Select Data for Plotting dialog, Plot Setup dialog or Layer Contents dialog can be used to serve the same purpose. These dialogs display dataset name using range notation including book name, sheet name, and column long or short names. This allows for easy identification of datasets that originate from either Origin or Excel workbooks.
The Excel workbook dataset naming convention is similar to the Origin workbook dataset naming convention:
ExcelWorkbookName_ColumnName@SheetNumber
Where ExcelWorkbookName is the workbook name, ColumnName is the column name, and SheetNumber is a numeric value reflecting the order in which data was plotted from the sheets in the workbook (see note, below).
To verify the @SheetNumber value for each sheet that contains plotted data, right-click on the workbook window title bar and select Properties from the shortcut menu. The workbook sheets and their associated @SheetNumber values display in the Sheet Name - Origin Index list box.
Note: The @SheetNumber value is not the Sheetn number that displays at the bottom of the Excel workbook tab. When referencing the first plotted sheet, Origin does not use @1.
References to plotted Excel workbook data are found in the same locations as are references to plotted Origin workbook data. These locations include: the data list at the bottom of the Data menu and Layer Contents dialog box.
When adding data to an existing graph window, the data are plotted using the style of the graph template (for example, line or scatter). If you have created a custom template with data plot style holders, Origin will use the first available style holder. If there are no style holders available, Origin plots the data using the style of the graph template.
You can continue to add data to a graph using this dialog box as long as you do not click Close. However, if you created a graph using a different plotting method or if you closed the Select Data for Plotting dialog box after creating a graph, then you must manually reopen the dialog box to activate this plotting method.
Note: Each graph type has specific data requirements (for example, a ternary diagram requires X, Y, and Z data). To learn more, see the specific plot type in the Appendix section on Graph Types.
To Make a Plot Using Excel Workbook Data
- Take scatter plot for example. Select menu Plot: Symbol: Scatter or click scatter button
 in 2D Graphs Toolbar to open Select Data for Plotting BookName dialog. Select a range of cells or a column in Excel sheet and click X button to assign X data. Similarly, select Y data and click Plot button to make a scatter plot. 3D graphs can be made the same way but need to further assign data to Z. When the first row is column title row, you can simply include that row in data selection and it will be automatically assigned as Title Row and later shown as axis title. You can also specify a certain row as label row by selecting that row and click Title Row button. Data requirements for each graph type may differ, refer to this table for details. in 2D Graphs Toolbar to open Select Data for Plotting BookName dialog. Select a range of cells or a column in Excel sheet and click X button to assign X data. Similarly, select Y data and click Plot button to make a scatter plot. 3D graphs can be made the same way but need to further assign data to Z. When the first row is column title row, you can simply include that row in data selection and it will be automatically assigned as Title Row and later shown as axis title. You can also specify a certain row as label row by selecting that row and click Title Row button. Data requirements for each graph type may differ, refer to this table for details.
To Plot Excel Data by Drag and Drop
- First specify a plot type for your data. Select menu Window:Origin Options when a workbook is active or Preference: Options when any other child window is active. This opens the Options dialog box. Select the Drag and Drop Plot type such as Line, Scatter, or Line+Symbol on the Graph tab or select Current to use the style of the active graph window template.
- Then plot data using the drag and drop method. Select your workbook data. With your mouse, point to the right edge of the selection area when the mouse cursor is
 . Hold down the left mouse button and drag the highlighted data into the graph window and release the mouse button. . Hold down the left mouse button and drag the highlighted data into the graph window and release the mouse button.
- This method provides no dialog box to serve as an intermediary plotting tool, therefore this method must make assumptions as to how to treat the highlighted data. If one column (or a range from one column) is highlighted, this column supplies the Y values for the data plot. The data are plotted versus row number; if multiple columns (or a range from multiple columns) are highlighted, the leftmost column supplies the X values. All other columns supply the Y values. The data are plotted versus the X values; if multiple columns (or a range from multiple columns) are highlighted and the CTRL key is depressed while dragging the data, all the columns are treated as Y values. The data are plotted versus row number; if the graph window contains multiple layers, dropped data plot in the active graph layer (note that dropping data onto a single layer graph will activate this graph and this layer); if data are dropped onto a layer icon, the data plots in that layer.
- Note that the resultant plot type is determined by the Drag and Drop Plot drop-down list selection on the Graph tab of the Options dialog box. This plotting method is available whenever a workbook is active and a graph window is open in the project (excluding minimized and hidden graph windows).
To Add Excel Data to Existing Graph
- Activate that Excel workbook window. Create the new data plot association(s) by selecting data and clicking the plot designation buttons in Select Data for Plotting BookName dialog. Then redirect window activity back to the graph window. Click the Add Plot button to add the data plot(s) to the active graph layer.
- Alternatively, you can use Plot Setup or Layer Contents dialog to add data to existing graph window.
To Plot Excel Data into Multiple Layers
- Select a plot type from menu or click a plot type through toolbars to bring up Select Data for Plotting BookName dialog. After you specified data for X and multiple column data for Y, the Plot Into drop-down list becomes active. Select Multiple Layers from that list and click Plot button to plot each data plot into its own layer in the same graph window. You can click Save Settings button to save the selection from the Plot Into drop-down list for future instances of this dialog box in the current Origin session.
 | To select multiple Y columns, you can click and drag through the desired column headings, SHIFT+clicking on a range of columns, or CTRL+clicking on nonadjacent columns. You can also select a range of data in a column by click and drag through the desired cells and use CTRL+click to select additional cells.
|
To Directly Plot Excel Data Without Specifying Designations
- Highlight all data to be plotted in Excel workbook, and select a plot type to bring up Select Data for Plotting dialog. Click Use Default button and click Yes in prompt window. Then the plot will be created using Origin's default plot assignments for the selected graph type instead of establishing plot associations each time in the dialog box. E.g., if you select two workbook columns to make a Y error bar plot, Origin uses the row index number for X values, the left column for Y values, and the right column for Y error bar values. For X and Y Error bars, the leftmost column for X values, the second column for Y values, the third column for X error bar values, and the last column for Y error bar values.
- This is very useful in creating some special graph types, e.g., XYAM vector, XYXY vector where you cannot specify two columns as X using Select Data for Plotting dialog. Refer to this table for default plot assignments details for each graph type.
- If you want to reopen Select Data For Plotting dialog for plotting, clear the Default Plot Assignments check box on the Excel tab of the Options dialog box, which can be accessed from menu Window: Origin Options when a workbook is active or Preference: Options when any other child window is active.
To Make 3D Surface Plot from Excel Data
- You can select a contiguous range of Excel workbook data and create an Origin matrix directly. To create the matrix highlight the workbook data. Select Window:Create Matrix from the menu bar. This menu command opens a new matrix window and fills the matrix with the highlighted data. In this way, you can create an array of Z values that can be used to generate a 3D surface plot.
Name Excel Workbook and Worksheet
The naming of Excel workbook is controlled in Workbook Properties dialog accessed by right clicking on the Excel workbook window title bar and select Properties... from shortcut menus. In this dialog, you can not only name the workbook via Short Name or Long Name but also add Comments to it. If you create an Origin data plot from your Excel workbook data and, subsequently, you rename the workbook sheet, you lose the association between the data plot and the workbook data.
For externally saved Excel workbook, the full path and file name also display in the title bar.
To Rename Excel Workbook in Origin
- Right-click on the Excel workbook window title bar and select Properties from the shortcut menu. This menu command opens the Workbook Properties dialog box. Type a new name in the Window Title text box and click OK. Note that if the workbook is saved externally to the project, the full path and file name also display in the title bar.
To Relink Renamed Excel Workbook Data to Origin Plot
- To rebuild the link, right-click on the workbook window title bar and select Update Origin from the shortcut menu. This opens the Associate Excel Worksheet dialog box. Highlight the renamed workbook sheet and click OK.
Run Excel Macros and Visual Basic Application Functions
When an Excel workbook is the active child window, the user-interface is -- with the exception of a small subset of Origin window and plotting options -- provided by Excel. Thus, when a workbook is active, the Format, Tools, and Data menus are Excel menus. However, Origin does provide access to your Excel workbook data using LabTalk, Origin's built-in scripting language.
To Run Excel Macros in Origin
- Origin uses an excel object method to run Excel macros from Origin. For the Excel macro to run properly, you must supply the correct arguments using the excel object method. LabTalk will accept no more than five arguments. Additionally, the workbook containing the Excel macro must be the active window. To run the macro, type the following in the Script window and press ENTER:
- excel.run(SheetName.MacroName) or excel.run(ModuleName.MacroName)
- To select a range for running Macro, run the following command:
- Excel.RunRange(SheetName,RangeName,Arg1,Arg2,&ldots;,Arg5)
- Where SheetName is the name of the sheet containing the macro, RangeName is the name of the cell on the sheet where the macro starts (for example, C6), and Argn are the correct arguments for the macro (not to exceed five arguments). The return value after executing the excel object method comes from the macro.
To Invoke Visual Basic Application Functions in Origin
- To run the Visual Basic application function, type the following in the Command Window and press ENTER:
- Excel.Run(FunctionName,Arg1,Arg2,&ldots;,Arg5)
- Where FunctionName is the Visual Basic application function, and Argn are the correct arguments for the function (not to exceed five arguments).The return value after executing the excel object method comes from the function.
Copy Excel Data Outside and Paste/Paste Link into Origin
Copying Excel data from a workbook opened in Excel and paste/paste link into Origin enable user to full access Origin's powerful graphing and analysis features.
If you choose Paste Link, you will create a DDE link between the Excel data and Origin workbook.
- Any change in that Excel data will dynamically update Origin workbook.
- Note that this Paste Link feature works for Excel file no matter you saved it to local or cloud (e.g. OneDrive).
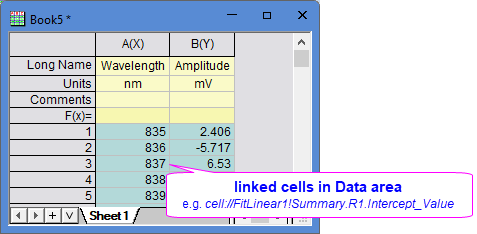
- When you click on the Worksheet cells with the DDE link, the path from Excel will show on Status bar. If the pastes contents is a range (not a single cell), the Worksheet cells in that ranges will share the same path of the links.
- The cells with Excel DDE link are highlighted with d green background color by default. You can deselect View: Highlight Formula/Linked Cells to clear the background color.
- To display the cells with DDE link to gray background, select Edit: Edit Mode or press Ctrl + Alt + B to open the Edit Mode.
To Copy from Excel with External Relative Path (Recommended)
- Open the external Excel file in Origin. Save the project file.
- Set the external Excel file path relative to OPJ.
- Copy data from the Excel file opened in Origin and paste link to Origin workbook
- Change data in the external Excel file
- Reopen the Origin project file
- Data in Origin will be updated accordingly
To Copy from Excel with Absolute External Path
- Open the external Excel file in Excel.
- Copy data from the Excel file and Paste Link to Origin workbook
- Change data in Excel
- Data in Origin will be updated dynamically.
- Notes: Please note that data from absolute external path is "path dependent". Whenever the Excel file is moved to a different folder, or the related OPJ is opened on a different computer, There is always a dialog pops up to remind you that the DDE Link is broken.
To Copy from Excel with Formula
- Open the external Excel file in Excel.
- Select Formula tab. Select Show Formula.

- Copy data from the Excel file.
- Right click on the Origin worksheet cell (not in label rows), and choose Paste (Keep Excel Formula).
- Notes: Some Excel formula are different/missing in Origin, which will return "#NAME?" (missing value). See Excel and Origin Functions Comparison for reference
Notes:
- Copying data/text from the external Excel file in Excel and then pasting it to Origin graph directly (use Paste menu or Ctrl+V) will paste as text instead of Excel object. If you want to paste as Excel file, please use Paste Link.
- The system variables, @DDES and DDEL, can be used to turn off the DDE related messages which remind you the file location is changed.
- The system variable @DDEN can be used to depress the Start DDE Link dialog. Refer to this FAQ for details.
- Copying "TURE" and "FALSE" from Excel will paste as numeric value "1" and "0" in Origin
|
Edit Bad Cell Formula
Since Origin supports importing and copy-pasting Excel formulas, any syntax that doesn’t fully translate or any unsupported function will cause the formula to fail in Origin and be flagged as a "bad formula."
Origin highlights cell formula with background colors. To show the colors, choose View: Highlight Formula/Linked Cells. The bad formulas are distinguished in different colors:

|
Invalid numeric operation.
e.g. supposed A1 contains the number "1" and B1 contains the text "GOOD", formula =A1+B1 is meaningless and thus returns error code #NUM!
|

|
Wrong number or type of arguments passed to the function.
e.g. formula =sin(A1,5) passes 2 parameters ("A1" and "5") to sin, but it accepts only 1 parameter, so #VALUE! is returned.
|

|
Unrecognized function name or undefined variable.
e.g. formula =Junk(A1) returns #NAME? because there is no function called "Junk".
|

|
Invalid reference.
e.g. formula =[Junk]1!A1 returns #REF! because no workbook named "Junk" is found.
|

|
Any other syntax or parsing error.
e.g. formula =(A1+4)exp(A1-5) is missing the operator "*" between "(A1+4)" and "exp(A1-5)", so #ERROR! is returned.
|
To batch-edit bad formulas
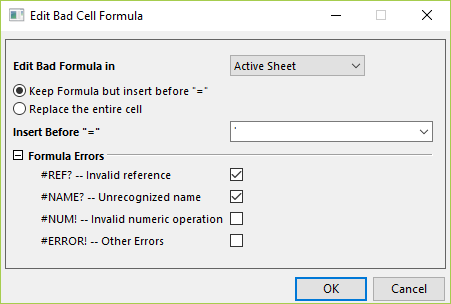
- select menu Edit: Edit Bad Cell Formula
| Edit bad formula in
|
Find and edit bad formulas in the scope of: Current Selection/Active Sheet/Active Book/Project.
|
| Keep Formula but insert before "="
|
Keep the current formula syntax, but insert the correction entered in the Insert Before "=" edit box immediately before the "=" character.
For example, prepend "'" before "=" to keep and show the original Excel formula expression.
|
| Replace the entire cell
|
Overwrite the whole cell with the text entered in Replace With.
For example, replace bad formulas with missing "--".
|
| Formula Error
|
Tick the checkboxes to select the error codes you want to include when finding and editing bad formulas. Note that #VALUE! is not shown in the list which means it is always included.
|
FAQs
See Also
|