6.6 Importing Data by Drag-and-DropImp-DragDrop
Origin supports drag-and-drop import for many common file types. For historical reasons, there are multiple technologies used. When you drop a file onto an Origin worksheet or matrixsheet, a code-checking sequence occurs that determines which method is used. See Import Code Reading Sequence, below.
Import Code Reading Sequence
When files are dropped into Origin, this sequence occurs:
- The oldest method -- and that which is first checked -- calls a LabTalk section in a file called DOFILE.OGS. If found, the import routine is run. While the legacy code in DOFILE may still run satisfactorily, the user should not attempt to write new import routines using this method.
- Next in the sequence, the active worksheet or matrixsheet is scanned for import filter information saved to the sheet (see Save Drag-and-Drop Settings into the Sheet, below).
- If no filter information is saved to the sheet, the data folder is checked for a matching Origin Import Filter (*.oif).
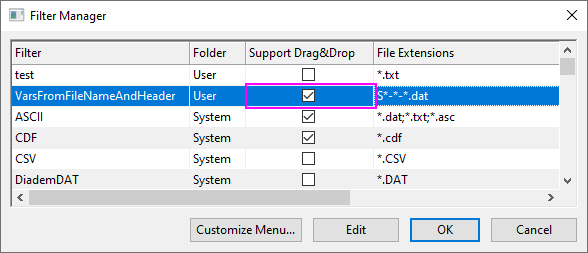
- If no filter is found in the data folder, the User Files\Filters folder is checked for a matching import filter. If a USER filter exists and the Support Drag&Drop filter box is checked in Filter Manager, then this filter handles import.
- If no matching filter is found in User Files\Filters, the code checks to see whether there is an installed Data Connector that matches the file type. If a matching Data Connector is found, the Data Connector handles import
- If no Data Connector is found and the SYSTEM Support Drag&Drop filter box is unchecked or does not show in Filter Manager, Origin opens an attention box asking if you want to open the Import Wizard to import the file.
 | Drag-and-drop behavior for .dat, .xls/xlsx, .txt and .csv, can be modified by setting system variable @IFS. See Notes in the next section.
|
Data Connectors and Drag-and-Drop
Data Connectors are Origin's newest data import technology. Data Connectors offer simple import for common data files such as Text/CSV and Excel. Files are often handled automatically, without the need for configuration of dialog boxes or saving of settings to the sheet or to an external filter file. Both Text/CSV and Excel Connectors do a good job of handling date-time data: data should be automatically recognized and formatted in the sheet on import.
If you have been using an Origin Import Filter (*.oif) -based routine, it should still be fully-supported (see Note, below). However, we encourage you to try importing your data using one of the available Connectors (Data: Connect to File). Also, note that you can use your import filter with a Data Connector (Data Connect to File: Import Filter).
- Import filters saved to the sheet or to the data folder as an Origin Import Filter (*.oif) file, will take precedence over use of a Data Connector.
- Filters saved to
User Files\Filters will take precedence over the Data Connector if the User folder filter's Support Drag&Drop box is checked in Filter Manager (Preferences: Import Filters Manager).
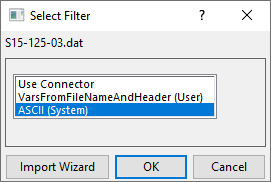
- If -- when you drop your file(s) -- multiple applicable filters are found, this opens the Select Filter dialog. Use the dialog to choose the filter you want to use; or choose to Use Connector.
- Check Data: Select Fileter Dialog menu item (or toggle system variable @IFSS to 1) to ALWAYS open the Select Fileter dialog when drag and drop a data file.
- Drag-and-drop behaviors of .dat, .xls/xlsx, .txt and .csv files can be modified by changing the value of system variable @IFS (default = 0). For instance, if you (a) set @IFS=1, (b) you have at least one .dat file applicable filter in
User Files\Filters and (c) Support Drag&Drop is enabled for that filter in Filter Manager, then dropping a .dat file onto Origin will open the Select Filter dialog. Here, you can choose a filter, including a System filter (these are generally not helpful); or you can choose to Use Connector.
- Also worth noting: when you drag-and-drop a file that has an applicable filter in the data folder, this produces essentially the same result as choosing Data: Connect to File: Import Filter. The advantage here is you get to use your import filter to parse the file and in addition, a Data Connector is added to the sheet.
Save Drag-and-Drop Settings into the Sheet
When using one of the X-Function based dialogs for file import -- those found under Data: Import from File -- you have the option of saving the current dialog box configuration to a Dialog Theme or to Save Settings for Drag and Drop.
When you Save Settings for Drag and Drop, you are saving an import filter to the sheet itself. As long as the sheet -- or a duplicated sheet is active -- you can then drop new files of identical file type and structure and have them imported cleanly into the sheet.
- Create a new workbook and choose a file format under Data: Import from File (e.g. Single ASCII).
- Choose a matching file, make sure the Show Options Dialog box is checked and click Open.
- Select options in the dialog so that file data will be properly parsed, then click the
 to the right of Dialog Theme (top of the dialog) and choose Save Settings for Drag and Drop. to the right of Dialog Theme (top of the dialog) and choose Save Settings for Drag and Drop.
- At this point, you can drop another file of like type and structure onto the active sheet (note that depending on your dialog box Import Mode settings, you may overwrite the existing data or you may start a new sheet or book) and it will be handled by the settings saved to the sheet.
- You can also save the window as a template (File: Save Template As) and recall the window configuration -- including drag-and-drop file handling -- for later use.
Using the Import Wizard to Set Up D&D Import
The Import Wizard supports import of ASCII and simple Binary files ("simple" being an optional header section followed by a sequential binary structure). If your data do not fall easily into one of those two categories, you can write your own Origin C code (User-Defined) to handle data import.
Regardless of Data Type, one of the chief advantages of using the Wizard to import your data files is that you can save your custom settings to an Origin import filter (*.oif) that can be used repeatedly to import identically-structured files. Once you've created your filter, subsequent files are easily imported by drag-and-drop.
Origin Import Filters
When creating an import filter, the normal sequence of events is to open the Import Wizard, select a data file, then step through a sequence of Wizard pages in which you interactively parse the file, select file and window naming options, select header information to be stored and re-used, etc. When you have finalized your import settings, you can store them as an import filter (saving the filter is highly recommended if you plan to import the same or similar files in the future).
When creating an import filter, you have the option of saving the filter (a) in the data file folder, (b) in the User Files folder or (c) in the Window. All options support drag-and-drop file import.
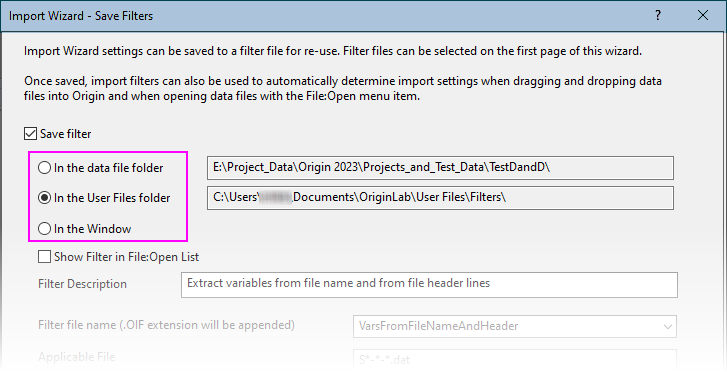
One advantage of saving the filter in the Window is that the filter travels with the window itself and, thus, it becomes part of the Origin project file (*.opju) or child window file (*.ogwu).
The two other options (data file folder or User Files folder) require saving the filter as a separate *.oif file. The primary advantage here is a greater degree of flexibility when importing. You can choose to always use the filter (data folder) or to opt not to use the filter and use a Data Connector instead (by clearing the User filter's Support Drag&Drop check box in Filter Manager (Preference: Import Filters Manager); or -- another great option -- to use a Data Connector with your import filter file settings (Data: Connect to File: Import Filter).
Once created, an import filter file can be tweaked to import files that vary somewhat in their structure, without having to completely recreate every import specification. The procedure here would be to open the Wizard, (1) pick the file for which you intend to modify your import filter, (2) load the import filter (you may have to clear the List filters applicable... check box to list User filters), (3) step through the Wizard, modifying settings as needed and (4) on the Save Filters page of the Wizard, save your filter settings to a new name.
Your import filter can be narrowly-defined to work only with a particular file name (or variations on that file name) or it can be broadly-defined to apply to all files with a given file extension. For instance, you might work with an instrument that automatically names data files in sequence using a scheme something like XYZ_001.CSV, XYZ_002.CSV, XYZ_003.CSV. Using the "*" wildcard character, you could broadly target the filter to all .CSV files in your data file folder by specifying that the filter apply to any file with the name "*.CSV." Conversely, you could narrowly-target the filter by specifying that the filter apply only to CSV files named "XYZ*.CSV."
Target Windows and Target Window Templates
When defining an import filter for ASCII, binary or user-defined file types, you must specify a Target Window and Target Window Template. Note that only Data Type = User-Defined allow specifying something other than Target Window = Workbook. Note, too that User-Defined allows you to bypass specifying the Target Window and Target Window Template (Target Window = None) if window creation is to be handled by your Origin C code (in which case, the code would handle window creation).
- The Target Window specifies the type of child window that will receive the imported data.
- The Target Window Template is a specific window template (may simply be <default> but could be a custom template with with your own configuration and format settings). The Target Window Template is called when drag-and-drop import operations require creating new windows.
Assuming that you have defined an import filter, if you drag-and-drop one or more data files into an active window and that window is of the Target Window type, then Origin will import the file(s) using the new window/new worksheet/new column settings specified in the filter. If, for instance, (1) the filter Import Mode is set to Start New Columns and (2) the file(s) are dropped onto a workbook window (the Target Window type specified in the filter), then the file(s) are imported and added as columns into the active worksheet in the active workbook. If the active sheet had empty columns, they would be filled first. In this case, the active workbook was of the correct Target Window type and each file required only the creation of new columns. No new windows needed to be created so, therefore, the Target Window Template was not used.
If the filter Import Mode had been set to Start New Books, then the first file dropped would import into the active workbook if the columns in the active sheet were empty (again -- the Target Window was of the correct type), and each subsequent file would import into new workbook windows created using the Target Window Template. Note that the Target Window Template may, or may not, be the same template that the active workbook window was based upon. However, the default Target Window Template (<Default> from the drop-down list on the Import Wizard Source page) is the default Origin worksheet or matrix template. Unless you have chosen a different default template, this would be ORIGIN.OTW (worksheet) or ORIGIN.OTM (matrix).
|