4.50 FAQ-689 What is the User Interface Module (UIM) and how do you edit and program a UIM Object?UIM-editing-programming
Last Update: 12/9/2021
 | VERY IMPORTANT NOTES!!!
UIM is a very old tool and now Origin has more powerful and flexible tools to build your custom dialog and complete routines. From Origin 2018b, we hide UIM toolbox in the Edit Mode by default. In the current version,
- You can create a set of buttons or toolbars to run custom LabTalk scripts. Please refer to User-Defined and Custom Toolbars and Toolbar Buttons for detailed information.
- To build your custom dialog, an automatic way is to use X-Function Builder. Please refer to the X-Function Builder document for detailed information.
- If you need more controls, OriginC provides a variety of methods to handle complex program task. Several tools including GetN Macros, GetNBox, external DLL even Python can be employed. Please refer to OriginC document for detailed information.
- Lastly, starting from Origin 2017, we add support for dialogs using HTML and JavaScript which adds more flexibility to making dialog that interacts with Origin. Please refer to Origin C HTML Dialog with JavaScript Support for detailed information.
If you still want to use UIM, you can set system variable @UIM to 1 to bring up the UIM toolbox in the Edit Mode and then continue this page of how to use it.
- Select Preferences: System Variables from menu
- In the Set System Variables dialog, enter @UIM in Variable and set its Value to 1
|
Overview
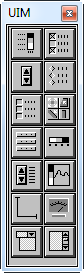
The User Interface Module (UIM) consists of a set of objects that can be used to develop custom tools. These 14 objects are generally added to a window template and can be programmed to run some LabTalk script. The various types of objects -- bitmap buttons, checkbox controls, radio buttons, etc. -- can be modified and programmed, allowing you to create an intuitive interface for your custom routines.
The UIM has long been an OriginPro-only feature. Beginning with Origin 2015 SR1, it will be included in standard Origin. Go to www.originlab.com to download documentation of the UIM in PDF format .
- To add a UIM object to a window template:
- Open an Origin window (workbook, matrixbook, graph or layout) that you intend to use as your application template.
- From the menu, click Edit: Button Edit Mode to select button edit mode (a check mark beside Button Edit Mode indicates that you are in button edit mode).
- Click the desired control on the UIM toolbar.
- At the location you want to add the object, drag out a rectangle with your mouse. A UIM object will be added.
- While in Button Edit Mode, you can select the object and move or resize it, as needed.
- To rename the UIM object:
- In Button Edit Mode, right-click on the object and choose Programming Control.
- Edit the Object Name and click OK to close the dialog box.
- To customize the UIM object:
- Use the UIM Object dialog to customize controls, layouts, and background. Click the Titles..., Values... and Special... buttons for further options. These buttons open dialogs for different UIM object types.
- To open the UIM Object dialog box, in Button Edit Mode double click on the object. If not in Button Edit Mode, press the Ctrl key and double-click on the object.
- To add code behind the object:
- Use the Programming Control dialog box to add script to run behind the object.
- To open the Programming Control dialog box: In Button Edit Mode, right-click the object and choose Programming Control. If you are not already in Button Edit Mode, press the Alt key and double-click on the object.
- To access UIM object controls via script, use the ObjectName.ControlName notation. If there are spaces in the Control Name, they should be trimmed when calling your control in the code.
| Note: When accessing controls in the current UIM object itself, you can use this.ControlName
|
Example
In this example we create a simple UIM object that takes From, To and Step Length values from the user, then uses LabTalk script to fill Column A with data when the user clicks a Generate Col(A) button.

- Select Edit: Button Edit Mode. The UIM toolbar displays.
- Click the Status button
 . .
- Drag out a rectangle on a blank area of a workbook. An object labelled STATUS is added to the workbook window.
- Double-click the object to open the UIM Object dialog box.
- Edit the object as shown in the image below.
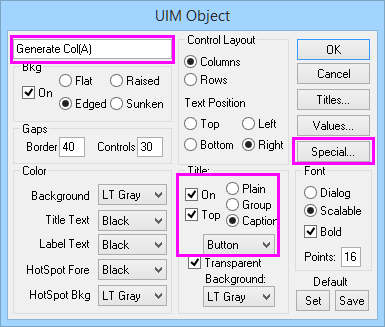
- Click the Special button and open the Status Object dialog box.
- Duplicate the settings as shown in the image below. For From, enter 0.00; For To, enter 100.00; For Step Length, enter 5.00.
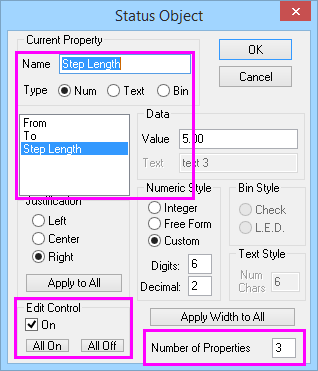
- Click OK twice to close the Status Object dialog box and the UIM Object dialog box.
- Right-click on the STATUS object and choose Programming Control.
- In the script box, type the following:
-
col(A) = data(this.From, this.To, this.StepLength);
- From the Script, Run After list, select Button Up.
- Click OK to close the dialog box.
- From the menu, click Edit: Button Edit Mode to exit button edit mode.
- Click the Generate Col(A) button to fill col(A) with data.
Keywords:UIM, User Interface Module, custom routine, custom tool, custom application, GUI, LabTalk
|