24.4.2 Group Folder ManagerFileShare-GroupFolder
The Group Folder Manager is designed for managing files in the group folder for the group leader machines. It allows you to copy Origin files from user files folder to the group folder to share them with the client machines. You can also remove files from the group folder so that they will not be published to clients any more. This tool can also delete files from the user files folder. When you find a file in your user files folder that is not updated (the version of this file is older than the one in the group folder), you can use this tool to get the updated file from the group folder.

| Note:
The Group Folder Manager can be used only when the group folder is set to be in a correct location and the current machine is set as a group leader machine. To do both of these, you can use the Set Group Folder Location Dialog.
|
Opening the Group Folder Manager
To open the Group Folder Manager:
- Select Preferences: Group Folder Manager from the Origin menu.
View files
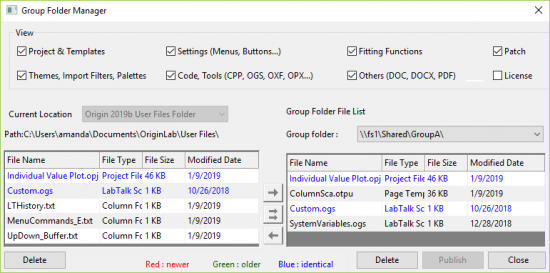
There are seven check boxes in the dialog to specify whether to show certain file types in the lists.
| Projects & Templates
|
OPJU, OGWU, OTWU, OTPU, OTMU, OPJ, OGW, OTW, OTP, OTM
|
| Settings (Menu, Buttons...)
|
OMC, XML, INI, TXT
Note: For XML and INI files, Origin only supports these 6 files: CustomColors.ini, ColorManager.ini, TextStyles.ini, ParamTab.ini, default.xml, ImportMenu.xml (in \User Files\Themes\Menus)
|
| Fitting Functions
|
FDF
|
| Patch
|
Service Release patch files
|
| Themes, Import Filters, Palettes
|
OIS, ODT, OTH, OIF, ODQ, ODS
|
| Code, Apps
|
OGS, H, C, CPP, OXF, OPX
Note: Installing an OPX file will auto-copy the file to folder \User Files\Auto Install\, which allows you to share the tool later.
|
| Other
|
DOC, DOCX, PDF
|
| License
|
use_server.lic
Note: Check this checkbox to publish concurrent license - use_server.lic file from the group leader's computer (select menu Preferences: Optioins > System Path tab to see the license file path).
|
Two Folder Panel
There are two panels in the dialog User Files Folder panel on the left and Group Folder panel on the right.
When a file type is selected in the View check box, both panels list all files of this type in two folders.
Files with the same name but located in these two different folders are compared. The up-to-date status is marked by the color of file names.
| Color
|
Means
|
| Green
|
The file is older than its counterpart in another folder.
|
| Red
|
The file is newer than its counterpart in another folder.
|
| Blue
|
The file is identical to the one with the same name in another folder.
|
| Black
|
It is a new file. The file only exists in the User Files Folder or the Group Folder.
|
Note: The Add button or Remove button or Remove button  will be available when selecting the files with status Newer, Older or New File. After the files are added to another folder, the color of the file names becomes Blue both in User Files Folder list or Group Folder list. will be available when selecting the files with status Newer, Older or New File. After the files are added to another folder, the color of the file names becomes Blue both in User Files Folder list or Group Folder list.
Publishing Files
To publish files, you need to copy the files from your user files folder to the group folder. You can follow these steps in the Group Folder Manager:
- Select the file type of the files to be shared in the View file check boxes. Files of the selected type in the user files folder are listed in the User Files Folder panel.
- Select the files (hold down the Shift key or the Ctrl key for selecting multiple files if desired) in the User Files Folder panel.
- Click on the
 button. The selected files will be added to the Group Folder panel. button. The selected files will be added to the Group Folder panel.
- Click on the Publish button
 to publish the files and close the dialog. to publish the files and close the dialog.
Publish Files to Multiple Groups
From Origin 2019b, you can publish different files to different groups.
- Select the desired group folder from Group Folder drop-down list on Group Folder panel.
- Select the desired file on the User Files Folder panel
- Click Add to Multiple Folders button
 . In the dialog that opens, select all the group folders you want to add to, and click OK. . In the dialog that opens, select all the group folders you want to add to, and click OK.
- Click Publish to perform publishing for all changed folders.
If an Origin is member of multiple groups, it will be notified when any of these groups have new files and can receive files of all groups.
Copying Files from Group Folder to User Files Folder
When a file that exists in the group folder is missing in the user files folder, or when the file in the user files folder is older than its counterpart in group folder, you may want to copy the file in the group folder to your user files folder.
To do this in the Group Folder Manager:
- Select the file you want to copy in the Group Folder panel. To select multiple files, hold the Shift key or the Ctrl key and click.
- Click on the
 button. button.
Removing Files from the Group Folder
To remove the files from the group folder with the Group Folder Manager:
- Select the file type of the files to be removed in the View file check boxes. Files of the selected type in the group folders are listed on the Group Folder panel.
- Select the files (hold down the Shift key or the Ctrl key for selecting multiple files if desired) in the Group Folder panel.
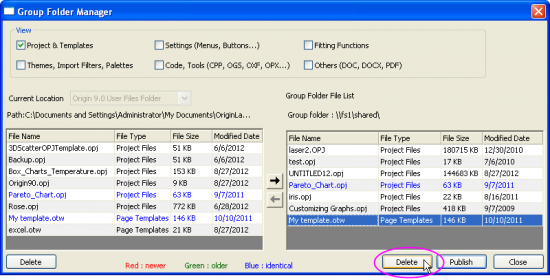
- Click on the Delete button below the Group Folder panel to remove the files from the group folder.
- Click on the Publish button
 to perform publishing and close the dialog. to perform publishing and close the dialog.

Deleting Files from the User Files Folder
To delete files from the user files folder with the Group Folder Manager:
- Select the file type for the file to be deleted in the View file check boxes. Files of the selected type in the user files folder are listed on the User Files Folder panel.
- Select the files (hold down the Shift key or the Ctrl key for selecting multiple files if desired) in the User Files Folder panel.
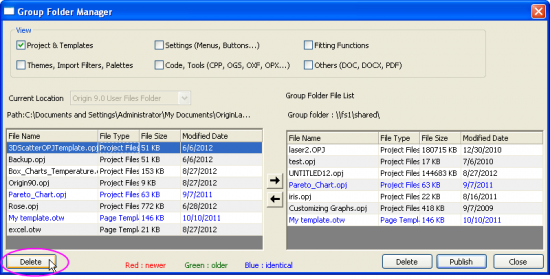
- Click on the Delete button below the User Files panel to delete the files from the user files folder.
- Click on the Publish button
 to perform publishing and close the dialog. to perform publishing and close the dialog.

| Note:
When you use Delete button in the Group Folder Manager to delete a fitting function file (FDF file) from the user files folder, it is actually moved to the \delete subfolder under the <User Files Folder>\fitfunc folder where is used to store the user-defined FDF files.
|
|