8.13.9 The Insert Variable Dialog Box (Used with Text Labels)GraphRef-InsInfoVar-Dialog
You can use the Insert Variables dialog box to insert workbook or matrixbook data or metadata into text objects added to plots of workbook or matrixbook data.
- If you want to insert metadata into a worksheet cell or the Before Formula Scripts panel of the Set Column Values dialog, please refer to this page.
To open this tool:
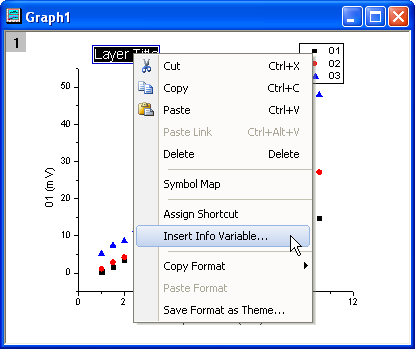
When the text object is being actively edited, you can open the Insert Variables dialog by two methods:
- Press the Ctrl+H key.
- Right-click and select Insert: Info Variable... from the context menu.
Left Panel
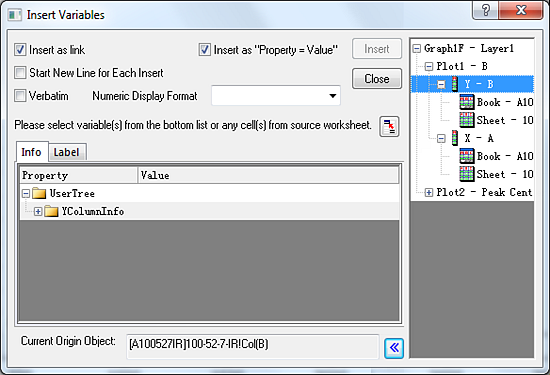
Insert as Link
Select this box to insert a string that is dynamically linked to the variable. Any changes of the variable will result in updates of the corresponding string.
When the Label tab is active, and column is selected in the right panel, you can select between two Link with... properties:
- The link form is like this: %(1Y,@LC). It displays the 1st Y dataplot's comment.
| Link notation
|
Explanation
|
| 1
|
Plot Index ( Plot 1 )
|
| Y
|
Dataplot
|
| @LC
|
Comment ( @LL = Longname, @LU = Units ...)
|
- The link form is like this: %(1@W,2,C). It displays the 2nd column of the worksheet.
| Link notation
|
Explanation
|
| 1
|
Plot Index ( Plot 1 )
|
| @W
|
Book Short Name
|
| 2
|
Column Index in the sheet
|
| C
|
Comment ( L = Longname, U = Units ...)
|
| Note: There is a list of variable options( @letter arguments) in the Text Label Options page.
|
Insert as "Property=Value"
Insert the variable in the form of "Property=Value", such as "Unit = cm". This is useful when inserting variables extracted during file import. See below.
Start New Line for Each Insert
Each inserted value starts a new line in the text label.
Verbatim
Select this check box to override escape sequences that are included in text. This is particularly useful when inserted variables such as file path, which includes backslash " \ " characters.
| Note: Do not check this check box, when you want to show the variables with superscript or subscript.
|
Numeric Display Format
When the Info tab is activate the control is available. Default is empty which means using the internal Display Format. The value just as it would appear in the worksheet. Click the arrow to the right-side of the control to see some example formatting options. Select from the list or type into the box using this list of Origin Formats. Supported formats include D (date) and T (time) options as long as the date and time data display in the worksheet as numeric None means inserting values at full precision (double = 15 digits).
| Note: Numeric format display which are set here cannot apply to data in the User Variables node, because data there is in fact a string, even though it might appear like dates or numeric data.
|
Data Selection Button (selecting cell(s) from a worksheet)
Use the data selection button  to insert up to 20 worksheet cell values (data rows or label rows). You can insert cell values from any worksheet in the folder. to insert up to 20 worksheet cell values (data rows or label rows). You can insert cell values from any worksheet in the folder.
When you link the cell value to the text label (Link to Value box), the underlying LabTalk code is of the form:
- %(1, @WT, ColIndex, RowIndex).
The syntax is explained in the LabTalk Help file topic Worksheet Cell Access.
Info tab
Choose the information to be inserted.

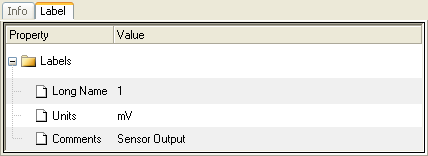
Label tab
When you select the column in the right panel, the labels of the column, such as Long name, Comment and Unit, will be listed in this tab.
Select a label and then you can insert it into the Text object
 . .
Current Origin Object
This non-editable text displays the Origin object selected in the right panel.
| Object in the right panel
|
Text displays
|
| Graph Plot
|
[GraphWindow]LayerIndex!PlotIndex"PlotLegend"
|
| Column
|
[Workbook]worksheet!column
|
| Workbook
|
[Workbook]
|
| Worksheet
|
[Workbook]worksheet
|
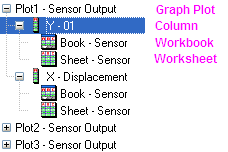
Right Panel
The plots in the target graph are listed in this panel. The source data of the plot is listed under the plot name recursively. You can select different Origin objects to show the corresponding info in the left panel. Then you can choose the information in the left panel and insert it.
Inserting Variables Extracted from Imported ASCII Files into Text Labels
When importing files with the Import Wizard, you have the opportunity to identify file name and header information as variables. This extracted metadata can be inserted into a text label in the following way:
- Create a new text label using standard "in-place" text label creation methods.
- While in text entry mode, press CTRL + H, or right-click and select Insert Info Variable. This opens the Insert Info Variables dialog box.
The Insert Info Variables dialog box will list variables extracted during ASCII file import. You can choose and insert variables in three ways:
| Literal Text
|
If you do not select either the Insert as Link or the Insert as "Property = Value" check boxes, the value of the variable will be inserted as literal text.

|
| Insert as link
|
Select this box to insert a string that is dynamically linked to the value of a variable. Any change in a string's value will produce a change in the label value when the file is next imported.
To learn more, see Linking Text Labels to Data and Variables.
|
| Insert as "Property = Value"
|
Select this box to insert "variable name = value" into the text label .

|
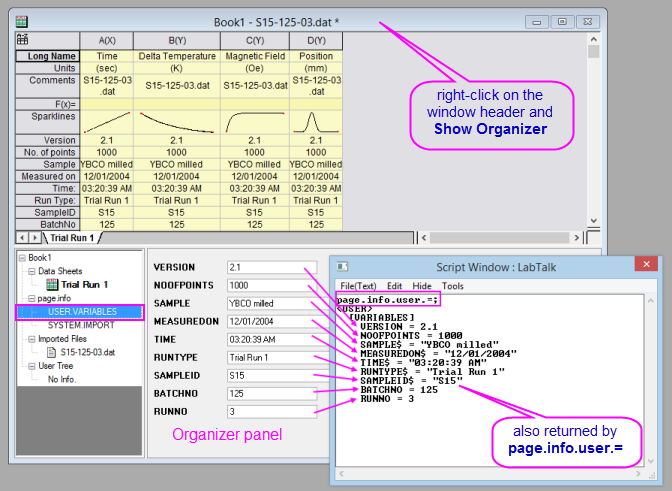
 | Variables stored in the page object can be listed in the Script Window by typing the command:
Page.info.user.=
|
|