1.4.1 Create and Edit an Origin C File
Overview
Code Builder is an Integrated Development Environment (IDE) for Origin C and LabTalk programming. Code Builder provides tools for writing/editing, compiling, linking, debugging, and executing your Origin C code. Although Origin C code can be written in any text editor, it must be added to Code Builder's Workspace to be compiled and linked.
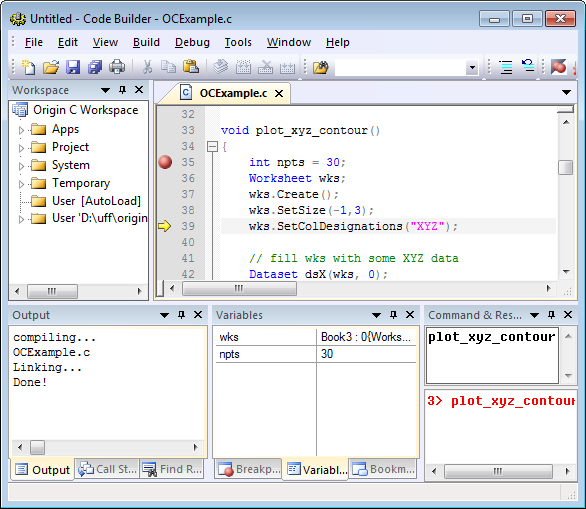
The Code Builder window
File Types
Origin C utilizes four types of files: source, object, preprocessed, and workspace.
Source (*.c, *.cpp, *.h, *.ocz)
Source files are essentially text files that contain human-readable Origin C code. You may create them in Code Builder or another text editor, and save them to any location. Code Builder's text editor provides syntax coloring, context-sensitive help and debugging features. Code Builder also allows you to create an encrypted Origin C source file (*.ocz) so it can be safely shared with others.
Until source files have been compiled, linked and loaded, the functions they contain cannot be used in Origin.
Object (*.ocb)File, Object File(*.OCB)
When a source file is compiled, an object file is produced. The object file will have the same file name as the source file, but will be given the *.ocb file extension. The object file is machine readable, and is what Origin uses to execute functions that are called. Origin compiles a source file for the first time, and then recompiles only when the source file is changed.
Object files in Origin are version specific, and therefore, sharing them is discouraged. If you wish to share some functions or Origin C applications, share preprocessed files instead.
Preprocessed (*.op)File, Preprocessed File(*.OP)
By default, Origin compiles source files to produce object files. However, the system variables below can be changed to produce a preprocessed file instead of an object file. Preprocessed files still require compiling, but have the following advantages for code sharing:
- Origin version independent
- Functions can be shared without sharing source code
- The build process happens much faster than with source files
The system variables that allow you to produce either object (OCB) or preprocessed (OP) files are @OCS and @OCSB. You can change their values in the Script Window or in the Code Builder LabTalk Console. For example, in the Script Window, enter:
@OCSB=0; // Hereafter, on compile, generate OP files
@OCSCompiler, Generate Pre-processed File
The default value of this variable is 1, which allows you to create an OCB file or OP file. If @OCS=0, the compiler will not create an OCB file or an OP file.
@OCSBCompiler, Type of Pre-processed File
The default value of @OCSB=1; this generates an object file at compile time. To generate an OP file, set @OCSB=0, after which OP files will be generated at compile time. The OP file will be saved in the same folder as its source file and have the same file name, but with the OP extension. Note that if @OCS=0, this variable is meaningless.
 | Notes:
1. The generated OP and OCB have 32 bit and 64 bit versions. For example, the op file generated from abc.c file on a 32 bit version will be named as abc_32.OP.
2. Since Origin 9.0, the generated 32 bit or 64 bit version file works only in its corresponding version (32 bit or 64 bit) of Origin.
|
Workspace (*.ocw)File, Workspace File(*.OCW)
In Code Builder, you may create or use a project that contains many Origin C source files. These files may or may not be hierarchically organized in folders. It would be very inconvenient to have to load many such files manually each time you switched between projects.
For this reason, the structure and files contained in the User folder can be saved to a workspace file. Upon loading a workspace file into Code Builder, a project is restored to the state in which it was last saved; all of your source files are available in whatever structure they were assigned.
The Workspace View
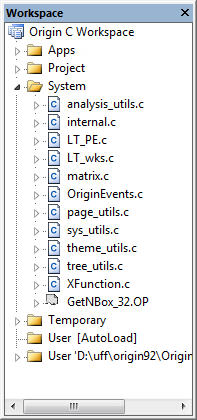
The Code Builder Workspace view contains six folders:
- Apps
- Project
- System
- Temporary
- User [AutoLoad]
- User
The Workspace View
The files in each folder are compiled and linked following different events.
AppsWorkspace, Packages Folder
This folder is used to manage packages. This folder contains only folders, and each folder represents a disk folder in Apps Folder.
- Context menu of "Apps" folder
When you right click on the Apps folder, there is a context menu with two items:
- Add Existing Folder...
- New
The first is for choosing a folder that already exists in the Apps Folder, and the second is for creating a new folder named Untitled which also creates a new disk folder named Untitled in Apps Folder. Repeating New will create enumerated Untitled folders.
- Context menus of each package folder.
-
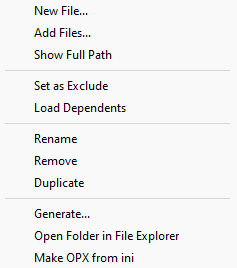
- New File...
- This is used to create file in the folder.
- Add Files
- This is used to add files to the folder. Each package folder represent a disk folder in Apps Folder. If selected files are not already in the Apps Folder\packageFolder\, they will be copied to Apps Folder\packageFolder\ folder.
- Show Full Path
- Show or hide the full path of the files.
- Set as Exclude
- Prevents all files in an App folder from being compiled and linked when the Build button is clicked in Code Builder.
- Load Dependents
- Load and compile all dependent Origin C files into the Temporary folder.
- Rename
- Rename the folder.
- Remove
- Remove the folder from Code Builder. This will not actually delete the folder from the file system.
- Duplicate
- Duplicate the folder.
- Generate...
- Launch the Package Manager and add the files from the package folder. If an OPX in the same file system location as the last time it was saved exists, that OPX will be loaded and all files removed before adding all the files from the package folder.
- Open Folder in File Explorer
- Open package folder in file explorer.
- Make OPX from ini
- Generate the OPX file by "package.ini" if exists. See [1]
ProjectWorkspace, Project Folder
Files in the Project folder are saved within the current Origin project file (*.OPJ). They are added to the Project folder of the Code Builder workspace when you open an Origin project file containing them. They are automatically compiled and linked upon opening the project file.
SystemWorkspace, System Folder
Files in the System folder are externally saved in Windows folders (usually in the Origin C folder or one of its subfolders). They are automatically added to the System folder of the Code Builder workspace, compiled, and linked whenever Origin starts.
TemporaryWorkspace, Temporary Folder
All files that are not listed in the Project, System, or User folders, and get loaded and compiled when using Origin, will appear in the Temporary folder. For example, if you export a graph then all the files used for handling a graph export will appear in the Temporary folder.
User [AutoLoad]Workspace, User Folder
This folder is similar with the User Folder described below, except that the files in this folder will be compiled and linked automatically when Origin is started, and then the functions defined in the files under this folder are available, and no need to compile and link manually.
UserWorkspace, User Folder
Files in the User folder are externally saved in Windows folders and are manually added to the User folder of the Code Builder workspace, compiled, and linked by the user in Code Builder.
| Notes:
The contents of the Apps and User [AutoLoad] folders persist across all Origin sessions, while the contents of the Project folder are unique to each Project file (OPJ).
|
Code Builder Quick StartCode Builder
Get started using Code Builder in just a few steps:
- Open Code Builder by pressing Alt+4 on the keyboard or by clicking the Code Builder toolbar button
 . .
- New a Source FileCreate a new source code file by pressing Ctrl+N or by clicking the New toolbar button. When the New File dialog appears enter a name for your source code file and then press Enter or click the OK button.
- An editor window will open. Go to the end of the last line in the editor window and press enter to start a new blank line. Enter the following function:
void HelloWorld()
{
	printf("Hello World, from Origin C\n");
}
- You need to compile and link the code before calling it. You can compile and link it by pressing Shift+F8 or by clicking the Build toolbar button
 . .
- The Output window will show the compiling and linking progress. If any errors appear, then double check your function and fix the errors. When no errors appear, the function is ready to be called.
- Functions, ExecutionClick in the top part of the Command & Results window. Since no argument is needed for the function, type either HelloWorld or HelloWorld() and press Enter. In the bottom part of the Command & Results window you should see a repeat of the line you entered, followed by a line with your function's output.
While these steps are sufficient to get you going with Code Builder, there are many more details that will help you write, debug and execute your Origin C files effectively. These are covered in the sections that follow.
|