2.6.6.9 imgUserfilter(Pro)
Menu Information
User Filter
Brief Information
Apply user-defined filter to image
Additional Information
This feature is for OriginPro only.
Command Line Usage
1. imgUserfilter fltm:=[Mbook4]Msheet1!Mat(1);
2. imgUserfilter fltm:=[Mbook4]Msheet1!Mat(1) offset:=2 dv :=10 type:=max;
X-Function Execution Options
Please refer to the page for additional option switches when accessing the x-function from script
Variables
Display
Name
|
Variable
Name
|
I/O
and
Type
|
Default
Value
|
Description
|
| Input Matrix
|
img
|
Input
Image
|
<active>
|
Specifies the source image to be manipulated. The default input is the active image.
|
| Output Image
|
oimg
|
Output
Image
|
<input>
|
Specifies the output image. By default, the output image is the same as the input image.
See the syntax here.
|
| Filter Matrix
|
fltm
|
Input
MatrixObject
|
<unassigned>
|
Specifies the matrix that represents the mask used for filtering.
|
| Offset
|
offset
|
Input
int
|
0
|
Specifies a value used to offset the final result of the output.
|
| Divisor
|
dv
|
Input
int
|
1
|
Specifies a value used to divide the final result of the output.
|
| Operation Type
|
type
|
Input
int
|
sum
|
Specifies the type of operation used to get the filtering output.
Option list
- Performs sum operation.
- Performs maximum operation.
- Performs minimum operation.
|
Description
Although OriginPro offers many manipulable tools to process images, user-defined spatial filters can process an image flexibly, allowing you to apply various effects on images.
The imgUserfilter function filters the input image using a user-defined mask. With this function, customer can create a user-defined spatial filter and apply it to the image. The selected filter is passed as a parameter to this function. The filter has a rectangular form (matrix) where the values are user-defined. It allows the creation of simple customized filters, where each value found in matrix is multiplied by the corresponding pixel, and then the specified operation is performed on the results.

Examples
In this example, we use the imgUserfilter function to apply a user-defined filter to the input image:
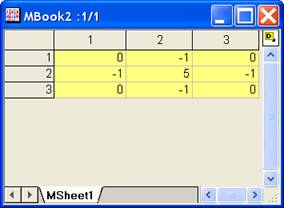
- Create a new matrix for the mask.
- From the menu, select Matrix: Set Dimensions to open the dialog of mdim. Set Columns to 3 and Rows to 3. Click OK to close the dialog.
- Enter the values for this matrix as the screenshot below:
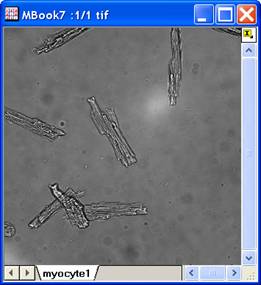
- Create another matrix and import myocyte2.tif under \Samples\Image Processing and Analysis folder into it.
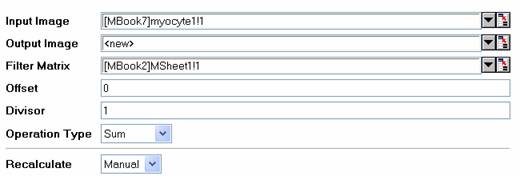
- When this image is active, select Image: Spatial Filters: User Filter to open the dialog of the imgUserfilter X-Function.
- In the dialog, change the settings as the screenshot below and click OK to close the dialog.
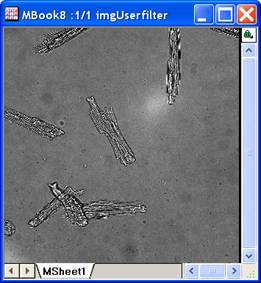
A new image is created. We can see that the edges and details are enhanced.
|
|
|
The original image
|
The output image
|
Algorithm
The computation uses L_UserFilterBitmap() function from LEADTOOLS Main API. Please refer to the LEADTOOLS Main API Help file, Version 14 and read the L_UserFilterBitmap topic.
References
LEADTOOLS Main API Help file, Version 14
Related X-Functions
imgMedian, imgAverage, imgSharpen
|