11.2.8 Create and Update Apps for OriginCreate-Update-Apps
Summary
Apps are custom applications for Origin that perform specific graphing and/or analysis tasks. Origin users can browse for Apps and download and install them from the File Exchange area of the OriginLab website. Origin users can also create Apps and share with other on File Exchange. This tutorial provides the guidelines for making an App and detailed steps to build, upload and modify an App.
What you will learn
This tutorial will show you how to:
- Build an App
- Upload an App to File Exchange Website
- Modify an App and Submit for Approval
App Files Specifications
The following files are supported/needed for Apps:
Icon files
- Icon file (Required)
- This should be a png file with size of 32*32 in pixels. This icon will be displayed in the Apps Gallery window in Origin.
- Small icon file (Optional)
- This should be a bmp file with size of 16*16 in pixels, and 16 color (4 Bits). It will be available from View: Toolbars: Apps button group in Origin. It can be used as a button, by adding to a toolbar.
Programming files
X-Function, *.ogs, *.c, *.h and DLL files are supported. Note that X-Function file name should not be the same as *.c file name if both exist.
Other files
Any other files such as documentation (*.chm, *.pdf), image files, sample data, etc, can be included.
Building an App
1. Locate the Apps folder under the AppData area of your Origin installation. You can enter the following command in Command/Script Window to locate this folder:
%@A=; // The output can be, e.g., C:\Users\XXX\AppData\Local\OriginLab\Apps\
2. Open the folder in the path found in step1, create a subfolder in this location. Note that the subfolder name will be used as your App name. Place all your files for the App in this subfolder.
3. Start Origin and click Code Builder button  in Origin main interface. in Origin main interface.
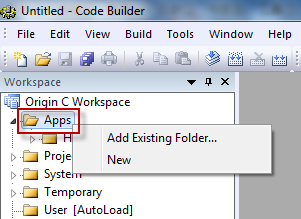
4. In Code Builder window, right click on the Apps folder in the left Workspace panel. Select Add Existing Folder from the shortcut menu and browse to add the folder created in step 2. Expand the folder in Workspace panel. All files in the folder will be listed.
Note that if you have no existing App folder, you can choose New from the shortcut menu to create a new sub-folder in Apps folder. If you right click on a file, you can choose to remove the file. Right click on the folder, and you can add more files, even files not located in current folder.
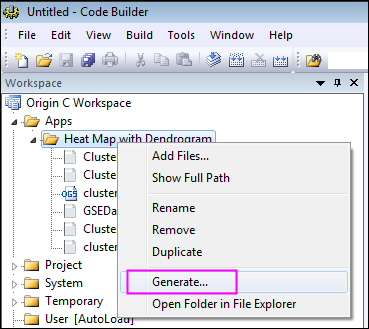
5. Right click on the newly created App folder in Code Builder's Workspace panel, and choose Generate from the shortcut menu. It will open the Package Manager dialog.
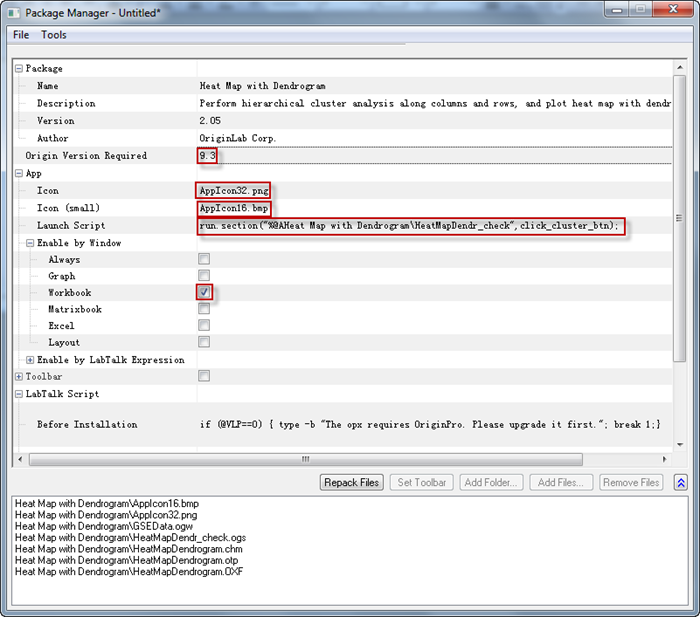
6. In Package Manager dialog, do the following:
- Package branch:
- Name
- Do not change the Name field, otherwise the folder name will also be changed.
- Description
- Input descriptions of the App in this field. The desciptions will be shown in the file exchange web's Summary section.
- Version
- Set current App version. You can use two decimal digits, e.g. 1.11.
- Origin Version Required
- Set the required Origin version. For Origin 2016, you should type 9.3 instead of 2016.
- App branch:
- Icon
- Set it to file name for icon to be displayed in Apps Gallery window.
- Icon (Small)
- Set it to file name for small icon used in toolbar.
- Launch Script
- LabTalk script to run after you click the App icon. If you want to open an X-Function dialog, you can write your script such as: xfname -d; You can also have your script point to a section in ogs file, and run that section, e.g. run.section(%Afoldername\ogsname,sectionname).
- Enable by Window
- Specify the active window type(s) for which the App should be enabled. e.g. for Latex App, Graph window should be active.
 | While it would be rare to do so, you can specify that your App be enabled for Notes windows by expanding the Enable by LabTalk Expression node and beside LabTalk Expression, type the following:
note.active=1
|
- LabTalk Script branch:
- Specify LabTalk script for before, after installation and before uninstalling.
7. When settings are done in Package Manager, click File: Save from the menu. The .opx file will be saved. The opx name can be different from the folder name. The opx file for an App is ready now. You can simply drag-and-drop the file onto Origin to install. Note that you may need to run Origin not as administrator to be able to drop the file onto Origin.
Uploading App to File Exchange Website
When the App package file is ready, you can upload it to File Exchange website to share with the public. To do it, follow the steps below:
- Go to File Exchange Website, click Submit a file on the bottom right to open Submit File page. Select File Type as App and fill in other needed information, File Category, Created using Origin:, etc. Note the information contained in the App package will be automatically extracted, such as, Minimum Origin Version Required, Title, Summary.
- Upload the App OPX package file, screenshot image, click Submit button to submit your App and create a File Exchange tool page for it.
- You can then download the OPX file from the web page you have created, and drag-and-drop onto Origin to test it. A package ID will be assigned to the opx during the download process.
- You can continue editing the web page for your App. Once finished, you can click Update button to update the web page.
- When you are ready to publish your App, press the Request Approval button on the botton of Update form. You will be notified by OriginLab through email when your App has been approved. The approval status is also shown on the Update File page as indicated by OriginLab Tested, OriginLab Approved checkboxes.
- Once your App got approved, it will be automatically shown on the Tools: Apps on file Exchange menu list.
Modifying an App
Modify App Settings
- Select Tools: Package Manager from Origin menu. Select Tools: Browse Installed Package in Package Manager dialog's menu. Select the App and click Open button.
- You can change the settings in the dialog. If your files in the folder are modified, you can click Repack Files button.
- Click File: Save to save the App OPX package.
Add, Remove or Change Files in App Folder
When you need to add files, remove files or change file names in App folder, you can perform these operations by right clicking on the App folder in the Workspace panel on Code Builder and selecting corresponding option from the shortcut menu. When done, click Generate from the shortcut menu to regenerate the App package.
Note that when removing files or changing file names, original files should be kept in the App folder under path C:\Users\XXX\AppData\Local\OriginLab\Apps\ even if they are not being used, otherwise old settings in the opx will not be kept in Package Manager dialog when you click Generate button.
Upload Modified OPX to File Exchange Page
Log in Origin website, go to the File Exchange page you have created for your App and upload the updated OPX file to the File Exchange page. Update the web page as needed, including notes on what has been updated in current App version. Users would know this update from menu Tools: Apps on File Exchange: * YourApp (installed) as indicated by the asterisk symbol * if this App was previously installed.

Request Approval from OriginLab
Click the Request Approval button in the File Exchange webpage of your App and wait for OriginLab to notify you.
|