2.13.6 Image ProcessingImage-Processing
Image ProcessingOrigin 8 offers enhanced image processing capabilities compared with earlier versions of Origin. A few examples of basic image processing are shown below, along with LabTalk scripts for performing the necessary tasks.
To view a list of all X-Functions available for image processing, please type the following command:
lx cat:="image*";
Some of the X-Functions are only available in OriginPro.
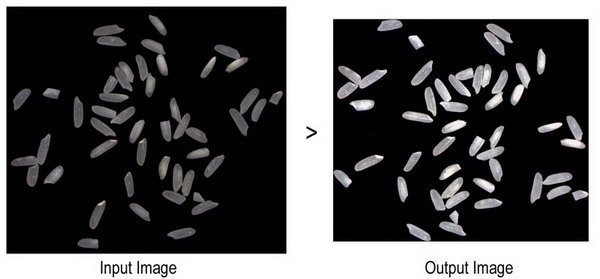
Rotate and Make Image Compact
This example rotates, trims the margins, and applies an auto-level to make the image more compact and clear.Rotate image, Trim margin
//Create a new folder in the Project Explorer
pe_mkdir RotateTrim path:=aa$;
pe_cd aa$;

//Create a matrix and import an image into it
window -t m;
string fpath$ = "samples\Image Processing and Analysis\rice.bmp";
string fname$ = System.path.program$ + fpath$;
impimage;
window -r %h Original;

//Get the dimension of the original image
matrix -pg DIM nCol1 nRow1;

window -d;	//Duplicate the image
window -r %h Modified;

imgRotate angle:=42;
imgTrim t:=17;

matrix -pg DIM nCol2 nRow2; //Get the dimension of the modified iamge

imgAutoLevel;// Apply auto leveling to image

window -s T;	//Tile the windows horizontally

//Report
window -n n Report;
old = type.redirection;
type.redirection = 2;
type.notes$=Report;
type "Dimension of the original image: ";
type "   $(nCol1) * $(nRow1)\r\n";   //  "754 * 668"
type "Dimension of the modified image: ";   //  "688 * 601"
type "   $(nCol2) * $(nRow2)\r\n";
type.redirection = old;
We can also rotate, resize, and adjust the color scale of the image in new image window.
Minimum Origin Version Required: 2016 SR0
fname$ = SYSTEM.PATH.PROGRAM$ + "Samples\Image Processing and Analysis\Rice.bmp";
cvopen fname:=fname$;  //open the image in new image window;

cvRotate angle:=-42 interp:=0 resize:=0 trim:=1; //rotate and resize the image
cvGray img:=<active>;
cvHistEq img:=<active>;   //equalizes the histogram
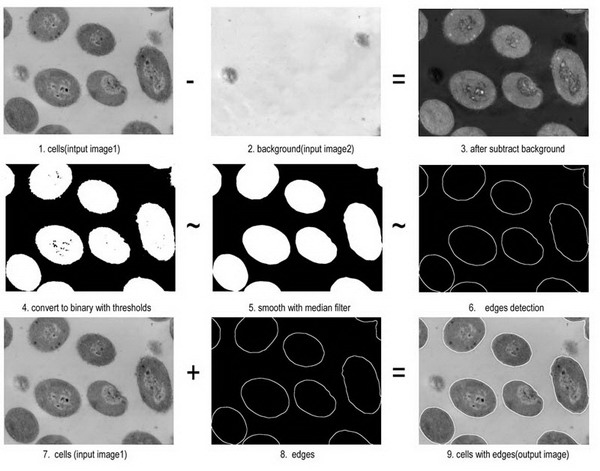
Edge Detection
Edge DetectionSubtract background from Cells image then detect the edges.
//Create a new folder in the Project Explorer
pe_mkdir EdgeDetection path:=aa$;
pe_cd aa$;

//Create a matrix and import the cell image into it
window -t m;
string fpath$ = "samples\Image Processing and Analysis\cell.jpg";
string fname$ = System.path.program$ + fpath$;
impimage;
cell$ = %h;

//Create a matrix and import the background image into it
window -t m;
string fpath$ = "samples\Image Processing and Analysis\bgnd.jpg";
string fname$ = System.path.program$ + fpath$;
impimage;
cellbk$ = %h;


//Subtract background and pre-processing
//x, y is the offset of Image2
imgSimpleMath img1:=cellbk$ img2:=cell$ func:=sub12 x:=7 y:=13 crop:=1;
//specify the lowest and highest intensity to be convert to binary 0 or 1.
imgBinary t1:=65 t2:=255;
// the dimensions of median filter is 18
imgMedian d:=18;

//Edge detection
// the threshold value 12 used to determine edge pixels,
// and shv(Sobel horizontal & vertical) Edge detection filter is applied.
imgEdge t:=12 f:=shv;
edge$ = %h;

//Add the edges back to the cell image
imgSimpleMath img1:=edge$ img2:=cell$ func:=add;
window -z;
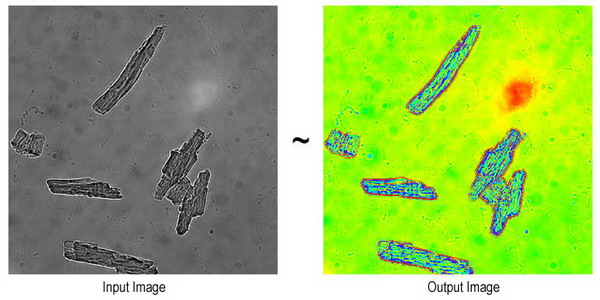
Apply Rainbow Palette to Gray Image
This example shows how to convert a gray image to rainbow color.
pe_mkdir Conversion path:=aa$;
pe_cd aa$;

//Create a matrix and import a sample image
window -t m;
path$ = System.path.program$;
fname$ = path$ + "samples\Image Processing and Analysis\myocyte8.tif";
impimage;
window -r %h Original;

window -d;	//Duplicate the image
window -r %h newimage;

imgC2gray;	//Convert to gray

//Apply pallete
fname$ = System.path.program$ + "palettes\Rainbow.PAL";
imgpalette palfile:=fname$;

window -s T;	//Tile the windows horizontally
Add Palettes to gray scale image in new image window
Minimum Origin Version Required: 2016 SR0
fname$ = SYSTEM.PATH.PROGRAM$ + "Samples\Image Processing and Analysis\cell.jpg";
cvopen fname:=fname$;  //open the image in new image window;

cvGray img:=<active>;
cvPalette img:=<active> fname:="C:\Program Files\OriginLab\Origin2016\Palettes\Lite Cyan.pal";
Converting Image to DataConverting Image to Data
When an image is imported into a matrix object, it is kept as type Image, indicated by the icon I on the top right corner of the window. For certain mathematical operations such as 2D FFT the type needs to be converted to Data, which would then be indicated by the icon D at the top right corner.
This script example shows importing multiple images into a matrixbook and converting them to type data:
// Find files using wildcard
string path$=system.path.program$+"Samples\Image Processing and Analysis";
findFiles ext:="*tif*";

// Create a new matrixbook and import all images as new sheets
newbook mat:=1;
impImage options.FirstMode:=0 options.Mode:=4;
// Loop over all sheets and convert image to byte data
doc -e LW {
   img2m om:=<input> type:=1;
}
|