1 App Development
Components of an App
The absolute minimum necessary components of an Origin App include:
- A file system folder with the same name as your App (the App folder).
- A 32 X 32 pixel PNG file for the App icon residing in the aforementioned folder.
Additionally...
- Usually, an App will also include at least one code file whether it be a LabTalk script file (*.OGS), Origin C file (*.C,*.CPP,*.H, *.OCZ), an X-Function (*.OXF) or even a Python file (*.PY). Sometimes there will be multiple files depending on the complexity of the App.
- The folder for an App can contain non-code files such as OPJ, OGW, OGG files as well as various types of Origin template files. Apps can also include help files, PDFs, example data, "Read Me" text files, or other types of files.
During App development and after installation, the folder for an App is placed in the "%LocalAppData%\OriginLab\Apps" folder in the file system ("%LocalAppData%" represents the hidden "AppData\Local" folder for the current Windows user). As will be discussed later, the folder for an App can be accessed either via Windows File Explorer or directly from Origin's Code Builder environment.
In the process of creating an App, all the files in the folder for the App will eventually be packaged into an Origin package file (OPX). This file serves as the drag and drop installer for an App.
The Process of Creating an App
- Deciding on an App Name
- Code Language
- Packaging and Installing an App for the First Time
- Continuing to Develop an App
- Finishing and Distributing an App
Deciding on an App Name
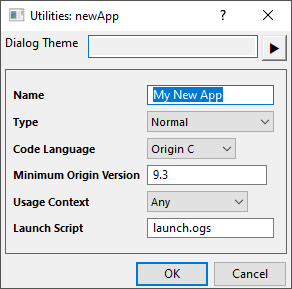
Run LabTalk script newApp -d to open the newApp dialog, and set the Name.

Note: The name can contain any characters that are valid for folder-naming in Windows but it is safest to limit the naming to ASCII alphanumeric characters and space or hyphen characters. It is also a very good practice to name the App as uniquely as possible to avoid conflicts with existing Apps or those that may be published in the future. For example, naming the app "Calculate Tangent" or "Fit Curve" is too generic. One suggestion is to add a prefix to the App name maybe based on a company name or some initials such as "ABC Calculate Tangent" or "CD Fit Curve".
Code Language
Set the Code Language. Default is Origin C(*.C,*.CPP,*.H, *.OCZ). The other Code Language is Python(*.PY).
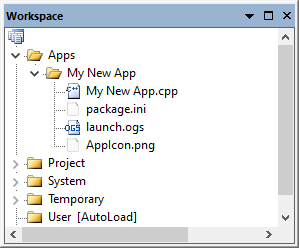
Click OK, then all necessary files will be created in the folder with the same name, and added to Code Builder workspace.
One of the files is launch.ogs. This script file contains the logic necessary to launch the App when its icon is clicked in the App Gallery after installation.

Note: At this point, the choice of source code file type is not irrevocable - the number and types of files can be modified down the road. The source code files can also be LabTalk script files (*.OGS) or X-Functions (*.OXF).
Packaging and Installing an App for the First Time
Package the new App into an OPX file for the first time so that it can be installed before further development (In order to actually launch an App from the App Gallery, it must be installed a first time).
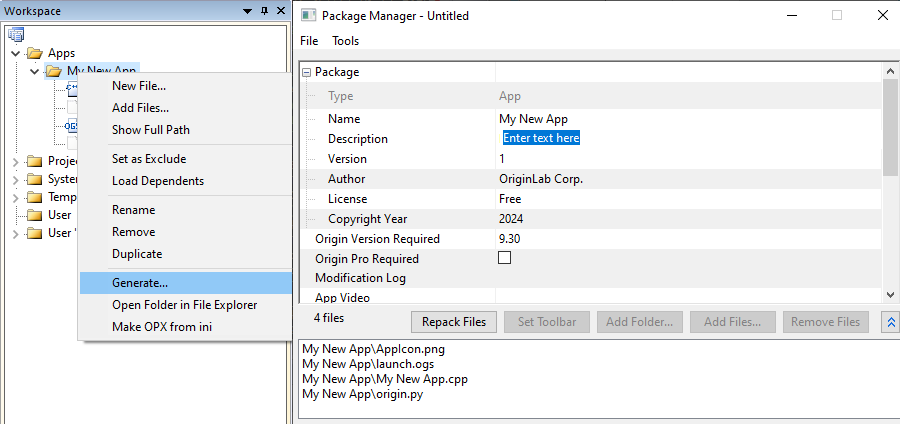
In the Workspace window of Code Builder, right-click on the folder for the App and select Generate.... The Package Manager will open with many of the required fields already filled in. A few fields may require editing by the developer.

Once all of the fields have been properly filled in, the OPX file can be saved (from the File menu of Package Manager), to an arbitrary location in the file system. The name of the OPX should be the same as that of the App.
Note: The two fields, Origin Pro Required and Encrypt C and CPP Files, were added in Origin 2018. These are advanced fields that can be ignored for basic App development. However, they are discussed in App Distribution.
Once saved, the OPX can be dragged into Origin to actually install the App. Note: the first time the App is installed during the development process, there will be a prompt to replace the existing files. As long as nothing has been changed since the OPX was saved, it is okay to replace the files.
For a more detailed look at Package Manager, see Packaging Multiple Files as OPX.
Important Note: When an OPX file has been generated this way, one should not attempt to modify it by opening the OPX file in Package Manager, directly. First, the list of files in the package is locked. Second, it may cause the OPX file to become out of sync with the internal settings for it in Origin. One should always modify the OPX file by right-clicking on the folder for the App in the Workspace window and selecting Generate....
About the "Origin Version Required" Field
Setting the proper Origin Version Required value during OPX generation is important to App development. It tells Package Manager what the minimum version of Origin should be when an App is actually going to be installed. If a user tries to install an App in an earlier version of Origin than the Origin Version Required value assigned to the App, the user will be warned and the App will not install. One generally should set the Origin Version Required value to be the same version of Origin with which the App is being developed.
This field expects a certain pattern: <Majorversion.MinorversionServicerelease>. Some theoretical examples based on the current and potential future Origin releases:
- 9.40 -> Origin 2017
- 9.41 -> Origin 2017 SR1
- 9.42 -> Origin 2017 SR1
- 9.5 -> Origin 2018
- 9.55 -> Origin 2018b
- 9.6 -> Origin 2019
- 9.65 -> Origin 2019b
etc...
OPX File Location and App Folder Backing-Up
It is very important to select a good, secure location to save your OPX file in order to protect it from being accidentally deleted. If one uninstalls an App, even an App that is under development and listed in the Workspace window, the folder for the App and thus all of its files are permanently deleted. Therefore, it is good to always have a "safe" copy of the OPX file in case the App needs to be reinstalled to get the files back. It is also a very good idea to frequently generate a new OPX in order to not accidentally lose any important changes that may have been made. It might even be a good idea to create a backup copy of the actual App folder.
Ease of Use Improvements in Origin 2019b and Later
Origin 2019b and later include a number of context menu based improvements to make developing Apps easier. Some appear at the App folder level and some appear at the file level:
- Set as Exclude (folder and file level): Prevents all files or an individual file in an App folder from being compiled and linked when the Build button is clicked in Code Builder. This allows the developer to control which files get compiled during App development.
- Load Dependents (folder and file level): This will load and compile all dependent Origin C files into the Temporary folder.
Both of these features are meant to alleviate the dreaded error from occurring when compiling App files.
Error, Function somefunc@_JIAAAAAAIAAAAAAALBAAAAAAIAAAAAAAIAAAAAAALBAAAAAALAAAAAAALAAAAAAA
LAAAAAAAIAAAAAAAIAAAAAAAIAAAAAAAIAAAAAAAIAAAAAAA was called, but its body could not be located during linking.
- Make OPX from ini (folder level): If an App folder contains a file name "package.ini", its content will be used to generate an OPX file for the App. The OPX file will be output to the Origin User Files folder. An example of a "package.ini" file is at the bottom of this page.
Continuing to Develop an App
At this point, one will probably want to continue developing an app by adding additional code to the source code files. Perhaps one might add, delete, or change the name of a source code file as well. At any point in the development process, a new OPX file can be generated to reflect the recent changes.
Adding and Deleting Files in an App
There may be a point at which one wants to add, delete, or change the name of one or more files for an App being developed. New files can be created via Code Builder as previously described. Files should be renamed or deleted via Windows File Explorer (assuming they are not open on the Code Builder editor).
If files have been added, deleted, or their names changed directly in the file system, the App file file in the Workspace window must be updated. Here are the relevant steps:
- Add a File: Right-click on the App folder and select Add Files... and selected the relevant file. It will be moved to the folder for the App.
- Delete a File: Right-click on the file and select Remove. This will not actually delete the file from the file system.
- If one has changed the name of a file, then it is simply a matter of first removing it and adding it back as per the above steps.
Regenerating/Updating an OPX File
Any time after creating the OPX file for the first time, one can update the OPX with the latest App changes. Simply right-click again on the folder for the App in the Workspace window and select Generate.... All of the fields from the last time the OPX was created, are already filled in and Package Manager has repackaged the files as listed in the workspace. It is generally recommended to increment the version number at this time. If the OPX file is still in the same file system location as the last time it was saved, Package Manager will save the OPX to that folder.
Note: One does not have to reinstall an App every time its OPX it updated. When one updates an OPX for an installed App, Origin will automatically incorporate the changes into the information it stores internally about the App. For example, if the version number is incremented, it will be reflected in the App Gallery for the App.
App Icon
The default Icon file is AppIcon.png, can be replaced with a new one of the same name. This PNG file must be 32x32px. The file can be saved with any color depth and even transparency.
Note: A 16x16px bitmap version of the App icon is optional for toolbar, because most don’t need the toolbar side. The color depth of the BMP file must be 16-color and it cannot support Transparency. As is the case with the PNG file, it is suggested to name the file "AppIcon.bmp" and to save it to the same location as the PNG file, and add to workspace. For instructions on how to add a toolbar to an App see Adding a Toolbar to an App in Advanced Topics in App Development.
Including Sample Files with an App
Sample files (projects, data for import, etc) may also be included with Apps. For more information see Including Sample Files with an App in Advanced Topics in App Development.
Finishing and Distributing an App
At some point, one can decide that the App has reached a point where it is finished (at least for the current version). At this point a "final" OPX can be generated as per previous steps and then the decision can be made about how to distribute it if desired. See Distributing an App for more information.
Example package.ini File
This is an example "package.ini" file for use with the new Make OPX from ini App folder level context menu item starting with Origin 2019b.
[Package]
Name=CD Test App
Description=An example of an Origin App.
Version=1.0
Author=Jane App Developer
[Origin]
Version=9.65
Pro=0
[App]
Icon=AppIcon.png
ToolbarIcon=AppIcon.bmp
LaunchScript=launch.ogs
[AppEnable]
Always=0
Graph=0
Workbook=1
Matrixbook=0
Image=0
Excel=0
Layout=0
LabTalkExp=
[Toolbar]
ButtonGroupFile=
Create=0
[LabTalk]
BeforeInstall=
AfterInstall=
BeforeUninstall=
[Files]
EncryptC=0
SourcePath=
OPXFile=
|