1.1.4 Creating Graph Preview GetN DialogGetN Graph Preview Dialog
This section shows how to create an X-Function graph preview GetN dialog , including how to initialize a preview graph, how to update the preview graph on a GUI change, and how to update the GUI on the rectangle moving on the graph.
Create an Empty GetN Graph Preview Dialog
- Select Tools: X-Function Builder... menu to open the builder.
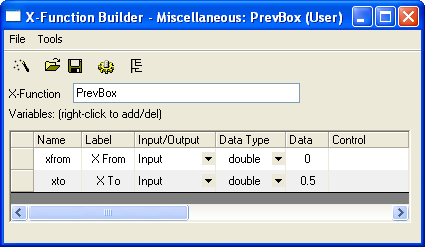
- Enter PrevBox as the X-Function name.
- Add a second variable by right-clicking on in the table and choosing Add variable.
- Change the variable names, labels, and other values as the image below
- Click Tree View button
 . Expand Usage Context -> Menu branch and set Auto GetN Dialog to GetNGraphBox with Preview. . Expand Usage Context -> Menu branch and set Auto GetN Dialog to GetNGraphBox with Preview.
- Click the Save button to save this X-Function under X-Functions-> Miscellaneous subfolder.
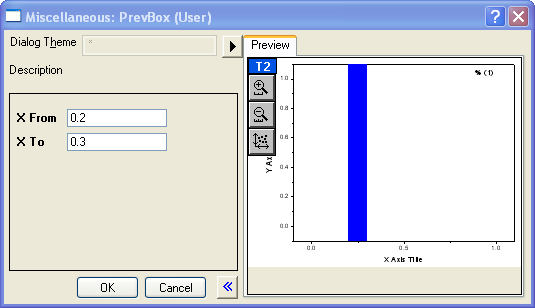
- Close X-Function Builder, and run prevbox -d in Command window. A GetN dialog with graph preview shows.
X-Function, Coding in Code BuilderCoding X-Function in Code Builder
Initialize Preview Graph
- Go to the GetNGraphPreview_OnInitGraph function, which is used to initialize a preview graph. Copy the following codes and paste them into the blank area of the function body.
// cast pgTemp from PageBase class object to GraphPage object
GraphPage gp(pgTemp);

// load this template to the graph in order to contain zoom
// in/out button on the graph. If this is not required,
// remove this line.
page_load(gp, "CurvePreview");

// get active graph layer in the graph page
GraphLayer gl = gp.Layers();

// add a rectangle, set x position reference to xfrom and xto
// variables
GraphObject go;
add_rect(gl, go, trGetN.xfrom.dVal, 0, trGetN.xto.dVal, -1,
    SYSCOLOR_BLUE, 2, LN_VERTICAL, true, false);
Click the Compile button.
Go to the Command & Results window at the bottom-right corner of Code Builder.
Enter prevbox -d and press Enter key to open the X-Function dialog. A blue rectangle shows in graph. Move it, X From and X To values don't update yet.
Update Preview Graph on GUI Change
- To cause the preview graph to be updated, you need to include the UPDATE_GRAPH_CHANGED bit in the dwUpdateGraph variable in the GetNGraphPreview_OnChange function. For example:
// include the bit to call GetNGraphPreview_OnUpdateGraph
// to update graph
if( !(dwUpdateGraph & UPDATE_GRAPH_CHANGED) )
	dwUpdateGraph |= UPDATE_GRAPH_CHANGED;
- Add the following code into the GetNGraphPreview_OnUpdateGraph function to update the graph. Click the Compile button and run "PrevBox -d" in the Command window.
// cast pgTemp from PageBase class object to GraphPage
// object
GraphPage gp(pgTemp);

GraphLayer gl = gp.Layers(); // get active graph layer
GraphObject go = gl.GraphObjects("Rect");

double x0 = trGetN.xfrom.dVal;
double x1 = trGetN.xto.dVal;

// update x position of rectangle on GUI
vector vv(4);
vv[0] = x0; vv[1] = x1; vv[2] = x1; vv[3] = x0;

Tree tr;
tr.Root.Data.X.dVals = vv;
go.UpdateThemeIDs(tr.Root);
go.ApplyFormat(tr, true, true);

// refresh graph window
gp.Refresh(TRUE);
Update GUI on Graph Object Event
If you want to update the GUI when you move/resize the rectangle on the preview graph, you need to:
- Add the following to the GetNGraphPreview_OnInitGraph function after the add_rect function.
// set event script to notify preview dialog when rectangle
// is moved or resized. For other event types see the GRCT_*
// in oc_const.h file.
set_LT_script(go, "run -oc notify_dlg_on_move_obj;",
              GRCT_SIZEMOVE);
- Add the following code to GetNGraphPreview_OnChange to update the new position of the rectangle to the GUI. Click the Compile button and run "PrevBox -d" in the Command window.
if( bChangedByGraph )
{
	// get rectangle x from/to and update GUI
	GraphPage gp(pgTemp);
	GraphLayer gl = gp.Layers();
	GraphObject goRect = gl.GraphObjects("Rect");

	Tree tr;
	tr = goRect.GetFormat(FPB_DATA, FOB_ALL, TRUE, TRUE);

	vector vv;
	vv = tr.Root.Data.X.dVals;

	trGetN.xfrom.dVal = vv[0];
	trGetN.xto.dVal = vv[1];

	// to include UPDATE_GRID_* bits to update GUI
	if( !(dwUpdateGrid & UPDATE_GRID_SIMPLE) )
		dwUpdateGrid |= UPDATE_GRID_SIMPLE;
}
Add Preview buttons
To add a Preview button and an Auto Preview check box, please see X-Functions: Customizing an X-Function: Adding Custom Button on Dialog: Show Preview Button on Graph Preview GetN Dialog
|