5.13 Creating OPX for Custom Tools with LabtalkTutorial-Creating-OPX-for-Custom-Tools
Summary
In Origin, it is possible to pack your own LabTalk script as an .opx file and share it with others. In addition, you could create a custom button calling the LabTalk script and also include this button in the .opx file for sharing.
What Will You Learn
This tutorial will show you:
- How to install an exiting OPX file
- How to call the x-function using a LabTalk file(.OGS)
- How to create the custom button(s) and export to a package file(.OPX)
- How to update a file in the OPX and repack in the Package Manager
- How to share the file with another machine
Steps
Install an OPX File
Drag and drop the OPX file MyStatistics.opx in the folder of <Origin Installation Directory>/Samples/LabTalk Script Examples/. This installed package includes four files:
- \OriginC\mystatistics.c
- \OriginC\mystatistics.h
- \X-Functions\Miscellaneous\normalitytest.OXF
- \X-Functions\Miscellaneous\onettest.OXF
The folder structure of the files is also remembered in the package and will be recreated when the package is installed.
Create Custom Buttons
In this section, you will learn how to use LabTalk script to call an X-Function (user-defined) and also how to create custom buttons which calls the LabTalk script file.
- Create a OGS file to run the x-function
- Click on the Code Builder button.
- In the Code Builder dialog, click on the New button to create a LabTalk Script File named MyButton in the User Files folder.
- Enter the following script in it and save the file. Then close the Code Build.
// Normality Test
[Normality]
	normalitytest -d;

// One Sample t-Test
[ttest]
	onettest -d;
- New a button group
- In the Origin menu, choose View: Toolbars to open the Customize dialog.
- Go to the Button Groups tab, and click New button to open the Create Button Group dialog.
- Set MyButton as the Group Name, select 6 in the Number of Buttons drop-down list , and choose the Userdef.bmp file from the User File Folder as Bitmap.
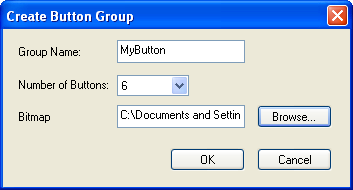
- Click the OK button and save the MyButton.ini file to the default path.
-
Setting the first button
- In the Customize dialog, select MyButton item from Groups list, and delete the first four buttons from Buttons panel.
- Click to choose the
 button, then click Settings button from Button group to open the Button Settings dialog. button, then click Settings button from Button group to open the Button Settings dialog.
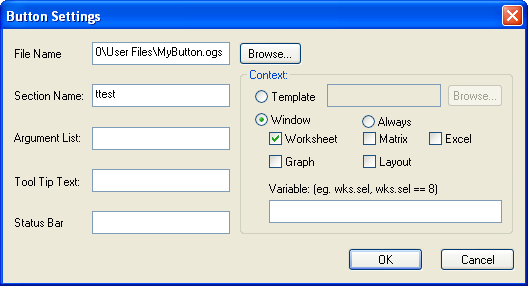
- Choose MyButton.ogs as the File Name, type Normality in Section Name textbox, and make sure the following check-boxes are unchecked: Matrix, Excel, Graph,and Layout.

- Click OK to close the dialog.
-
Setting the second button
- Click to choose the
 button, then click Settings button from Button group to open the Button Settings dialog. button, then click Settings button from Button group to open the Button Settings dialog.
- Choose MyButton.ogs as the File Name, type ttest in the Section Name textbox, and make sure the following check-boxes are unchecked: Matrix, Excel, Graph, and Layout.
- Click OK to close the dialog.
Create OPX File for Custom Tools
Now you have a custom tool which associated with several LabTalk script, X-Functions, and Origin C files, you can create an OPX file and share this custom tool with others:
- Click Export to open the Export Button Group dialog, then click Add File button and choose these four files in the User Files folder
- \OriginC\mystatistics.c
- \OriginC\mystatistics.h
- \X-Functions\Miscellaneous\normalitytest.OXF
- \X-Functions\Miscellaneous\onettest.OXF
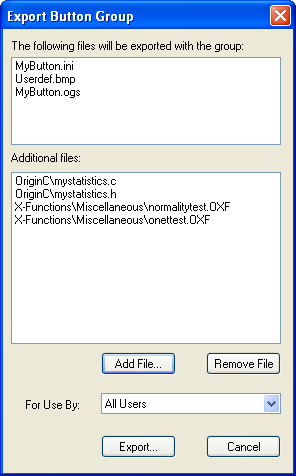
- Click Export button, then save the MyButton.OPX file to the User Files folder.
- Close the Customize dialog.
Edit the OPX file
If you update the OC or X-function files that are packaged in the OPX file, you can update the OPX file by Package Manager.We assume the file \X-Functions\Miscellaneous\normalitytest.OXF has been updated, so we need to repack it in the OPX file.
-
Select Tool: Package Manager in the main menu to open the dialog. In the dialog, select File: Open in the menu and open the MyButton.OPX file in the User Files folder.
- Click the Repack Files button to pack the files again.
- Under the Package node, update the Version to 2.
- Choose Save on the File menu and close the dialog.
Share the OPX file
You can share the OPX files to another user.
- Copy the OPX file in the another machine, then drag and drop the MyButton.opx file in Origin.
- When the package is installed successfully, you will find the new toolbar showing in the Origin.
- Select Tool: Package Manager in the main menu to open the dialog. In the dialog, select Tools: Browse Installed Package... . Then the installed packages are listed in the dialog. You can browse the packages information such as name, version, and description, and uninstall the selected package if you wish.
|