7 Import Data
Import-Data
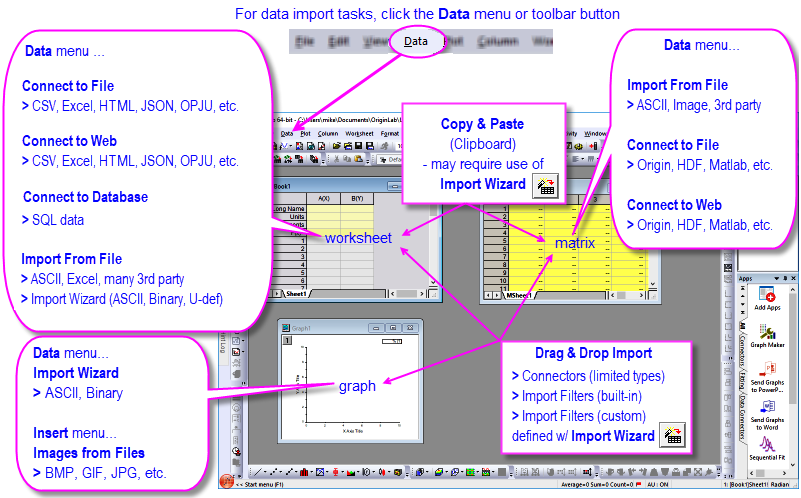
A new generalized data import mechanism we call Data Connectors was added in Origin 2019b. As the name implies, Data Connectors create a link between your project and an external source file. The source file may be local, it can be on a company network; it can even be on a web-server. Data Connectors support options for excluding imported data when saving the project (smaller files, plus, maintain a live link to source data) and for protection of data against accidental alteration or deletion. Data Connectors also make possible import of previously-unavailable data sources, including HTML Tables and JavaScript Object Notation (JSON). Data Connectors support drag-and-drop and Auto Import on Project Open. In addition, OriginLab continues to expand Connector support to new data formats. In Origin 2021b, for instance, we have improved Connectors for National Instruments TDMS and NetCDF files; plus we've added a new Thermo Fisher Scientific MSRawFile Connector.
Other supported import mechanisms:
- OriginLab continues support for Origin's long-standing X-Function + filter-based routines for ASCII, CSV, Excel, binary files, and many third-party formats, including MATLAB, pClamp, NI TDM and NetCDF. If you are a long-time user and you have import filters and Themes that you have long relied on, they should still work as they always have.
- Copy-paste for quick import of simply-structured data (mostly useful for quickly adding data to worksheets).
- For complex ASCII, binary or User-defined file types, you can use the graphical interface of the Import Wizard to parse your file and save settings to an import filter file. The Import Wizard supports power features such as saving file metadata to variables and use of custom Origin C functions for data processing and import.
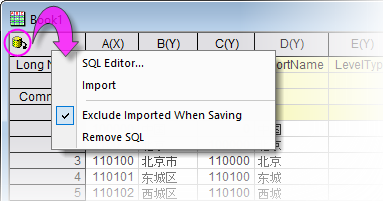
- If you work with SQL databases, you can use Origin's Database Connector and SQL Editor interface to create connection strings and SQL queries.
A Note to Upgrade Users
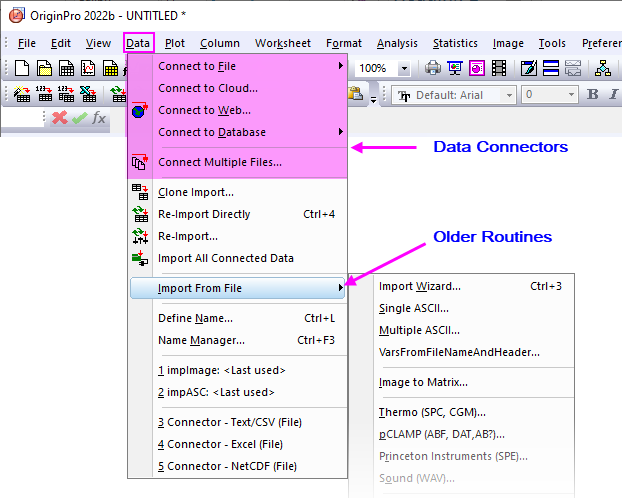
Longtime Origin users who are upgrading from older versions should note that import routines have moved from the File menu to a new Data menu. Here, you will also find Origin's newest data-import tool: Data Connectors.
Data Connectors
Data Connectors are a general mechanism for importing data to your Origin projects from local or from web-based files and pages. Data Connectors differ from older Origin import methods primarily in two default (but modifiable) behaviors:
- Data imported via Connector is locked to editing. This helps ensure data integrity.
- Data imported via Connector is not saved with the project. This helps to keep your project files smaller.
Data Connectors support a number of common data formats, including:
- Text/CSV
- Excel
- Origin File (project, workbook, matrix)
- MATLAB
- JavaScript Object Notation (JSON)
- HDF
- TDMS
- HTML Table
- Import Filter (use a custom import filter with the Data Connector mechanism)
- Shapefile
- NetCDF
- XML
 | To connect to SQL database, see Database.
|
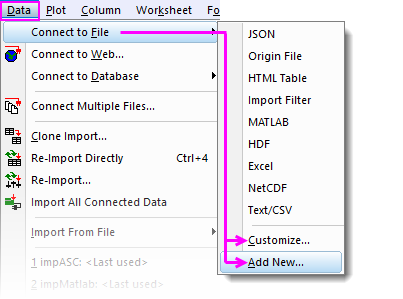
To import data with a Data Connector:
- With your workbook active, click the Data menu.
- If you are connecting to a local or network file, click Connect to File and pick a file type.
- To connect to multiple files, click Connect Multiple Files.
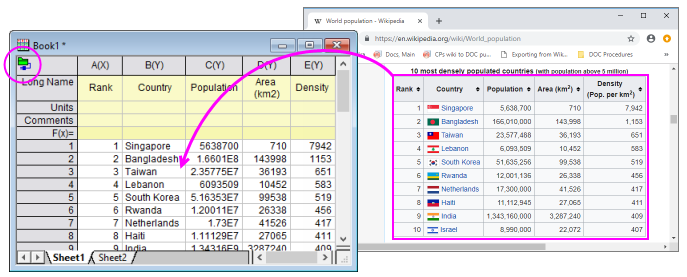
- If you are connecting to web data, click Connect to Web and enter a URL.
Things to Know about Data Connectors
- By default, when import data file size exceeds 500kB, the imported data and graphs made from that data are NOT saved with the Origin file (see LabTalk system variable @FSE). All analysis output resulting from imported data ARE saved with the Origin file. Not saving raw data with your project file can significantly reduce file size and improve performance when working with large projects.
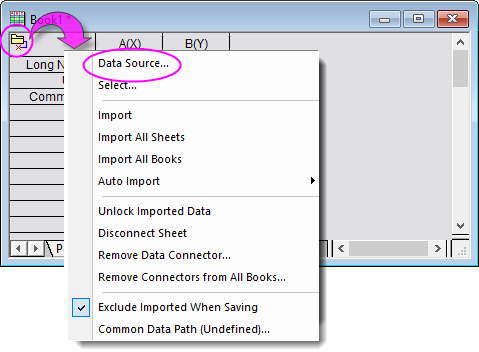
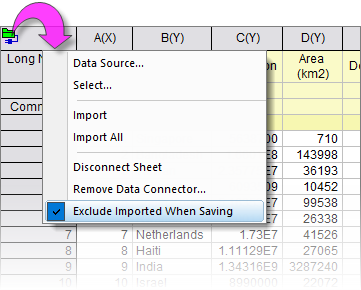
- IMPORTANT: Since, by default, connector-imported data (> 500kB) is not saved with the project file, users should always ask themselves whether they need to preserve imported data. This could be an issue when the data source is web-based and stored in a place beyond your control. If you prefer to save all data imported via a Data Connector, with your Origin file, click the Data Connector icon and clear the check mark beside Exclude Imported When Saving prior to saving your file†. Note that each Data Connector-containing book will have its own Exclude... check mark. Alternately, if you decide the Data Connectors are not needed, you can click the Data Connector icon and choose Remove Data Connector (from this book) or Remove Data Connectors from All Books (in the project).
- Data can be re-imported at any time by clicking the Data Connector icon (
 or
or  ) in the upper left corner of the worksheet and choosing Import (Ctrl+4) or Import All.
- By default, imported via a Data Connector is locked from editing. You can graph it and analyze it but you cannot modify it. While this ensures against accidental modification, some users may find this too restrictive. Unlock sheet data by clicking the Connector icon and choosing Unlock Imported Data. See this FAQ for more information on removing editing restrictions from Connector-imported data.
- A workbook can have only one type of Connector (e.g. Text/CSV). For files with a simple structure such as Text/CSV, you can have multiple sheets with each connecting to a separate file, as long as they share the same Connector. For files with more complex structures such as Excel or MATALAB, you will initially connect to one sheet/variable, then use the Data Navigator's Add and Connect Sheet(s) shortcut menu command to add other sheets/variables in the book, as needed. You can only connect a single Excel or MATLAB file to a single Origin workbook or matrixbook.
- In books containing files with a simple structure (e.g. CSV), when you right-clicking on a sheet tab and add a new sheet, the sheet is added with an empty Connector. The unconnected state is denoted by a pale-yellow Connector icon
 (see Connector states, below). Click on the Connector icon to open a shortcut menu where you can connect the sheet to a data source.
- Data Connectors that you do not use can be hidden by choosing Data: Connect to File: Customize... and clearing the checkbox next to unused Connectors.
- Data Connectors for file formats not shipped with Origin, are available by clicking Data: Connect to File: Add New.... New Data Connectors are added to the Data menu.
 | †Origin caches data imported by Data: Connect to Web, for a period of time determined by LabTalk system variable @CFDT, plus file size. By default, a 10MB file will use cached data for ~24 hrs. In other words, if you re-import (i.e. reconnect to the web file) within 24 hrs, you will be using data that was cached on first import. If you re-import to this 10MB file after 24 hrs passes, the cache is cleared and the data are freshly imported. To learn how to control this caching behavior see, these topics:
|
Data Source File Path
A Data Connector icon appears in one of five states:
- When the data source is connected, the icon looks like this:
- When data in the sheet are unlocked to editing (either by the Connector menu or @IPDC=0), the icon looks like this:

- When a data source import is pending, the icon looks like this:
- When a new sheet is added to a connected book, an empty Connector is added to the sheet and the icon looks like this:
- When the data source is no longer viable (e.g. the data source has been moved), the icon looks like this:

- When the sheet is protected against all edits (worksheet protection), the Connector menu is disabled and the icon looks like this:

Regardless of the state of the connection, you can click the Connector icon, then use the Data Source File Path and Common Data Path to help you maintain the connection between your Origin files and your source data.
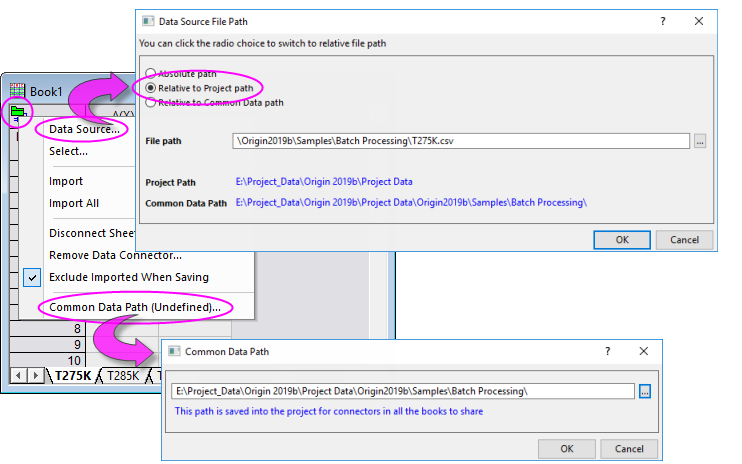
- Relative to Project Path: If your data are stored in folders under the project file, you could set Data Source File Path to Relative to Project path. You can then move the project and data sources together, and their relative paths are preserved. No path corrections are then needed when re-opening the project file from a different location on your network.
- Relative to Common Data Path: If data sources are under some common path, you could set Data Source File Path to Relative to Common Data Path. If the files are subsequently moved, you can re-establish the Common Data Path and then Import All Books.
Data Navigator
The Data Navigator is a collapsible panel that is automatically added to the workbook when you connect to multi-page/multi-variable files such as Excel, MATLAB or Origin Projects.
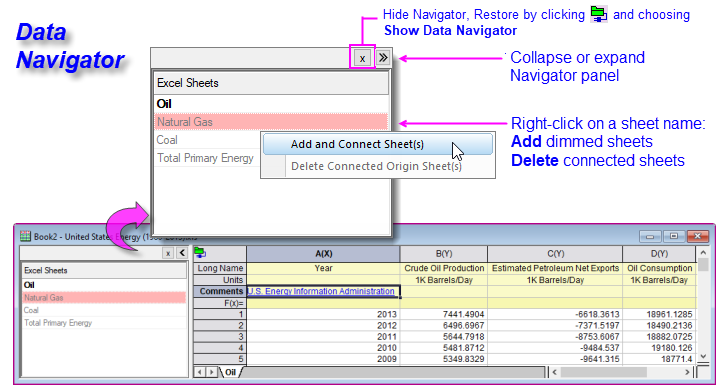
- Origin will import data from the first sheet and list other sheets in dimmed type.
- Right-click on a dimmed sheet -- or press CTRL or SHIFT and select multiple sheets -- then choose Add and Connect Sheets.
- The file name is assigned to the book Long Name and sheets are the original sheet name is assigned to sheet Name.
- Connected sheets can be deleted from the current Origin workbook.
Data Connectors and Drag-and-Drop
There is drag-and-drop support for the file types listed under Data: Connect to File:
- For files with a simple header information (e.g. only column name and units), a Data Connector is added and the file is properly parsed with no need for an import filter.
- For files that are not properly parsed (i.e. header information ends up in the data portion of the worksheet), consider making an Origin Import Filter (*.oif) file using the Import Wizard.
- Import filters can be saved to the data file folder, the User Files\Filters folder or in the current window. If you intend to use a template for your data import, you can save the filter to the window; otherwise the filter file (*.oif) should be placed either in the data file folder or in \User Files\Filters.
Connecting to Text/CSV
CSV Files
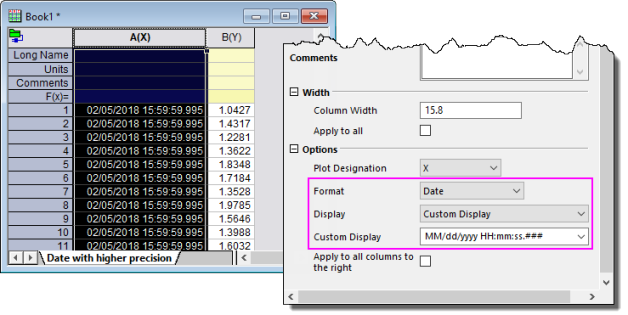
You can use a Data Connector to import local or web-stored text files (TXT, DAT, CSV). Data Connector methods work well for these file types, simplifying and in some cases eliminating, some of the problems associated with Origin's older X-Function-based import routines. For instance, import of date-time data always required manual configuration of date-time columns. With Connectors, if your date-time data are of a standard, easily-recognized format, that configuration is done for you automatically.
To connect to a file on a local or LAN drive:
- With the workbook active, choose Data: Connect to File: Text/CSV.
- Browse to and select your file.
- Set your CSV Import Options. In many cases, you can simply accept defaults and your file will be cleanly imported, so as a test, try importing data without modifying defaults. If the results are unsatisfactory, rerun the import and modify the default settings. Click the Other Options button (to the left of OK) for more options.

|
In this mini-tutorial, we use a Data Connector to import multiple files. These identically-structured files have multiple rows of metadata that we want to preserve. So, you will make use of an import filter file that has been developed using the Import Wizard, to import the files and write file metadata out to multiple column label rows in each worksheet. In so doing, you will see (a) how to import multiple files using a Data Connector and (b) how you can use an import filter file (*.oif) developed with an earlier version of Origin, to import files using Origin's newer Data Connector technology.
- Start a new project and with the workbook active, choose Data: Connect Multiple Files.
- In the files2dc dialog box, set the following:
- Data Connector = Import Filter
- Source = Specified Files
- File Names = <Origin Program>\Samples\Import and Export\S15-125-03.dat, S21-235-07.dat and S32-014-04.dat
- Same Book = enabled (checking the box will bring all files into one book)
- Click OK and in the dialog that opens, set Import Filter = Data Folder: VarsFromFileNameAndHeader.oif
- Click OK and the three files are imported as separate sheets in the workbook.
|
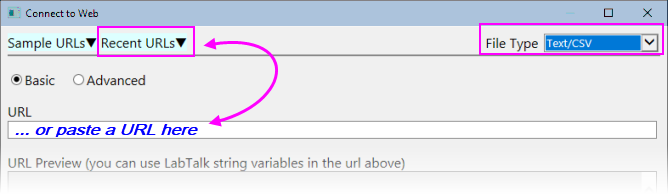
To connect to a file on the Web:
- Choose Data: Connect to Web.
- If you have a file URL, enter it in the URL box. Otherwise, set File Type to Text/CSV (optional but helps to filter Recent URLs), then click directly on Recent URLs and pick from the list.
| You can use the CSV Import Options dialog to specify a partial import of web-stored files just as you can for locally-stored files. Check the Partial Import box for guidance on the syntax used to define Column and Row import.
|
| Note: To learn more about working with the Text/CSV Connector, see the Origin Help:
Help: Origin: Origin Help > Text/CSV Connector
|
Connecting to MATLAB Files
While Origin continues to support older X-Function based MAT file import, Data Connectors offer some distinct advantages for import of both locally-stored and web-stored MATLAB files:
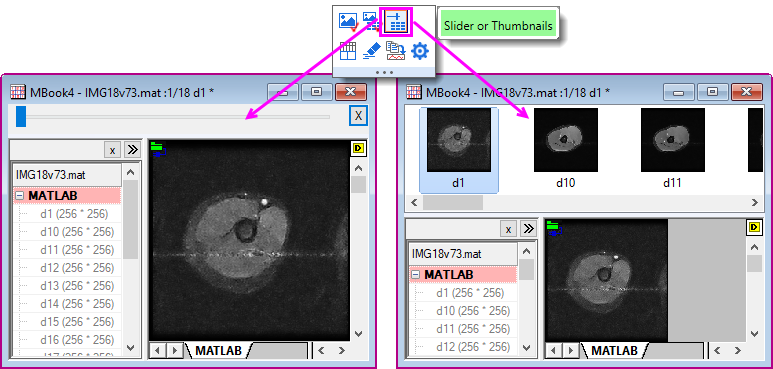
- Connecting to a MATLAB file at the root level will add all variables as Origin matrix objects in the matrixsheet.
- A slider is added so that you can flip through Origin matrix objects in the sheet. You can toggle between slider and thumbnails using the Slider or Thumbnails Mini Toolbar button.
- The Connector also adds a collapsible Data Navigator panel to the window. If you wish to add variables as individual sheets, you can right-click on the Data Navigator list and add them.
To connect to a MATLAB file:
- With a workbook or matrixbook active, click Data: Connect to File: MATLAB or Data: Connect to Web and enter a URL to your .mat file.
- Select the variables that you want to import (add them to the Browser's bottom panel) and click OK.
| Note: To learn more about working with the JSON/MATLAB Connector, see the Origin Help:
Help: Origin: Origin Help > JSON/MATLAB
|
Connecting to NetCDF and Shapefiles
The NetCDF file format is used for sharing multi-dimensional scientific data. The format is widely used in climate science. Shapefiles are commonly used to store geographic boundaries and other geo-spatial data.
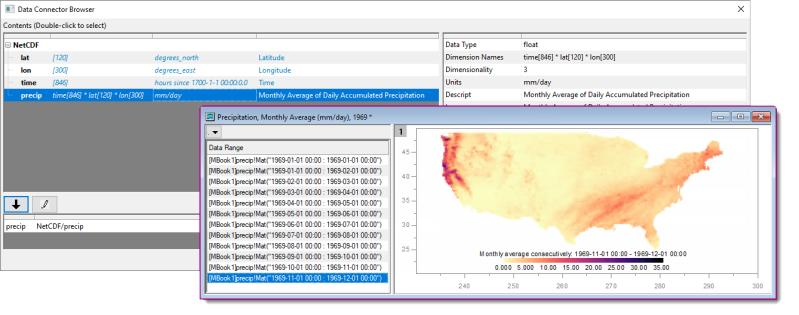
To connect to a NetCDF file:
- With a workbook or matrixbook active, click Data: Connect to File: NetCDF; or Data: Connect to Web and enter a URL to your .nc file.
- Select the variables that you want to import by adding them to the Browser's bottom panel.
- Adjust Import Options ("pencil" button) as needed and and click OK twice.
- If a workbook is active but the variable requires a matrixbook, you will be prompted to add a new matrixbook or an embedded matrixbook in the active workook.
To connect to a Shapefile:
- With a workbook or matrixbook active, click Data: Connect to File: Shapefile and browse to and choose your .shp file.
- Specify whether to Load Attributes and (optionally) encoding and/or Convert to WGS84, and click OK.
| Note: To learn more about working with the NetCDF Connector, see the Origin Help:
Help: Origin: Origin Help > NetCDF Connector
|
Connecting to a Cloud Drive
You can connect to Origin, MS Excel and ASCII files stored on MS OneDrive or Google Drive. Once you've established your account credentials, connecting to cloud files is similar to connecting to local files:
- With a workbook active, click Data: Connect to Cloud. This opens the browser for picking files.
- Use the browser's drop-down controls to switch cloud services or accounts, if needed.
-
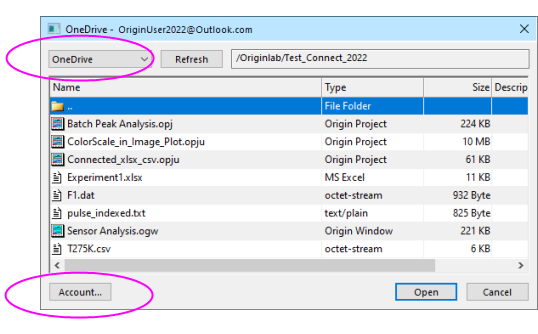
- Pick a file and click Open.
Note that the first time you connect to a cloud account, you'll be asked to verify that account. OriginLab will only access and transfer data between your cloud account and your local computer using a temporary file. No other communication of information occurs.
Working with Excel Data
Excel
There are several ways to work with MS Excel data in Origin:
- You can copy Excel data to the Clipboard and paste or paste link that data into Origin.
- You can use a Data Connector to import a local Excel file by (1) clicking Data: Connect to File: Excel, (2) clicking the
 button on the Standard toolbar, or (3) dropping your Excel file onto the Origin workspace.
- You can use a Data Connector to import Excel data from the web by clicking Data: Connect to Web: Excel (see below).
- You can use Origin's older X-Function-based routines to import a local Excel file by clicking Data: Import From File. This option was recently hidden to accommodate the Excel Connector but if you prefer to use this method, see this section of the Origin Help file.
Things to know:
- Origin imports files of type .xls, .xlsx or .xlsm.
- If you are importing data using the Excel Connector, you can refresh your Origin-side data at any time by clicking the Connector icon
 and choosing Import; or re-import your Excel data at the time that you open the Excel-connected Origin project.
- If you are using the older (X-Function based) impMSExcel import routine: Certain file import information is saved to the workbook on import. Having once imported an Excel file to an Origin workbook, you can use the Re-import button on the Standard toolbar to re-import an updated Excel file -- including those that contains multiple sheets -- to your Origin workbook.
- Origin does not support dynamically linking one Excel workbook with another Excel workbook, nor does it recognize or translate Excel formulas.
| Both the Excel Connector and impMSExcel routines support partial import of Excel data. For more information, see the Origin Help file topic Partial Importing and Re-importing.
|
Connecting to Excel Files
Origin's Data Connectors create a live link between your external data files and your Origin project.
- To connect to a local file, click Data: Connect to File or click the button located on the Standard toolbar.
- To connect to a web-stored file, click Data: Connect to Web.
- You can connect one Excel file per Origin workbook.
- If the file is a multi-sheet file, you must first connect to a single sheet. This opens the the Data Navigator panel (described above) where you can connect to additional pages, as needed.
- When all sheets are identically structured, ensuring that the first sheet is properly parsed (e.g. the header information is correctly handled) will allow you to connect additional sheets without making adjustments.
|
|
- Click the New Workbook
 button to create a new workbook, then choose Data: Connect to File: Excel. button to create a new workbook, then choose Data: Connect to File: Excel.
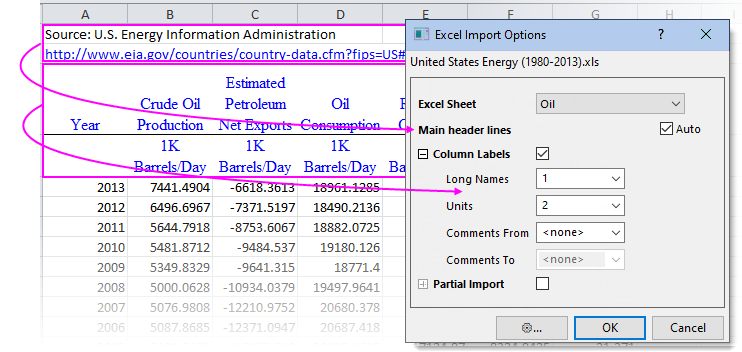
- Browse to and open <Origin Program>\Samples\Import and Export\United States Energy (1980-2013).xls.
- In the Excel Import Options dialog that opens, accept default settings and click OK.
- In the Data Navigator panel that opens to the left side of the workbook, hold the CTRL key and select the other three (dimmed) sheets, right-click and choose Add and Connect Sheet(s). The remaining sheets -- Natural Gas, Coal and Total Primary Energy -- are imported into the workbook. Note that if the unconnected sheets are large in size, you can opt to connect to them one-at-a-time, as needed.
|
Import from File
ASCII Data
The import routines listed under Data: Import From File pre-date Data Connectors. While the Import From File routines are no longer being developed, they are still supported.
Note, also, that Connectors may not exist for some of the file types listed in this table. If no Data Connector exists, you should use the Data: Import From File methods.
| The Standard toolbar Import Single ASCII button  now calls the Data: Connect to Files: Text/CSV routine. For the impASC routine, see the next section. now calls the Data: Connect to Files: Text/CSV routine. For the impASC routine, see the next section.
|
Importing ASCII Files with impASC
- The Data: Import From File: Multiple ASCII... (
 ) method is generally satisfactory for importing text files having a simple structure (works for single or multi-file import). This routine will typically handle files with commonly-used delimiters and a simple header structure, without adjustments.
- If the file import needs adjustments, select the Show Options Dialog checkbox when selecting your file(s) in the ASCII dialog. This will open the impASC dialog box prior to file import, allowing you to tweak the way that the files are handled.
-
Saving Import Settings
Once you've adjusted impASC dialog import settings, you can save them in one of two ways:
Saving import settings with the worksheet template offers portability (e.g. templates are easily shared with colleagues). Saving import settings as a Theme offers the advantage of being able to recall any number of import options combinations (Themes) when importing via the impASC dialog box.
For more information on Themes and templates, see the Customizing Origin chapter later in this User Guide. Additionally, see topics listed under "Topics for Further Reading", below.
| You can quickly load your custom import theme from the list at the bottom of the Data menu. You can also use the Data: Import from File: Add/Remove File Types ... menu to open the Import Menu Customization dialog box where you can select and add User Themes to the Data: Import From File menu.
|
Third Party Formats
If a Data Connector does not exist for a certain third-party format, you can still use Origin's older X-Function-based import routines. These include many widely-used formats, including pClamp, NI TDM, and NetCDF. As with all X-Function-based routines, you can customize third-party file import options and save your settings with the worksheet template or as a dialog Theme for later use. As with other supported file types, you can import third party files by drag-and-drop.
pClamp
HDF5
SPC
MATLAB
JCAMP
| File Type
|
Method
|
To Learn More, see
Help: Origin: Origin Help > Importing and Exporting Data
|
|
Thermo (SPC, CGM)
pCLAMP (ABF, DAT, AB?)
Princeton Instruments (SPE)
Sound (WAV)
NetCDF (NC)
CDF (CDF)
HDF5 (H5, HE, HDF5)
NI DIAdem (DAT) National Instruments
Famos (DAT, RAW)
ETAS INCA MDF (DAT, MDF)
IgorPro (PXP, IBW)
Prism (PZFX, XML)
MATLAB (Mat)
Minitab (MTW, MPJ)
KaleidaGraph (QDA)
SigmaPlot (JNB)
MZXML(mzData, mzXML, mzML, imzML)
EarthProbe (EPA)
EDF (EDF, BDF, REC, HYP)
Somat SIE (SIE)
JCAMP-DX (DX, DX1, JDX, JCM)
HEKA (DAT)
SPSS (SAV)
BRUKER OPUS
SAS (sas7bdat)
Tektronix (ISF)
Data Translation (DCF, HPF)
Binary 2D Array (IMG, B2D)Binary 2D Array, Import
Image Image, Import
|
Data: Import from File:
|
> Importing Third Party Files
|
| Note: Some of these 3rd party file formats are hidden by default. To add, choose Data: Import From File: Add/Remove File Types.... This opens the Import Menu Customization dialog box where you can choose which file types to show in the Import From File menu. To insert a separator after a menu command, right-click on the command in the right-hand panel and choose Add Separator. To remove a separator, double-click on it in the right-hand panel.
|
Drag-and-Drop, Importing by
| If no Data Connector exists for a given file type (i.e. those listed in the table above), then drag-and-drop support is managed by file extension, using the Filter Manager dialog. From the main menu, click Preferences: Import Filters Manager....
|
| Note: To learn more about working with the Third-party Formats, see the Origin Help:
Help: Origin: Origin Help > Importing Third Party Files
|
The Import Wizard
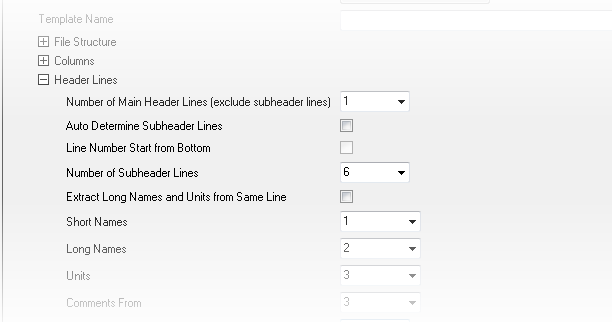
For import of complex ASCII files -- those not satisfactorily handled by the methods previously discussed -- you can use the interactive Import Wizard. Files with an optional header section followed by a sequential binary structure, can also be imported using the Import Wizard:Binary DataImport Wizard
Another advantage to using the Import Wizard to your ASCII data is that you can create import filters that are targeted to a group of similarly-named data files. This is especially helpful when those files contain metadata that that needs to be handled in a certain way. The filter can then be used for drag-and-drop import operations and it can be added to the Data: Import From File menu. You can view and edit these import filters by Preferences: Import Filters Manager menu.
To run the Import Wizard:
- Choose Data: Import From File: Import Wizard... or click the
 button located on the Standard toolbar.
- Develop Origin import filter files (*.oif) for import of ASCII files not handled satisfactorily by the Text/CSV Connector.
- Import data from the web pages using the Clipboard (see below).
- Extract variables from the import file name and header.
- Specify custom delimiters and date formats to parse your data.
- The ability to post-process your imported data using a custom LabTalk script.
| Note: For more information, view the help topic:
Help: Origin: Origin Help > Importing and Exporting Data > The Import Wizard
|
Copy/Paste the Clipboard Data
Clipboard Data, Importing
One obvious way to get data into Origin is simply to copy data to the Clipboard and paste it into Origin. This can be as easy as selecting a block of data in an Excel workbook and pasting it into an Origin workbook. However, Clipboard data may not be formatted, arrayed or delimited in a way that makes it easy to paste your data into Origin. Here are some things you should know:
- Data copied from Excel and pasted to Origin will be brought over with full precision, regardless of the number of displayed decimal digits in Excel.
- When working with Excel files with header information, paste the Clipboard data into data row 1 in Origin (not into the column label rows), then select a row and use the (right-click) shortcut key commands Set as Long Name, Set as Units, Set as Comment, etc. to tag your header information.
- Data copied from the web can be formatted in various ways. You may have to experiment a bit to find a method that brings the data over cleanly. If a simple copy and paste doesn't work, try using the Import Wizard. The Import Wizard provides an interactive interface for parsing Clipboard data, with the added benefit that you can save your procedure to an import filter file (.oif) for reuse with identically formatted data. For more information, see the tutorial Using the Import Wizard to Import Clipboard Data.
-
Selectively Import Data by Querying an Origin File
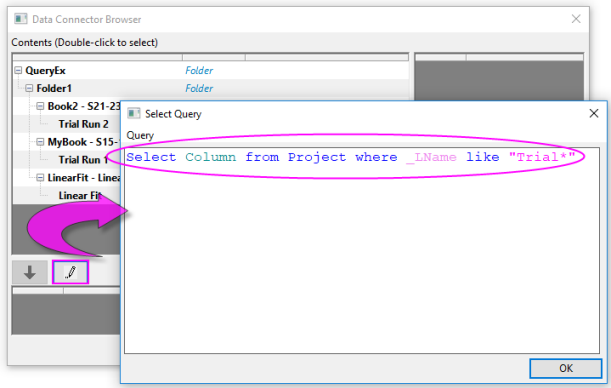
You can selectively import columns of data from an external Origin file by specifying an SQL-like Query in the Data Connector Browser prior to import.
To selectively query Origin files using the Origin Connector:
- With the worksheet active, choose Data: Connect to File or Connect to Web.
- Browse to your Origin file and click Open. This opens the Data Connector Browser.
- Click the Select Query button
 .
.
- Enter your Query in the Select Query dialog, then click OK.
Data will be selectively imported into the active workbook as specified by your query.
Common Keywords:
| Keyword
|
Description
|
| _SName
|
short name, e.g. _SName, Sheet_SName
|
| _LName
|
long name, e.g. _LName, Book_LName
|
| _Comments
|
comments, e.g. _Comments, Sheet_Comments
|
| Column_D1
|
column user-defined parameter, where 1 is the parameter index
|
| Column_[Name]
|
column user-defined parameter, where [Name] is a parameter name containing spaces
|
Examples:
Select Column from Project where _SName == "A";
Select Column from Project where _Comments like "S*3";
Select Column from Project where (Column_P1 like "*y*" and Column_D1 > 3);
Select Column from Project where Sheet_SName like "Trial*";
Select Column from Project where (Book_SName like "Book*" or Book_LName like "*fit*")
For more information, see Examples of using SQL query condition in Origin Connector.
Database
SQL Data
Origin supports connecting to databases by ODBC and OLE DB. Additionally, Origin includes a simple SQL Editor to add connection strings and generate SQL queries within Origin.
To import SQL data, start with the Data: Connect to Database menu command:
- Open lets you browse for and open a saved connection (ODS) or query (ODQ) file.
- New opens the Database Connector dialog.
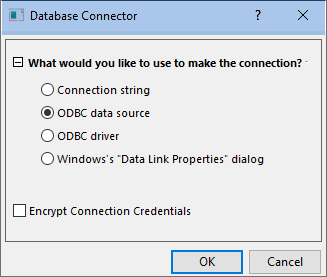
- Connection string: Select this if you already have a text-based connection string for a given data source (ODBC or OLE DB).
- ODBC data source: Select this if you have defined an ODBC data source via the Windows ODBC Data Source Administrator applet.
- ODBC driver: Select this if you have an ODBC driver and want to create a data source applicable to this data connector instance.
- Windows Data Link Properties dialog: Select this if you are using an OLE DB-based data source such as some SQL Server or Access client libraries.
Other things to note:
- Use the LabTalk system variable @IPDB to control protection of imported range (0 = no protection, 1 = protected but allow reorder, 2 = protected).
- Similar to other Connectors, you can opt to Exclude Imported (data) When Saving as OPJU/OGWU.
Digitizer
Digitizing Scatter Plots
At times, you may only have a graphic representation of some data that you would like to explore further. Use the Digitizer to import an image file, then digitize the plots, converting your image to numeric data that you can study and re-plot using Origin's analysis and graphing tools.
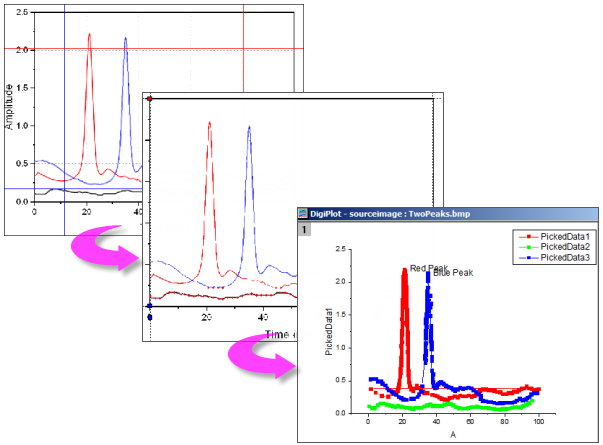
- Import most common image formats.
- Rotate the imported image, remove noise and calibrate scales by picking start and end values.
- Pick points on curves manually or automatically.
- Manually add curve inflection points, as needed.
- Interactively remove points that you do not want digitized.
- Support for Cartesian, polar and ternary coordinate systems.
To open the Digitizer:
- Click the Digitize Image
 button on the Standard toolbar or choose Tools: Digitizer... from the main menu.
Saving Origin Files without Imported Data
Users have long had the option of saving Origin files without data. Save Template As..., Save Workbook As Analysis Template and Save Project without Data, were three options for saving Origin files without data while preserving settings and operations with the file.
Users now have the option to save Origin files without imported data. This is a particularly attractive option for those who work with large data files, where saving of that data with the file would hinder performance or waste disk space.
- By default, data imported using a Data Connector, will not be saved with the book when the import file size exceeds 500kB. Each book has its own Exclude Imported When Saving check mark and clearing the check mark on any page in the book will cause all imported data to be saved with the book.
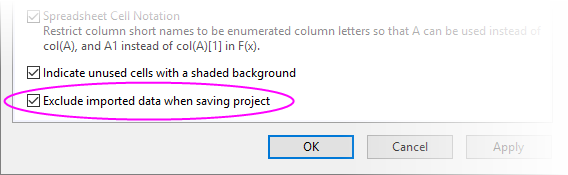
- Any book in the project -- not only those with Data Connectors -- can be configured to exclude imported data by right-clicking on the window title bar, selecting Properties, then checking the Exclude imported data when saving project box at the bottom of the dialog.
The act of excluding data when saving differs from saving a template file in a couple of important ways:
- When you exclude imported data, you are still saving all output resulting from analysis operations on imported data -- fitting results, statistical analyses, Set Values calculations, etc. -- you just don't save imported data or graphs of that imported data.
- Books which you have saved without imported data retain a "live" link to the original data source. For Data Connector-containing books, click the Data Connector icon and click Import (active sheet) or Import All (all sheets in book). For books used for standard file import, activate the empty book and click Data: Re-import Directly; or click the Re-Import no dialog button on the Import toolbar (see next).
Re-Importing Data Files
Re-Importing
There are two import commands in the Data menu that are specifically intended for repeat import of the same file (i.e. the file path and name must be the same):
- Re-Import Directly. When you import a file into an Origin worksheet or matrixsheet, by default a number of parameters, including file path and name, are saved in the sheet. If you have an external data file that is periodically updated or you want to reload a standard file into the worksheet, you can re-import directly without opening an import dialog.
- Re-Import.... This menu command opens the corresponding X-Function import dialog box for the file type so that you can adjust your import options before re-importing.
|
Notes:
- Only one file can be re-imported at a time. When you use either of these two menu commands, only the file associated with the active worksheet or matrixsheet, will be imported. If the selected data are imported from multiple files, re-importing will fail.
- If you import an ASCII file via the Import Wizard and select Data: Re-Import..., the impASC dialog will open instead of the Import Wizard.
- Re-import does not work for Binary or User Defined data types brought in using the Import Wizard.
|
Clone Import
Clone import works by "modeling" an import -- and optionally, an associated analysis operation -- and then applying what was done to the initial file, to a series of similar files. As long as the active book contains imported data and associated operations, it can be cloned. In this sense, cloning is similar to creation of an Analysis Template but is somewhat more limited in power (e.g cannot be used with the Batch Process tool).
Clone import is supported by both Data Connector and X-Function-based import methods. A brief tutorial will show you the basics of cloning import and analysis operations.
|
|
- Click the New Workbook button to open a new workbook.
- Using Window's File Explorer, browse to your <Origin Program>\Samples\Curve Fitting folder and find a file called Sensor01.dat. Drag-and-drop the file onto the new workbook. The .dat file is imported using the Text/CSV Connector.
- Click the column B header to select the column, then click the Scatter button
 to create a scatter plot. to create a scatter plot.
- Click on the X or Y graph axis scale and in the Axis dialog box that opens, click the Scale tab, then press Ctrl and select both Horizontal and Vertical axis icons in the left panel. Set Rescale to Auto and click OK.
- With the graph active, click Analysis: Fitting: Linear Fit and open the dialog box. Set Recalculate = Auto, accept other default settings and click OK. Answer No to the Reminder Message and click OK.
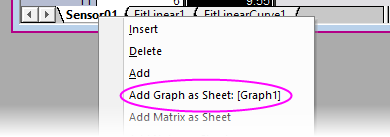
- Right-click on one of your workbook tabs and click Add Graph as Sheet. This will add your scatter plot with the linear fit results, as a page in your workbook.
-
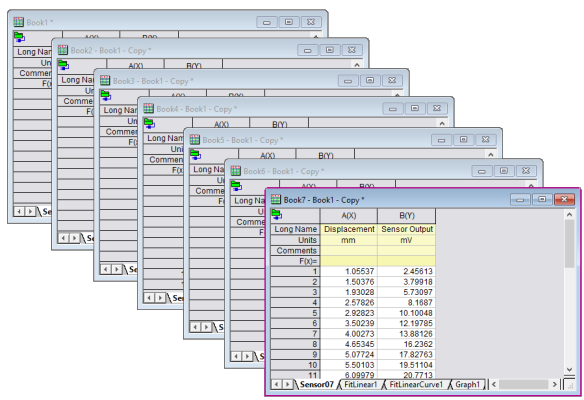
- Make sure the sheet with data imported from Sensor01.dat is active and click the Clone Import button
 on the Import toolbar. on the Import toolbar.
- Browse, once again, to your <Origin Program>\Samples\Curve Fitting folder, press Ctrl or Shift and select files Sensor02.dat - Sensor07.dat. Click Add Files and then click OK. What you should see is that using the original book as a model for import and analysis operations, the Sensor files are imported using the Text/CSV Connector and, one-by-one, they are processed (it may take a few seconds for all operations to go to completion).
-
|
Topics for Further Reading