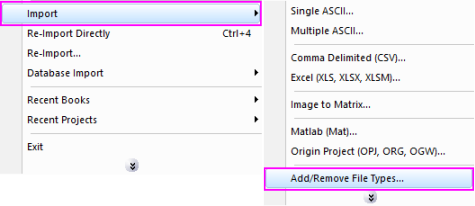
Data: Import from File: Sound (WAV)
If you do not see this file type, choose Data: Import from File: Add/Remove File Types...
To add drag & drop support for a file type, see Import Filter Manager. |
This X-Function supports file re-import. See this topic for details.
Sound (WAV)
Import waveform audio file
1. impWav;
2. impWav fname:="c:\Sample.wav";
Please refer to the page for additional option switches when accessing the x-function from script
|
|
|
|
|
|
|
|
Input string |
Filename of the file to be imported. |
|
|
|
Input TreeNode |
Basic information of the file(s) to be imported. Here it is just the size of the file.
|
|
|
|
Input TreeNode |
This is used to set the import options in the dialog. Please see the Description part of this document for details.
|
|
|
|
Output Range |
This is used to specify the output range. |
|
|
|
Output TreeNode |
This is for outputting the header information. It is hidden from the GUI. Users are not advised to use this variable.
|
|
|
|
Input int |
Specify the reimport mode, It is not available from GUI and only valuable to reimport.oxf |
This X-Function is used for importing Sound (WAV) data files.
Details on Some Dialog Options
1. The following example will import a WAV sound file with the dialog. It will also reduce part of the data points and rename the destination workbook name:
a. From the Origin menu, select Data: Import from File: Sound (WAV) or type impWav in command window. This will open the Open wav file dialog for you to choose the import file.
b. Browse to the folder where your data file is. Select the file and click the Add File(s) button. Click OK to close the dialog box.
c. In the impWav dialog box, expand Import Options branch and make sure Add Sparklines is checked.
2. The following script command imports a WAV sound file (C:\Sample.WAV) without opening the dialog:
3. The following example will use script to import all WAV files under a specific folder (assume it is C:\WAVData\).
impWAV;