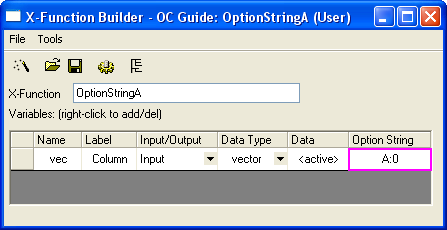
OptionStringA -d; in the Command Window. In the dialog that opens, you will not see the Recalculate combo box. 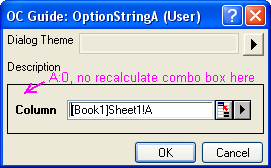
Recalculate Options enable you to control the Recalculate mode of an X-Function. By default, when the X-Function includes one of the following Origin Object types as an input or output variable: XYRange, XYZRange, vector, Column, matrix and MatrixObject, it allows you to use Manual, Auto or None as the Recalculate mode (the default mode is Manual). Please note that if the variable is used as both an input and output variable, the Recalculate mode is forbidden, and the Recalculate combo box will be hidden.
Hides the Recalculate combo box from the X-Function dialog.
Example
OptionStringA -d; in the Command Window. In the dialog that opens, you will not see the Recalculate combo box. Sets None as the default Recalculate mode. This mode is available for both input variables and output variables.
Example
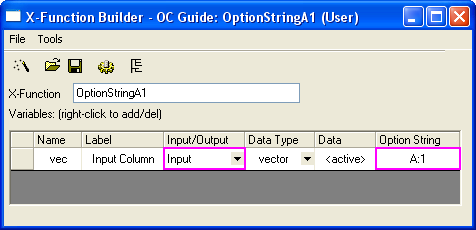
OptionStringA1 -d; in the Command Window. In the dialog that opens, the Recalculate combo box shows with None selected. 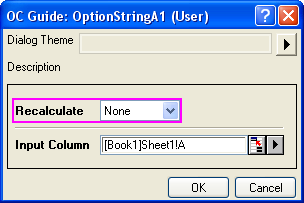
Allows sorting on the output columns with the Recalculate mode. It works for output variables only.
Example
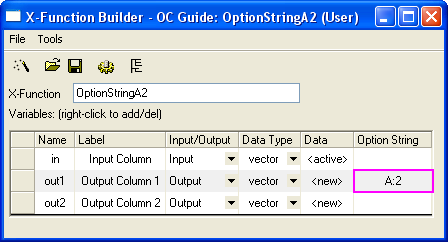
OptionStringA2 -d; in the Command window. After clicking the OK button, two empty output columns with locks will show, as below.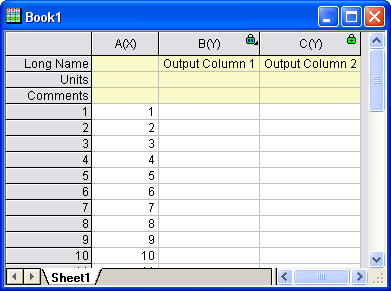
Allows the Recalculate mode, but the Recalculate combo box will be hidden in the X-Function dialog.
Browser Dialog Options control the settings in the Page/Graph Browser dialog, which is opened by a button in the X-Function dialog. They can also be used to filter the opened dialog. Please refer to the example about X-Function Graph Browser dialog.
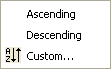
Sorts all pages in the Page/Graph Browser once the dialog opens.
Excludes 3D graphs from the Graph Browser.
Disables composite ranges from assigning column designation. Take an output variable with XYRange type, for example. If this option string is not specified for the variable, there will be two output columns, one with X designation and the other with Y designation. Otherwise, the two columns will both have the default Y designation.
Creates a new page with hidden state.
Makes an X-Function non-undoable.
By default, if a variable with double type is missing a value, this variable will show nothing (empty cell). This option string is used to show this kind of empty variable as "--".
This option string is only available for output variables of Range type. If the output variable is set to <new>, a valid Origin C Range object will be created, but without a new column for it. This option string helps the user prepare rows and columns for the output range objects inside the X-Function body.
This option string is only available for output variables of Range type. If the output variable is set to <new>, it will replicate the input Range, with the same number of columns and rows.
Applicable to MarkerInfo and ButtonInfo XVariable. If set will make it hidden.
Applicable to output XVariable. If set will suppress writable checking.
Applicable to any XVariable. If set will always support generate script from dialog.
Available from 9.0. Applicable to Output Page/Layer XVariable. If set will check the value of another XVariable call "hide" to determine to hide new created page.
Available from 9.0. Applicable to XVariable which is group begin (with Option String G ). If set will not hide whole branch if current XVariable is hidden.
E:V
Used in the X-Function wizard and X-Function bar to keep the real value of a variable. The destination created by the first Apply button will be used by the subsequent Apply buttons.
F:*6*
Provides a format string for displaying numeric values with double type. The standard LabTalk numeric format notation, such as *(Origin global numeric format setting), .2(two decimal digits), etc., can be used.
FT:str1|str2
Specifies the tags for the action filter of data selection from a graph. If a data object contains tags str1 or str2, it will be ignored when selecting the data hunting menu item Add all plots in active page/layer.
Example
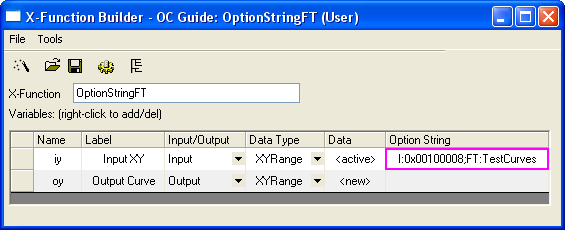
This example will show how to use the FT option string to exclude the data plot with tag name TestCurves when selecting all plots from a graph.
 .
.
// Put data to output XYRange
vector vx, vy;
vx.Data(1, 10, 1);
vy = vx;
oy.SetData(&vy, &vx);

// The specified name should be the same as options string "FT" of iy
tag_columns_in_data_range(oy, "TestCurves");

// Get source range graph, and plot results on this graph
vector<uint> vnIDs;
if( iy.GetPlots(vnIDs) > 0 )
{
	DataPlot dp;
	dp = (DataPlot)Project.GetObject(vnIDs[0]);
	GraphLayer gl;
	dp.GetParent(gl);

	gl.AddPlot(oy);
}
OptionStringFT -d; in the Command Window, then click the OK button to generate the output XY columns in the source worksheet and add its plot to the source graph.
OptionStringFT -d; again to open the X-Function dialog. In the Input XY branch, the newly outputted data plot from above is not there, because of the tag name TestCurves of this data plot.
FV:varname specifies the name of the input variable for each output variable. Then the information of this variable's book/sheet/object will be traced and shared with the output variable when the output variable is set by <input>/<same>. For example, suppose an X-Function contains three XYRange variables: the first two are input variables and the last one is an output variable. If the name of one input variable is set to the output variable by this option string, the output columns will be the same as the specified input columns when output is set as <input> or <same>. Otherwise, the output columns will be the same as the first input columns.
Used to group related variables in the X-Function dialog. Add G:Group Name in the Option String field of the variable for the beginning of the group, and G in the Option String field of another variable for the end of the group.
G:Group
The beginning of the group. By default, the branch of the group is closed. To set the branch as open for the first time, open the dialog and add a dash before Group Name, like G:-Group Name. Then the dialog will remember the branch status when opened next time.
G
The end of the group.
Example
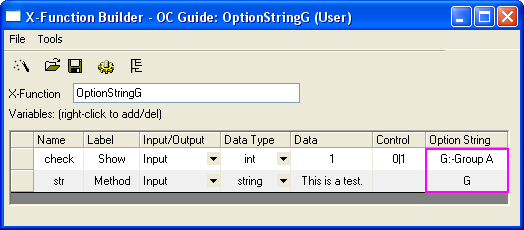
OptionStringG -d; in the Command window. The dialog that opens will look like the one below.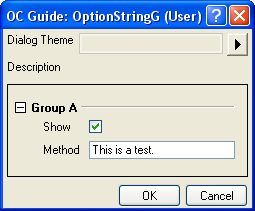
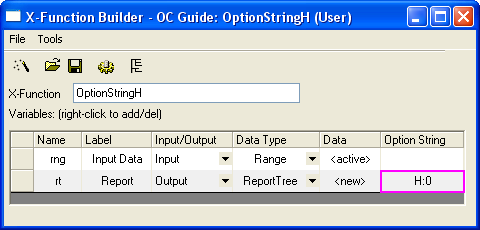
#include <ReportTree.h>
// Get data from Data Range object
matrix mData;
if( rng.GetData(mData) <= 0 )
{
	XF_THROW("No data is selected");
}

// Calculate the basic statistics on each column
vector vPoints, vSum, vSD;
for(int index = 0; index < mData.GetNumCols(); index++)
{
	vector vData;
	mData.GetColumn(vData, index);

	int nPoints;
	double dSum, dSD;
	ocmath_basic_summary_stats(vData.GetSize(), vData, &nPoints,
				&dSum, &dSD);

	vPoints.Add(nPoints);
	vSum.Add(dSum);
	vSD.Add(dSD);
}

// Create data table
int nID = 0; // ID should be unique
ReportTable rTable = rt.CreateTable("Report", "Report Table", ++nID, 0, 1);
rTable.AddColumn(vPoints, "N", ++nID, "Points", OKDATAOBJ_DESIGNATION_Y);
rTable.AddColumn(vSum, "Sum", ++nID, "Sum", OKDATAOBJ_DESIGNATION_Y);
rTable.AddColumn(vSD, "SD", ++nID, "SD", OKDATAOBJ_DESIGNATION_Y);

// Set this attribute as 0 not to specify any format.
// Many bits GETNBRANCH_* defined in oc_const.h to set table display format.
rTable.SetAttribute(TREE_Table, GETNBRANCH_TRANSPOSE);
OptionStringH -d; in the Command window to open the dialog. In the dialog, make sure that all the columns are selected for Input Data and <new> is selected for Report. Click the OK button and the report sheet will be displayed in the normal format (H:0).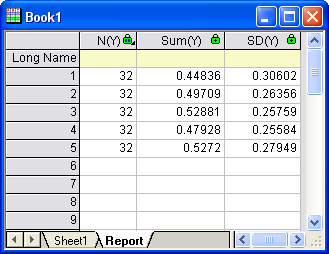
OptionStringH -d; in the Command window again. This time the report sheet will display in hierarchical table format (H:1).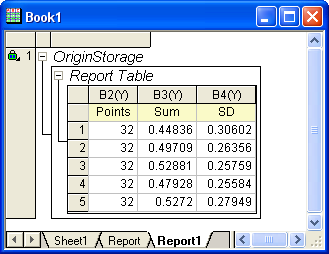
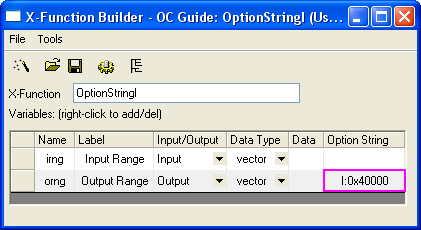
Restricts the input data range and modifies the behavior of the interactive controls. This Option String only works for the following input data types: Range, XYRange, XYRangeComplex, XYZRange, vector, vector<string>, and vector<complex>.
Allows multiple data selection in the 1st subrange.
Allows multiple data selection in the 2nd subrange.
Allows multiple data selection in the 3rd subrange.
Allows multiple data selection in all subranges.
Restricts to one dataset.
Supports Y error, XYRange only.
Supports label area in Range. By using this Option String, the output range will not clear the data before execution, which is similar to I:0x00040000.
The <input> option will disappear from the pop-up menu of the output variable.
The <new> option will disappear from the pop-up menu of the output variable.
The (<input>,<new>) options will disappear from the pop-up menu of the output variable, XYRange only.
Gets rid of the button for the pop-up menu.
Gets rid of the interactive button.
Valid for input variables with vector and Column type only. When the string for data selection is obtained, Columns are identified by indices, but not the short names of the columns.
This Option String will make the vector variable only use the Y column while initializing.
Shows the Column Browser button.
Sets variable as read-only, both I:0x0400 and I:0x0800 together will also work.
Gets rid of row selection while initializing or during interactive moment. Variable type: Column, Range and XYRange.
Replaces the range string of the whole sheet with column notation. For example, if a worksheet in Book1 named Sheet1 contains two columns, then the range string [Book1]Sheet1 will be replaced with [Book1]Sheet1!1:2.
This Option String makes the output range not clear the data before finishing the execution. Without this Option String, if there is no overlap in the input data ranges, columns in the output ranges will be cleared before using new data.
Example
 .
.
orng = irng;
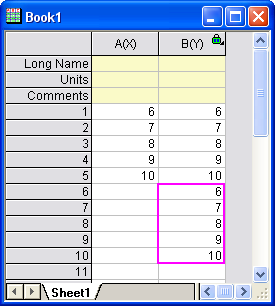
OptionStringI -d; in the Command Window, choose column A as input and column B as output, then click the OK button. The result is that column B is now also filled with row numbers.
Makes all columns hidden in the interactive pop-up menu.
If there are no selections in the active graph layer and the range variable is set by using <active>, the range variable will set to all plots in the active layer.
Uses the sampling interval as output X.
Makes the existing columns or plots show in the interactive pop-up menu.
If the output XYRange is set by using <auto>, this option creates a new X column.
The row range will be ignored, and only the single block range is valid. If there is no selection or the selection only includes one single cell, the selection will be considered to be the whole worksheet.
Creates the range string by using the first and last X values instead of the indices. The syntax is [BookName]SheetName!ColName[xFirstValue:LastValue]. It is very useful for monotonous data.
The Range variable will have no factor and no weight.
M:m-n
Makes a string variable support multi-line text. If the string variable is hidden, m lines of text are supported, if expanded, n lines are supported. Add * to the row range string to resize on the bottom right corner of the edit control.
Specifies the default name of an output object.
N: Book:="Book Name" Sheet:="Sheet Name"
N: Book:="Book Name" Sheet:="Sheet Name" X:="Object Name"
N: "Name"
N: X:="X Name" Y:="Y Name"
N: X:="X Name" Y:="Y Name" Z:="Z Name"
N: Book:="Book Name" Sheet:="Sheet Name"
Beginning with version 2021b, Origin supports substitution notation for the output name, for example, N:"Stats of %W". Variables are documented in the [OutputLongName] section in User Files\Origin.ini, as follows:
Example

input.CopyTo(output, 0, -1, 0, -1, 0); into the body of the main function OptionStringN, and then click the Compile button .
OptionStringN -d; in the Command window. When the dialog opens, select the worksheet as the Input Worksheet, click the OK button, and the result will be generated in a new worksheet named "Copy of [Name of Input Worksheet]".
Specifies the action of the output variable after running successfully.
Activates the corresponding Origin object, no matter if the object is hidden or in a different folder.
Activates the corresponding Origin object only when the workbook is the active window.
Does not activate the corresponding Origin object.
Specifies whether a variable is editable in the X-Function dialog.
P:1 is the default Option String. Using this Option String, the output variable, which is of an Origin object type, such as column, worksheet, etc., will be non-editable when bringing up the X-Function dialog again via Change Parameters. The variables with other types need to specify the Option String as P:0 to do so.
Only shows the label, and the editable field is invisible. Usually it is used to show the hint text.
Shows the variable as a separator in the X-Function dialog; valid for string type only.
Example
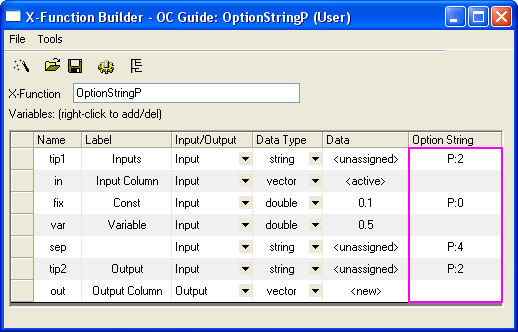
out = in + var; into the body of the main function, OptionStringP, and then click the Compile button .OptionStringP -d; in the Command window. In the dialog that opens, select column A as Input Column and column B as Output Column. Click the OK button, and the result is generated and stored in column B.
OptionStringP -d; is shown in the following image.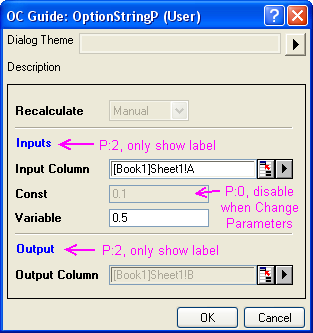
Used to control the value of the combo box in the X-Function when calling it via LabTalk script. It will not affect the dialog.
No restriction. Besides the values defined in the list in the combo box, other values can also be assigned to the combo box variable by using LabTalk script.
Default Option String. Only the values defined in the list in the combo box can be assigned to the combo box variable by using LabTalk script.
Example
OptionStringR x1:=5; in the Command window, and you will get an error: #Command Error!.OptionStringR x1:=5; in the Command window again, and you will get no error.Defines the default data object for input variable. This Option String is only for variables of Range type.
All columns in the active worksheet are selected as the data range.
The first matrix object of the active matrix sheet, or the first column of the active worksheet, is selected as the data range.
Makes it so the <active> option gets nothing but the matrix object. For the output variables, the <active> option will be replaced with <new>, which will create a matrix page.
Replaces the item values in a combo box with special values. For example, if a variable of int type is set as a combo box via the Begin|Mid|End string in the Control column, then the default item values for the combo box items are 0, 1, and 2, respectively. If the Option String SV:1|5|-1 is used for this variable, the return values of the items in the combo box are 1, 5, and -1, respectively.
Controls whether a variable is remembered in the X-Function dialog theme file. This Option String is only valid during theme selection in Tree View, which is the default setting.
If the specified theme is selected, the theme value will be used as the variable value.
Does not use the theme value as the variable value, even if a theme is selected.
If the specified theme is selected, both the theme value and the attribute will be used by the variable. This option is mainly used on Origin internal objects, such as XYRange, Image, etc.
Specifies whether the output variable is needed. This option string is only available for X-Functions with multiple output variables.
Adds a selected check box for the output variable. This is the default option.
Adds an unselected check box for the output variable.
Adds no check box for the output variable.
Example
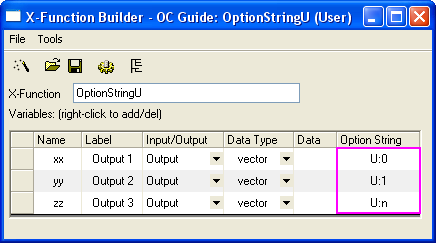
vector vv;
vv.Data(1,10,1);

if( xx ) // to check if output xx variable
{
	xx = vv;
}

if( yy ) // to check if output yy variable
{
	yy = vv;
}

zz = vv;
.
foreach(TreeNode subnode in trGetN.Children)
{
	string strVarName = subnode.tagName;
	int nUStatus, nOutput;

	// to check if is output variable
	if((subnode.GetAttribute(STR_XF_VAR_IO_ATTRIB, nOutput)
		&& IO_OUTPUT == nOutput))
	{
		// check Output check box status
		if(subnode.GetAttribute(STR_ATTRIB_DYNACONTROL_USE_CHECK, nUStatus))
		{
			switch(nUStatus)
			{
			case 1:
				printf("%s variable has Output checked check box.\n"
		, strVarName);
				break;
			case 0:
				printf("%s variable has Output unchecked check box.\n"
		, strVarName);
				break;
			}
		}
		else
		{
			printf("%s variable NOT Output check box.\n", strVarName);
		}
	}
}
OptionStringU -d; in the Command window, keep the default settings of the dialog, and click the OK button. This will create a new worksheet with two columns, and the check box status of each output variable will be printed in the Command window.
Specifies whether a variable is visible or not in the X-Function dialog.
The variable will be invisible in the dialog.
The variable will be visible in the dialog.
The variable will be invisible when using Labtalk script.
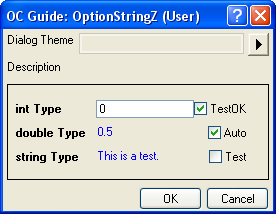
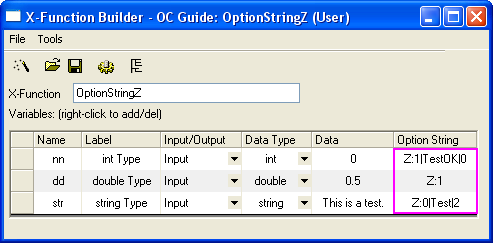
Adds a check box beside an input variable to specify whether it is editable or not. The syntax is Z:State|Label|Behavior.
Example
 .
.
TreeNode trInt = trGetN.nn;
int nAutoType = octree_get_auto_support(&trInt);
switch(nAutoType)
{
case -1:
	out_str("Auto check box of int Type control is unchecked");
	break;
case 0:
	out_str("No auto check box for int Type control");
	break;
case 1:
	out_str("Auto check box of int Type control is checked");
	break;
}
OptionString -d; in the Command window, and a dialog like the one in the image below will open. Change the status of the TestOK check box, and a message about the status of this check box will output in the Command window.